Incidentally poking a wire through from the cabin to the boot area is probably the hardest part of fitting my camera kit or at least that’s what many people find. Problem is you can’t see where you are poking and finding where the gap is is tricky. One customer commented that he found it simple. He put a high intensity LED torch in the boot and poked towards the light. Now why didn’t I think of that?
1 Like
I’ve just seen another post in a different thread which addresses this issue and they found that the existing pipe was indeed to small to feed through the cable. They ended up using a wireless transmitter so only the thin poser cable had to be fed through. Not sure if I trust those things to be reliable though.
I expect I’ll end up reverting to Plan B which is to mount it on the main body just above the number plate then I’ve only got to run the wire under the rubber seal into the boot.
Thanks RichardFX, that picture illustrates exactly what I was trying to understand.
I’ll try squeezing the clips and see if I can get the main grommet out. If I can, I may be able to just clip my cable to the existing flexi tube and feed it under the edge of the grommet into the hole into the boot, i.e. abandon the idea of going through the tube itself.
If not, then Plan B it is.
A single extra thin wire can be squeezed through the flexi, just not a video coax and power. Follow that radio camera advice from DeanF, it is good.
Be warned, if you try and bypass the grommet on it’s outside you are likely to cut though the new single wire on the metal edge of the hole, with sparks and smoke until the fuse(s) blow(s)!
Good point! Thanks for the heads-up.
Thanks everyone for your input.
I’ve got a much better idea now of what I’m up against.
I’m assuming you will be using a cable from the head unit to the camera which is similar to the ones in my kit. These have a phono RCA plug on each end for video and a 5.5/2.1mm DC power plug on one end and socket on the other. The negative (ground) of the power and the video screen are common. So poke a reasonable stiff wire up the tube between boot and boot lid to act as a draw wire. Then cut through the cable so you have enough to go from the camera into the boot. The cables are around 4mm across so there shouldn’t be a problem getting it through the tube. Strip the ends back and what you will find is two cores and an outer screen. If you are a stickler solder the two cores and a use shrink down covering. Then twist the screens over the top, tack solder and again apply shrink down. If you are a heathen like me just twist them together and wrap them with tape.
You will never be able to get the two plugs down that tube but one thin cable should be easy. In fact this method will make getting the cable to the head unit easier too. You are feeding two bare cable ends from front and back to a central point in the boot and then joining them. You could even get away with a three way terminal block.
Hi Roadie
No, my kit comes with a single 3m long cable that terminates in a small white connector (but too big to fit down the tube). That connector then plugs into another, bigger white connector which then splits later on into the three separate wires: one of which terminates in a brown RCA plug (video feed), one red power lead and one black ground, both of which are unterminated. Your suggestion still stands though - I could cut the cables at there white connector and simply connect them up again. As a semi-heathen I’d probably use a domestic connector block and then wrap it in tape!
One thing I’m still not clear on is that I believe a extra cable is required from the reverse lamp to a cable on the head unit harness which triggers the camera when reverse is engaged. Strangely such a cable wasn’t supplied with the camera. Other people seem to connect the red power lead to the reverse lamp feed which presumably does the same thing. Which is the best solution?
If the kit is designed to pick up power from the reversing light it will usually feed this back down the cabling to the head unit. Are there instructions online for whatever kit you have.
Yes, it came with instructions which just say to connect red “to electrical terminal controlled by ignition switch” and black “to vehicle (metal) body”. Then in the head unit manual it describes the connection of the violet/white wire: “of the two lead wires connected to the back lamp, connect the one in which the voltage changes when the gear shift is in the REVERSE ® position. This connection enables the unit to sense whether the car is moving forwards or backwards”.
The clearest instructions come from a reviewer on Amazon for the exact same model:
“The brown plug goes into the brown receiver for the imaging, the Black you tap into a black wire on the stereo harness to ground, the red you tap into the red wire on the stereo harness for an ignition live. I then took off the rear light, worked out which cable was providing power for the reversing bulb, spliced into that, run a cable to the head unit and tapped into the violet/white wire marked ‘reverse cam in’.”
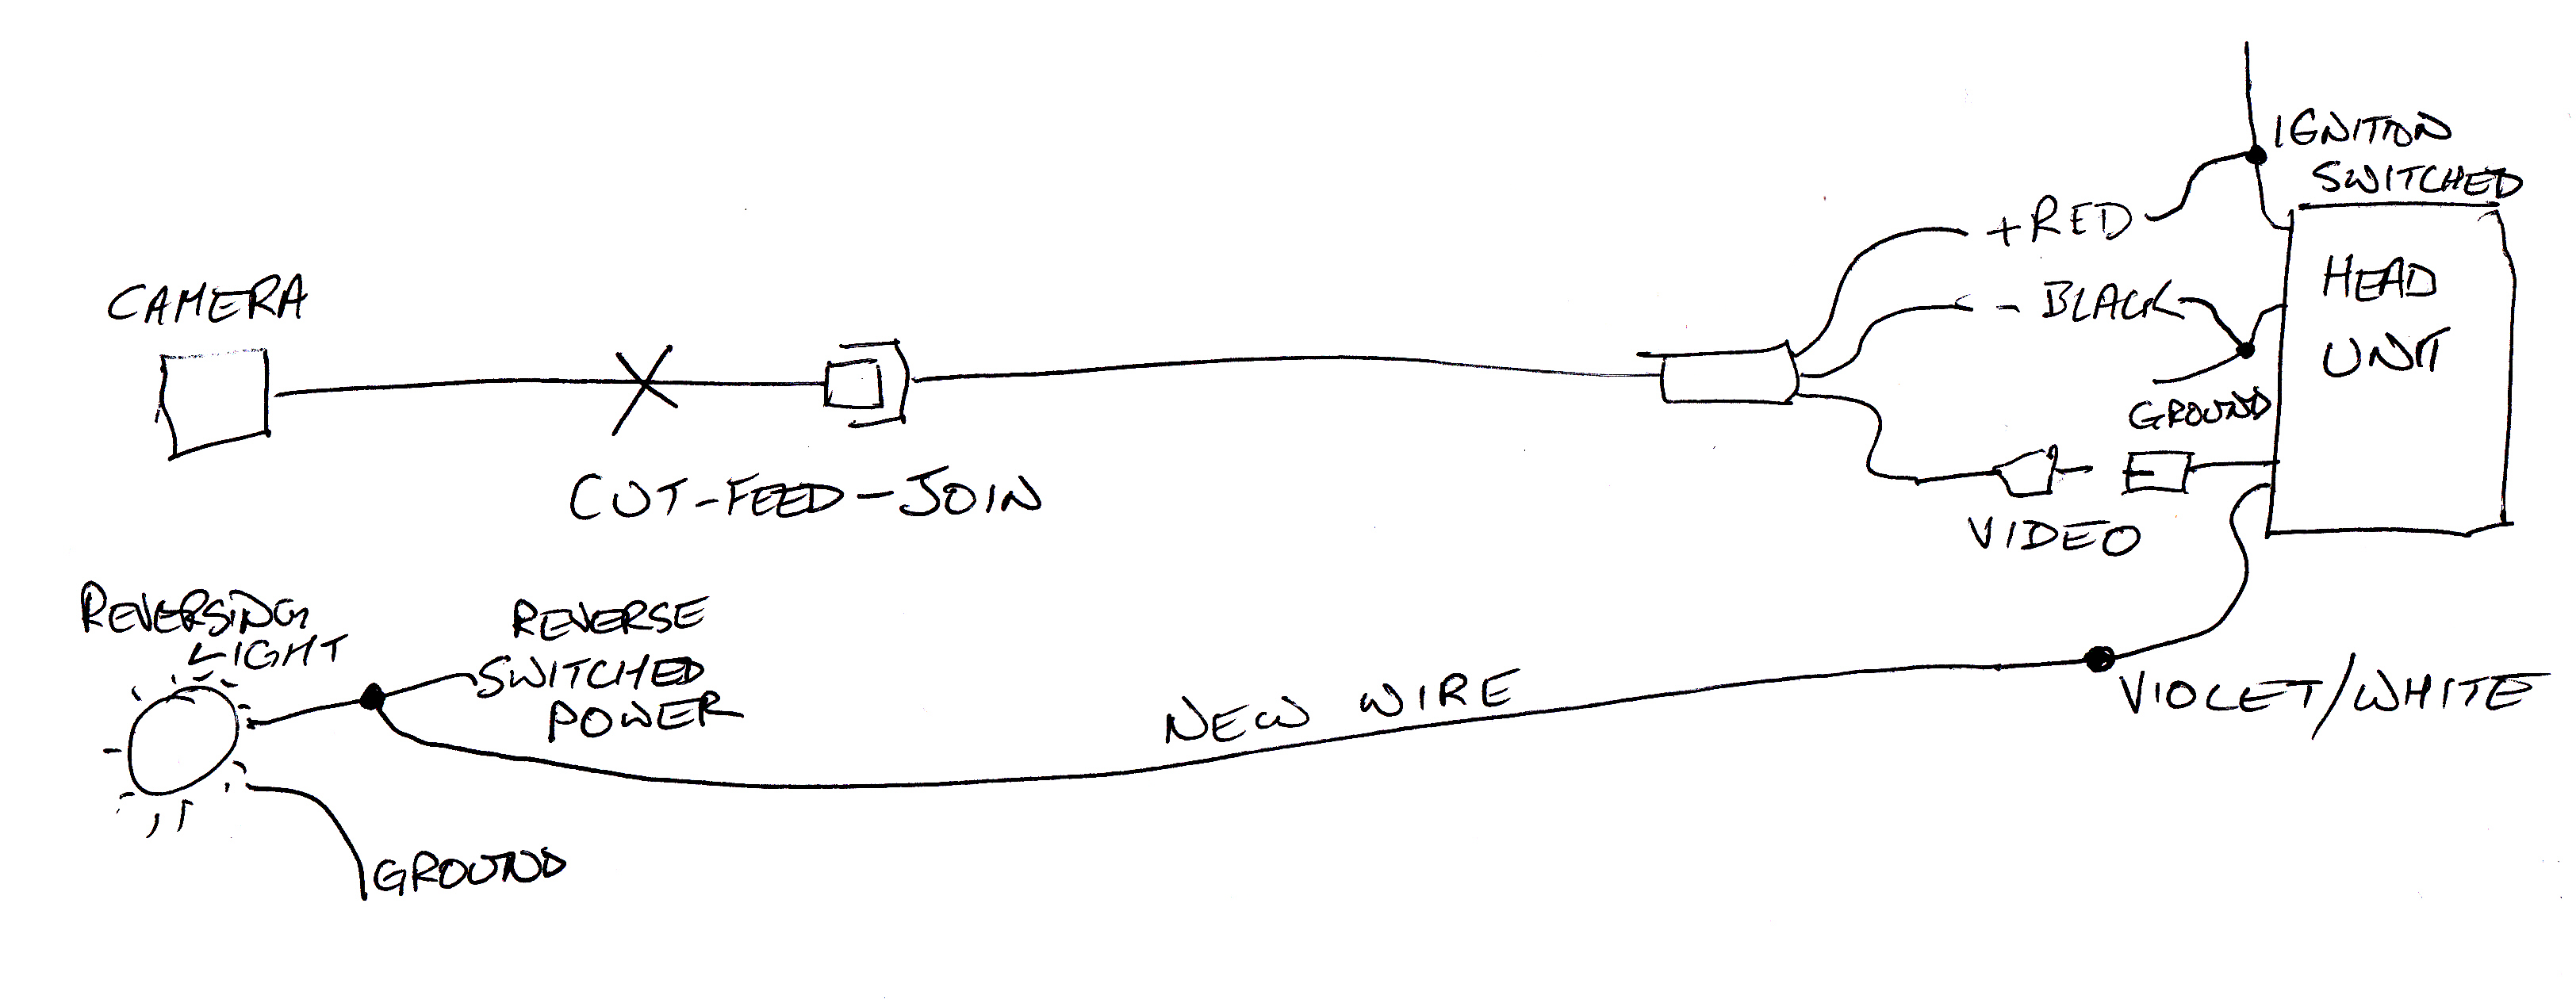
So how does this look?
If this corresponds to what you have then I think the diagram should be pretty self evident. You are going to have to chop the camera cable, feed it to the boot lid and then run and connect the kit to video and power / ground at the head unit end. You also need to run an additional wire from the reversing light to the head unit.
OK, things to do before you chop anything or run anything.
1.Make sure you can get a suitable draw wire through from the boot into the lid.
-
None of the kit is tested. If the camera is faulty your options for getting it replaced if you have chopped the cable will be very limited. Make the connections to the head unit and test the kit just laying loose in the car. You can also splice a suitable length of cable on to the reversing light in the boot and run it outside the car to the head unit. Test and make sure all works as expected before doing any of the tricky stuff.
-
While you only need a single core cable from the reversing light to the head unit there is nothing to stop you running a thin two or three core mains flex. That way you will have one or two spare wires from front to back should you ever need them.
1 Like
You’re a genius, that’s absolutely spot-on!
I‘d hoped not to have to cut the cable but looks like there’s no option If I want to mount the camera on the boot lid.
I had intended doing a dry run first to make sure everything works but thanks for the reminder - it’s good advice. Even I’m not stupid enough to just launch straight in!  Also, it will give me the opportunity to make sure the boot lid is actually the best place - I can stick it on temporarily with blu-tak or something.
Your idea of using multi-core cable is a great one. I’d planned on buying some proper automotive wire for the job but I suppose anything of a reasonable quality will do. I’ve actually got loads of surplus twin-core cable from a 12v LED lighting kit which would probably be ideal.
The extra wire isn’t powering anything. There will be very little current. The circuitry in the head unit will just be monitoring the line for a change in voltage. Whatever you have will do the job. It may well work if you use a piece of wet string.
1 Like
Unfortunately, I’m completely out of wet string!
1 Like
Did you ever manage to install your camera? I’m thinking of installing one and would be interested in your final solution! TVM ![]()