Meet Mindy, Daves MK1 NA MX5


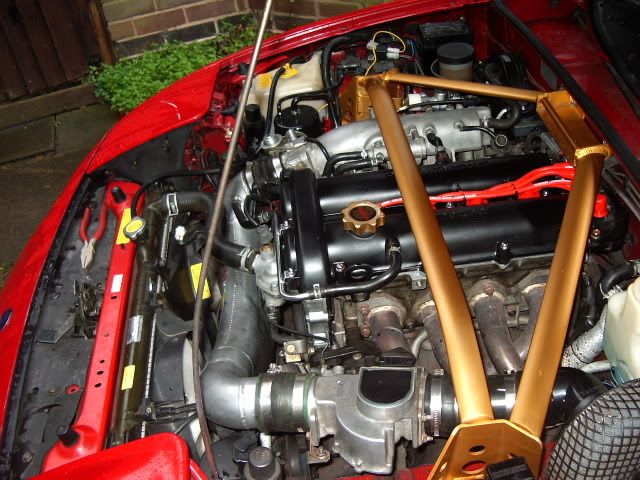
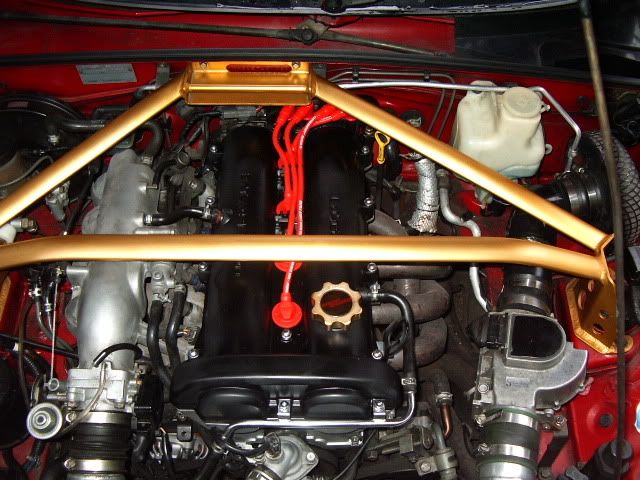
Those Mini wheels are 13-15lbs, so similar to Mazda OE. If selecting a 15" wheel, they’re all about that weight. PCD obviously has to be an essential consideration, but also centre bore size, and if a spigot ring is supplied. These cars are supposed to have hub centric wheels, not lug centric. Offset; 45-35mm is within factory specs. If you fit very low offsets, you can get odd handling effects. Minilite-style wheels; backspacing (a different measurement from offset) has to be considered if you are upgrading the brakes to 1.8 standard (the thickness of the spokes mean some designs can have marginal front caliper clearance).


15" Maxilites; TUV certified Swiss wheels, 35mm offset, but these needed a 5mm shim to clear the calipers


15" factory BBS, 45mm offset


15" factory Mk2 wheel, 40mm offset. This is a good wheel, in terms of weight, can be picked up cheaply, and if you bend one, easy to replace


And 14" can look good. I think these were 25mm offset; the odd handling was that the fronts would scrub on the wheel liner under hard cornering, which disappeared when the 15s were fitted. These are Japanese magnesium alloy Watanabes.


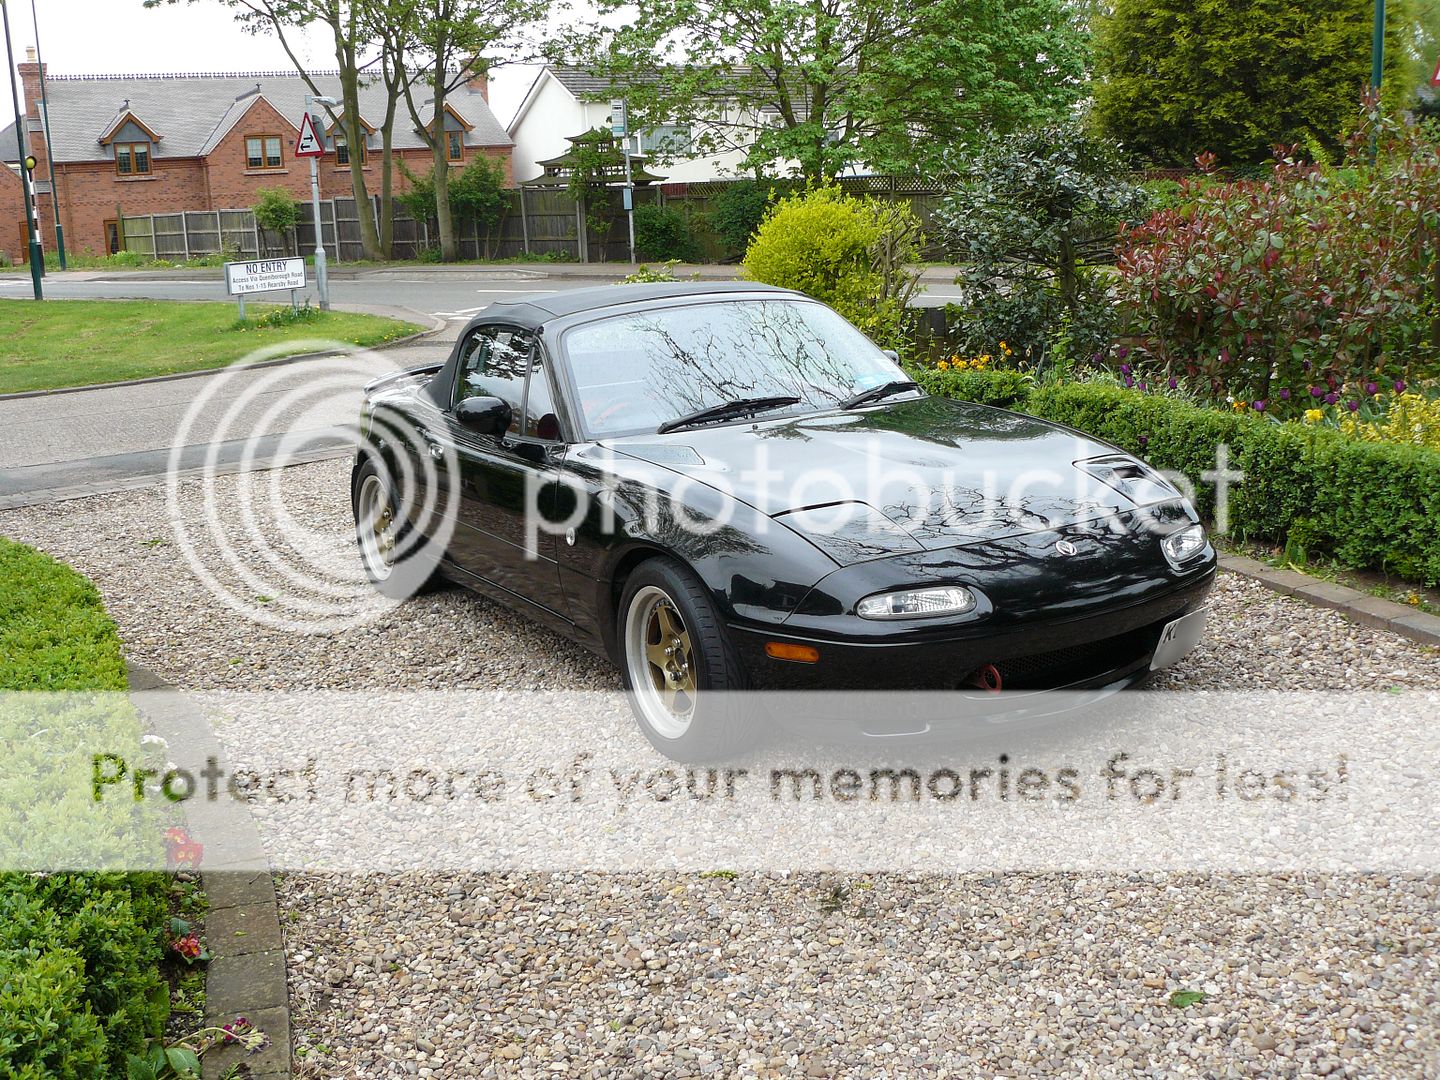
15" Works CR-01 split rims, 35mm offset


Thanks for the info Saz, mucho appreciated as always mate. I take it I’m going to be looking at 35mm offest then to be on the safe side with whatever wheels we choose? I’m not planning on going up to the 1.8 brakes, although the current ones will be replaced with new vented discs (if these are available in the same size as current?) but thinking that with them being marginally thicker with being vented might get the clearance issues you mention above?

Good shout on the water pump! I take it these aren’t that expensive, so will add that to the list. Yes, cam cover deffo needs done, so will see if I can pick up a second one which I can renovate and get powder coated prior to taking her in to get the timing belt done. Will just get them to fit it at the same time.

So, today Gayle and me have been busy! Started with removing the old (and totally gubbed) hood and prepping the car ready to fit the brand new hood. After some time, the old hood was off!

newest (1)Mindy-MX5_Replacing _hood.jpg

Generally pretty dirty in there after carpet and hood removed. Next we inspected the drain pots (the containers where the rainwater from the drain channel collects before going out down the drain tubes.

Drivers side, really grubby, lots of crap and stuff built up there.

newest (2)Mindy-MX5_Replacing _hood.jpg

Passenger side not quite as bad, but still dirty

newest (3)Mindy-MX5_Replacing _hood.jpg


We cleaned out both sides, then the actual drain tubes themselves. Gayle found the perfect tool for cleaning out the drain channel around the bottom of the hood…and old make up brush and the vaccum cleaner! Pose with the tool dear! That’s it, perfect! lol

newest (5)Mindy-MX5_Replacing _hood.jpg

  The tubes were surprisingly clean and clear! Hardly anything at all in them, and both appear to be perfectly clear. Next we cleaned the whole rear area. Could have left as is seeing as it can’t be seen once carpet goes in, but I’m OCD about these things! Plus the black metal can be seen once hood is in place but isn’t easily cleaned then so though do it now before fitting and it’ll make the whole finished job look so much nicer.

newest (4)Mindy-MX5_Replacing _hood.jpg

Yes, I cleaned and polished it! lol We then stopped for a tea brake and to get ready for fitting the hood and putting the car back together again.

And then, all fitted, the finished result…

newest (6)Mindy-MX5_Replacing _hood.jpg

newest (7)Mindy-MX5_Replacing _hood.jpg

newest (9)Mindy-MX5_Replacing _hood.jpg

Pics of Gayle and me, suitably proud of our handy work.

newest (11)Mindy-MX5_Replacing _hood.jpg

newest (10)Mindy-MX5_Replacing _hood.jpg

Can’t believe the difference this has made to the look and feel of the car. Really smartened her up, and no more drafts/gaffer tape/leaks. Took her for a spin afterwards as a wee reward, and to see what she was like with her 4 Mini alloys. Drove nice, and felt quite cosy inside now with the new hood. Still got some vibration through suspension, but nowehre near as bad now so that’s a result. Will be getting her up on a 4 post ramp soon so I can check out the bushes/drop links/shocks/springs and anything else under there and replace whatever’s needed. Hope you like!

Nice job on the roof - looks like a good one. Look after that plastic window particularly in the cold weather.

You just need the standard 1.6 235mm vented discs for your fronts. New will be a few mm thicker but should not cause additional clearance issues.

When you decide to do the cambelt, buy a kit that includes the waterpump and all gaskets required. These kits are available cheap and good quality. Have to warn you that cambelt/waterpump is not an easy job and often leads to complications and delays where additional parts required. I would put this job off until you can do without the car for a week.


That particular type of roof uses a Vybak PVC screen, which will remain pretty pliable, so I don’t expect it to crack. But, because it is quite soft, it will scratch easily, so use some toweling to protect is unzipped.

If powdercoating a camcover, be aware there are baffle plates to remove, and then to refit and seal. Personally, I don’t think Powdercoat is all that; it chips easily, and is not as resistant to solvents as you might think. Satin black Plasticote worked well enough for me on a previous car. Just cleaned it, prepped with aluminium primer, and rattle canned.


1 Like

The clearance issue was the caliper. Some people might have just taken a grinder to the caliper.

Thanks Rhino. Have to say, the satisfaction of doing it ourselves is great, and actually enjoyed the whole job from start to finish. Changing the cam belt is deffo not a job I’ll tackle myself though (as a famous dirty Harry cop once said “a mans got to know his limitations!” lol) Will be taking a trip up to RJM Performance for that one as I know they do a fantastic job.

That cover looks sweet Saz. I did the rocker on my Aerodeck a while back, and also the rocker on my VTi civic. Machined it flat with a flappy disc on the grinder(as they have seams that are quite unsightly and I wanted a nice smooth finish), then machine polished the raised section on it. Looked like chrome when I’d finished. Then masked it up, prepped and etch primed, the resprayed with two-pack in the same colour as the car (was a metallic red called sicillian red). Looked amazing when done, I’ll try and fins some photos of it. If the paint is more durable than the powder coating, I’ll just paint it then. There’s a special paint from the states that looks exactly like chrome when finished, but can’t remember the name of it. The base coat is mixed with water I think and you literally spray it so it’s running off the item your painting. Then it get’s lacquered. Was going to get this years ago to try. Have a look on you tube, it’s a wierd process but the results are amazing. The company that makes it have painted monster trucks etc and they look awesome. Might get some of that, and tint the lacquer red, gives it a mirrored red finish.

SpectraChrome, that was it!! Amazing product.

I’ve only had experience of Plasticote “Chrome paint” which looked like a really bright, shiney silver on wheels…for about a week. Whether it was due to the exposure to the air, or the hot-cold cycle of the wheels, but it turned grey.

Yeah, think I’ve seen that stuff.  Might get some of the spectra chrome just to try and see how it goes.

Fair play but from where I am sitting, you seem pretty hands on and from my memory of fitting a roof, it’s a job that would cause most people more indecision, hesitation and question asking than it did you.

I would only say that cambelt/waterpump is a ‘right of passage’ type job and if you do it yourself, you would be very pleased you did.

It is sufficiently difficult to keep you on your toes but certainly not a job that should cause real issue unless you put time constraints on it. If it all goes pear shaped, have a plan ‘B’ where a local garage/qualified person can be called on to assist.  

A lot of us know this job reasonably well and can advise on any matters you may encounter.

Main reason to do it yourself is to appreciate the condition of the engine in areas that really count and carry out peripheral work and cleaning/replacing where necessary that a commercial enterprise would simply avoid.

Not a mechanic myself either but will be doing this exact job on my 1997 MK1 1.6 with detuned engine this winter. I sorn the car at the end of the year for 3 or 4 months so there will be no pressure at all, just a cold, damp and dark garage.   


lol A space heater is your friend! Know what it’s like in the garage during winter mate, can be daunting going out there to work on the car. But I invested in a space heater (the kind that run on gas, looks like a wee jet engine) and honestly, it’s probably the best thing I  have ever bought for the garage! Can go into the garage when its -2, put on the space heater and honestly, have to turn it back off after 10 mins max as the garage is too hot! And mine is a double garage, so quite a big space for that little heater to heat, but it does it superbly. I bought a big Calor gas bottle that stands in the corner of the garage (can’t remember how much it holds, not the biggest one, maybe about double the size of one that goes in one of them old calor gas heaters that you used to get in houses) and remember the guy at the gas place asking what I would be using it for. Told him the space heater, he said “oh, that’ll last you about two days, poss 3 max!”. LOL That was over 4 years ago, and bottle still hasn’t run out!!! And it gets used a lot during winter months so deffo worth investing in one mate. They’re pretty cheap too (just watch for Machine Mart doing a sale )

Might try the cam belt, although have always shy’ed away from doing one as get it wrong, and the results can be expensive!.

Oh, and was out in Mindy today for a wee run, just to keep her all free’d up. Went along to the guy that runs a small one man outfit garage that I’ve used for years and arranged to take her in Sat morning so we can get her up on the 4 post ramp and give her a good going over. Really wanting to see what is causing the vibrations and also see what all the bushes are like (small knock from front o/s) as she’s pretty terrible going over bumps in the road. Will give me an idea on what needs to be renewed first, to make her drive nicer and above all be safer too. Then can take my time swapping over the less needy parts as I go along until all the suspension etc has been renewed.

On first glance, he did say she looks like a wee cracker, so hopefully he’ll still be saying that once we get her up in the air!


Oh, and it blooming rained while I was out! Good news is, the new hood is deffo doing it’s job, all nice and dry, no leaks! And not as much wind noise either now, as it came with all new seals around the windows etc.

You guys up in Scotland would laugh at what I call cold, damp and dark down here in South Devon. I really don’t deserve any creature comforts in what we call winter down here. Also have a double garage but full of bikes, tools, garden machinery, etc. A space heater would probably solve some of my problems by setting fire to the lot:-)

If you are intending to drive the MX5 interrupted throughout the winter and inconvenience created by possible delays in the cambelt/waterpump job will cause you stress, it would make sense to pass the job to someone else.  

If not, there are lots of very good write ups on this job. Read through several and get a feel for what you are letting yourself in for. Apart from saving around £200 you will feel a real sense of achievement and improved connection with your car. You cannot really do much damage - wasted time is probably the most likely issue where something missed or not done properly so a chunk of repeat work. I would say dealing with the crank bolt is the most critical part of the job - have to say on the three occasions I have been involved with this job the crank bolt has been remarkably easy to cope with.     


She’s going to be in the garage throughout winter (unless something utoward happens with the mini and I need a car asap) so time wouldn’t be an issue. i will take your advice mate and have a read through the forum tutorials, see if it’s something I think I can do. Would be an amazing feeling like you said if I could do this, would be the first ever timing belt change I’ve ever done, so might be worth trying. Did watch Fuzz Townsend on Car SOS doing the belt change on a mx5 (with his tip for cutting the belt in half and then removing one half of the belt and slipping the new one on. Not sure if that’s good practice or not though!) and think he also changed the water pump.


Yes, the winters up here can be bloody cold! Trouble is, the seasons are crazy up here sometimes. Can genuinely get all 4 seasons in one day! Up here we don’t seem to go gradually from season to season…usually we go from freezing cold winter, to a slightly less cold winter (some say, it’s called spring in other parts of the world! To us it’s just winter with less cold, still raining, still dull!), to summer, which (this year aside) is generally three days of sun then rain rain and oh yes, more rain! Then back to winter (we don’t seem to get an autumn, just goes from summer (warm) to cold winter over night. One reason why me and the mrs have decided that once we hit retirement age, were selling up and off to sunnier climes (probably Spain). The MX5 and the Aerodeck will of course be coming with us! lol Oh to live in a nice warm sunny country!

So, got one wee fault fixed thanks to advice from member Rhino on here and one of the useful forum guides. Noticed that when coming to a stop at roundabouts/junctions etc, the revs would drop right down to almost cutting out point. Initially thought there may be an air leak on the inlet side, but after using the guide to set the base idle, this has cured it. Really happy as it was a very simple fix!

Spent yesterday cleaning Mindy’s Engine bay. It was pretty grubby when we bought her, and it’s the one thing I hate…a dirty engine and engine bay! Went to Halfords and bought my product of choice, Gunk. Been using it for years and have yet to find anything that gets rid of the grime as good as this. Once it was all cleaned and rinsed off, dried the engine bay then used G3 compound to restore the pain on the inner wings etc, then polished with Meguires polish. Did all the black plastics with autoglym plastic and bumper restorer. Quite chuffed with how she looks in there now, much better than before. Got a few wee cuts while trying to get into the tighter areas so will at some point remove various bits around the bay for better access then go in there again with the polish.

Mindy_MX5_Engine_Bay_cleaned.jpg

Hope you like my efforts lol

Dave

It’s a very nice job.

When I was 17 and at college, worked with a car valeter. We used Gunk, Autoglym products and from memory duck oil. That was 37 years ago so good to see they still do a good job.

Got the cambelt/waterpump to do this winter but tempted to have a go at this on my car next summer.

Did you use a pressure washer and what protective measures did you need to take?

in the good old days it was a plastic bag over the distributor and points.    

lol, yes, Gunk has been around for as long as I can remember (and I’m 48 now!)! Can rmemebr my dad using it to clean the engine bays on his cars (Mk1 ford escort, Hilllman Avenger, Various Citroens and Ford Orion and Fiesta. Always cleaned up like new.

I wrapped/covered most of the electrical gubins with cling film. Keeps the water out and very easy to apply/take back off again. Bought a big can of the brush on Gunk (couldn’t find an aerosol version anywhere so possibly they’ve done away with that) and also one of the spray containers from halfords. Filled up the sprayer, and sprayed the engine first, then used various sizes of old hard brushes to work it in and get into all the wee nooks and crannies. Rinsed it off with my hose set to it’s most powerfull setting (we’ve got really strong water pressure from the cold tap here so was more than powerfull enough). I was going to use my pressure washer, but it’s old and such a faff to set up chose just to use the hose. Did all the inner wings etc next then again rinsed off. removed all the cling film and fired up the engine, then dried everything off round about. The heat from the engine also helps dry things off nicely. Then it’s just a case of polishing the metal work and detailing everything else.

Really is easy to do, but wear old clothes as the stuff stinks and gets onto your clothes no matted how careful you are! lol I spent around two hours from start to finish, so you could probably do it quicker, or take longer. Just depends on your levels of OCD

Deffo give it a go mate, you’ll be so please every time you open the bonnet once it’s done.

Dave

Decided to replace a couple of the exhaust rubbers at the rear as the back box was knocking off the subframe. Not surprised going by the state of the rubbers! The photo shows the one that was the worst! Hate folk doing bodges like this one something that only costs a couple of quid. Just replace it god damn it!

20180906_193956Mindy-MX5_Refurb-ashtray.jpg

When I bought her, I removed the ashtray from the centre console as the ashtray itself was grubby and well worn. Also wanted somewhere to put my phone, and thought as I don’t smoke, and with the state of it, it couldn’t really be used as a wee storage compartment. Decided I hated the look of the centre console with it removed, so decided to refurb it!

Below: as it was before refurb, all rusty and 'orrible! ??

20180908_141751Mindy-MX5_Refurb-ashtray.jpg

And the console with it removed

20180908_145152Mindy-MX5_Refurb-ashtray.jpg


So, sanded it all back, rust treated the metal, and etch primed followed by respraying it in gloss black (did want satin black but didn’t have any in the garage). Also removed the metal cigarette holder bit. Then decided that to stop objects sliding about/rattling, I’d trim the interior of the in material. Done it in red to match the exterior of the car. Just held in place with double sided taps so it can be removed/replaced as needs be.


The balck metal now nice and shiney like new again!

20180908_145311Mindy-MX5_Refurb-ashtray.jpg


Also sanded and painted the metal cig holder, and used it to stop anything small sliding to the rear of the compartment.20180908_145338Mindy-MX5_Refurb-ashtray.jpg


All done

20180908_145601Mindy-MX5_Refurb-ashtray.jpg


In other news, picked up a pair of the high back Eunos seats (cloth) with the built in speakers. Don’t like the current ones which have the separate headrests. Again, my Mrs Gayle is the queen of Ebay, as most pairs of seats were over £100. These were advertised for £50, but she still haggled and got them for £40! Even better, they were only a 30 min drive away, so we braved the torrential rain and stormy winds here last night to go and pick them up! We’re going to have them retrimmed in black leather before fitting them. Not sure if we are going for red centre panels on the seats, or just go subtle with all black but with red stitching and possibly red piping? What’s your thoughts?

Oh, and wiring wise, my car doesnt have the headrest speakers, so will the wiring for these already be in place? There’s wires for 4 speakers on the plug in the dash for the head unit, so hoping there’s a harness in place for plugging them in at the seats?