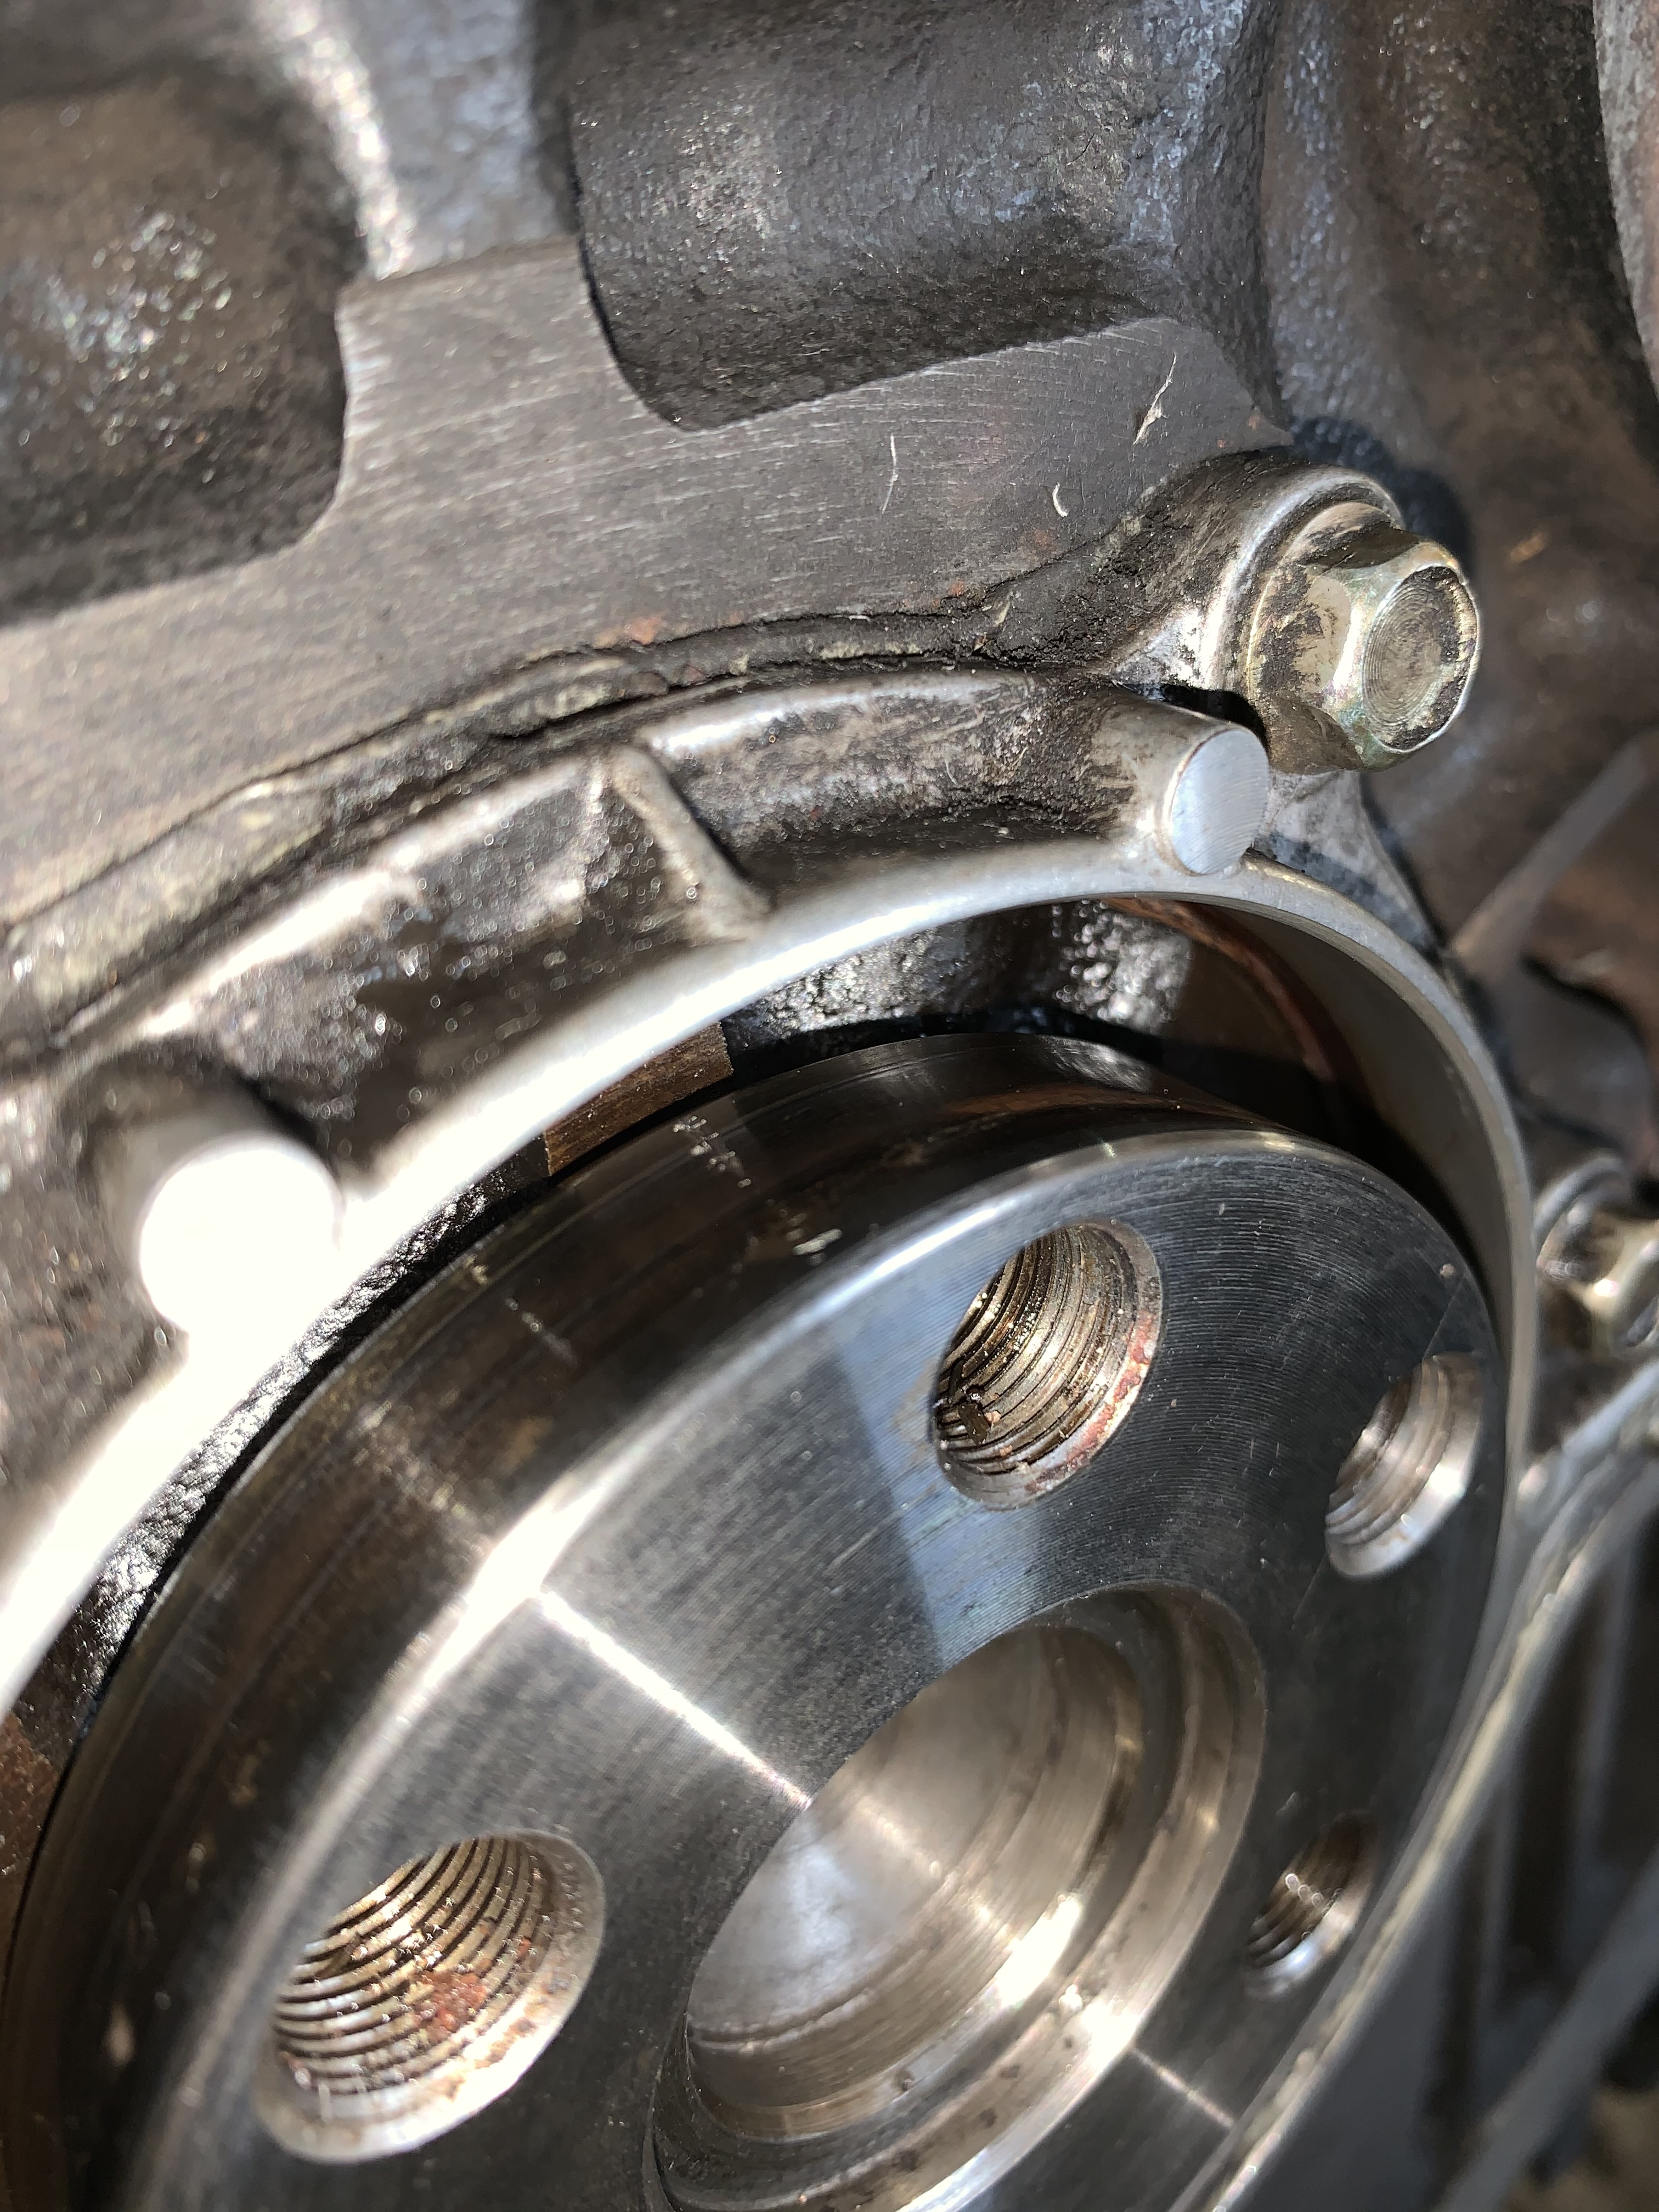
I was using a self taping screw to pull it out as ironically I didn’t want to scratch anything with a flat head when prising it out. From the angle I was at it looked like it was missing any metal work but unfortunately it wasn’t….
Is this going to be a problem, should I try and rub it down somehow? access is tight but i could get some form of wet and dry sand paper in?? Dont want to make it worse.
Pissed off with myself
Thanks for any advice.
J
The scratch is on the top of the crank but they seem to run sideways due to the screw scratching which is better than it running front to back i suppose.
If it’s not running front to back as it were, I would consider measuring wether or not the lip on the seal will miss it, but I am assuming that it is a simple seal with a lip as I have no knowledge of this specific seal, I’m sure someone else on here will know though.
Good luck hope it works out ok for you.
Dave.
Saddly the scratch is all the way down the sealing surface and not on the bit that the seal doesnt touch😢
Being doing some research and looks like the way to go is fine and careful sanding and then polishing. Going to see what I can pick up from our local car care shop tomorrow.
That’s probably your best bet, could also consider a very fine oil stone, goes without saying any debris from whatever method needs to be kept from getting into the engine, hope it works out okay for you.
Dave.
I would suggest 1400 grit wet and dry glued to a small steel rule with oil applied.Your finger tip will tell you if any sharp edges are left this is your main concern and remember to lubricate the seal and crank surface prior to fitting.NEVER fit oil seals dry.
Is it worth using a little loctite chemical metal filler or similar before sanding? You need to avoid leaving a low that oil will seep through as well as removing seal damaging sharp edges.
It would leave tiny amounts on the crank once finished but that probably the difference between a weep or not.
I went to my local car care place and picked up some 1200 and 2000 wet and dry. A quick try with the 2000 grit and it has cleared up the face quite nicely. Will stick with the 2000 and keep at it rather than risking the 1200.
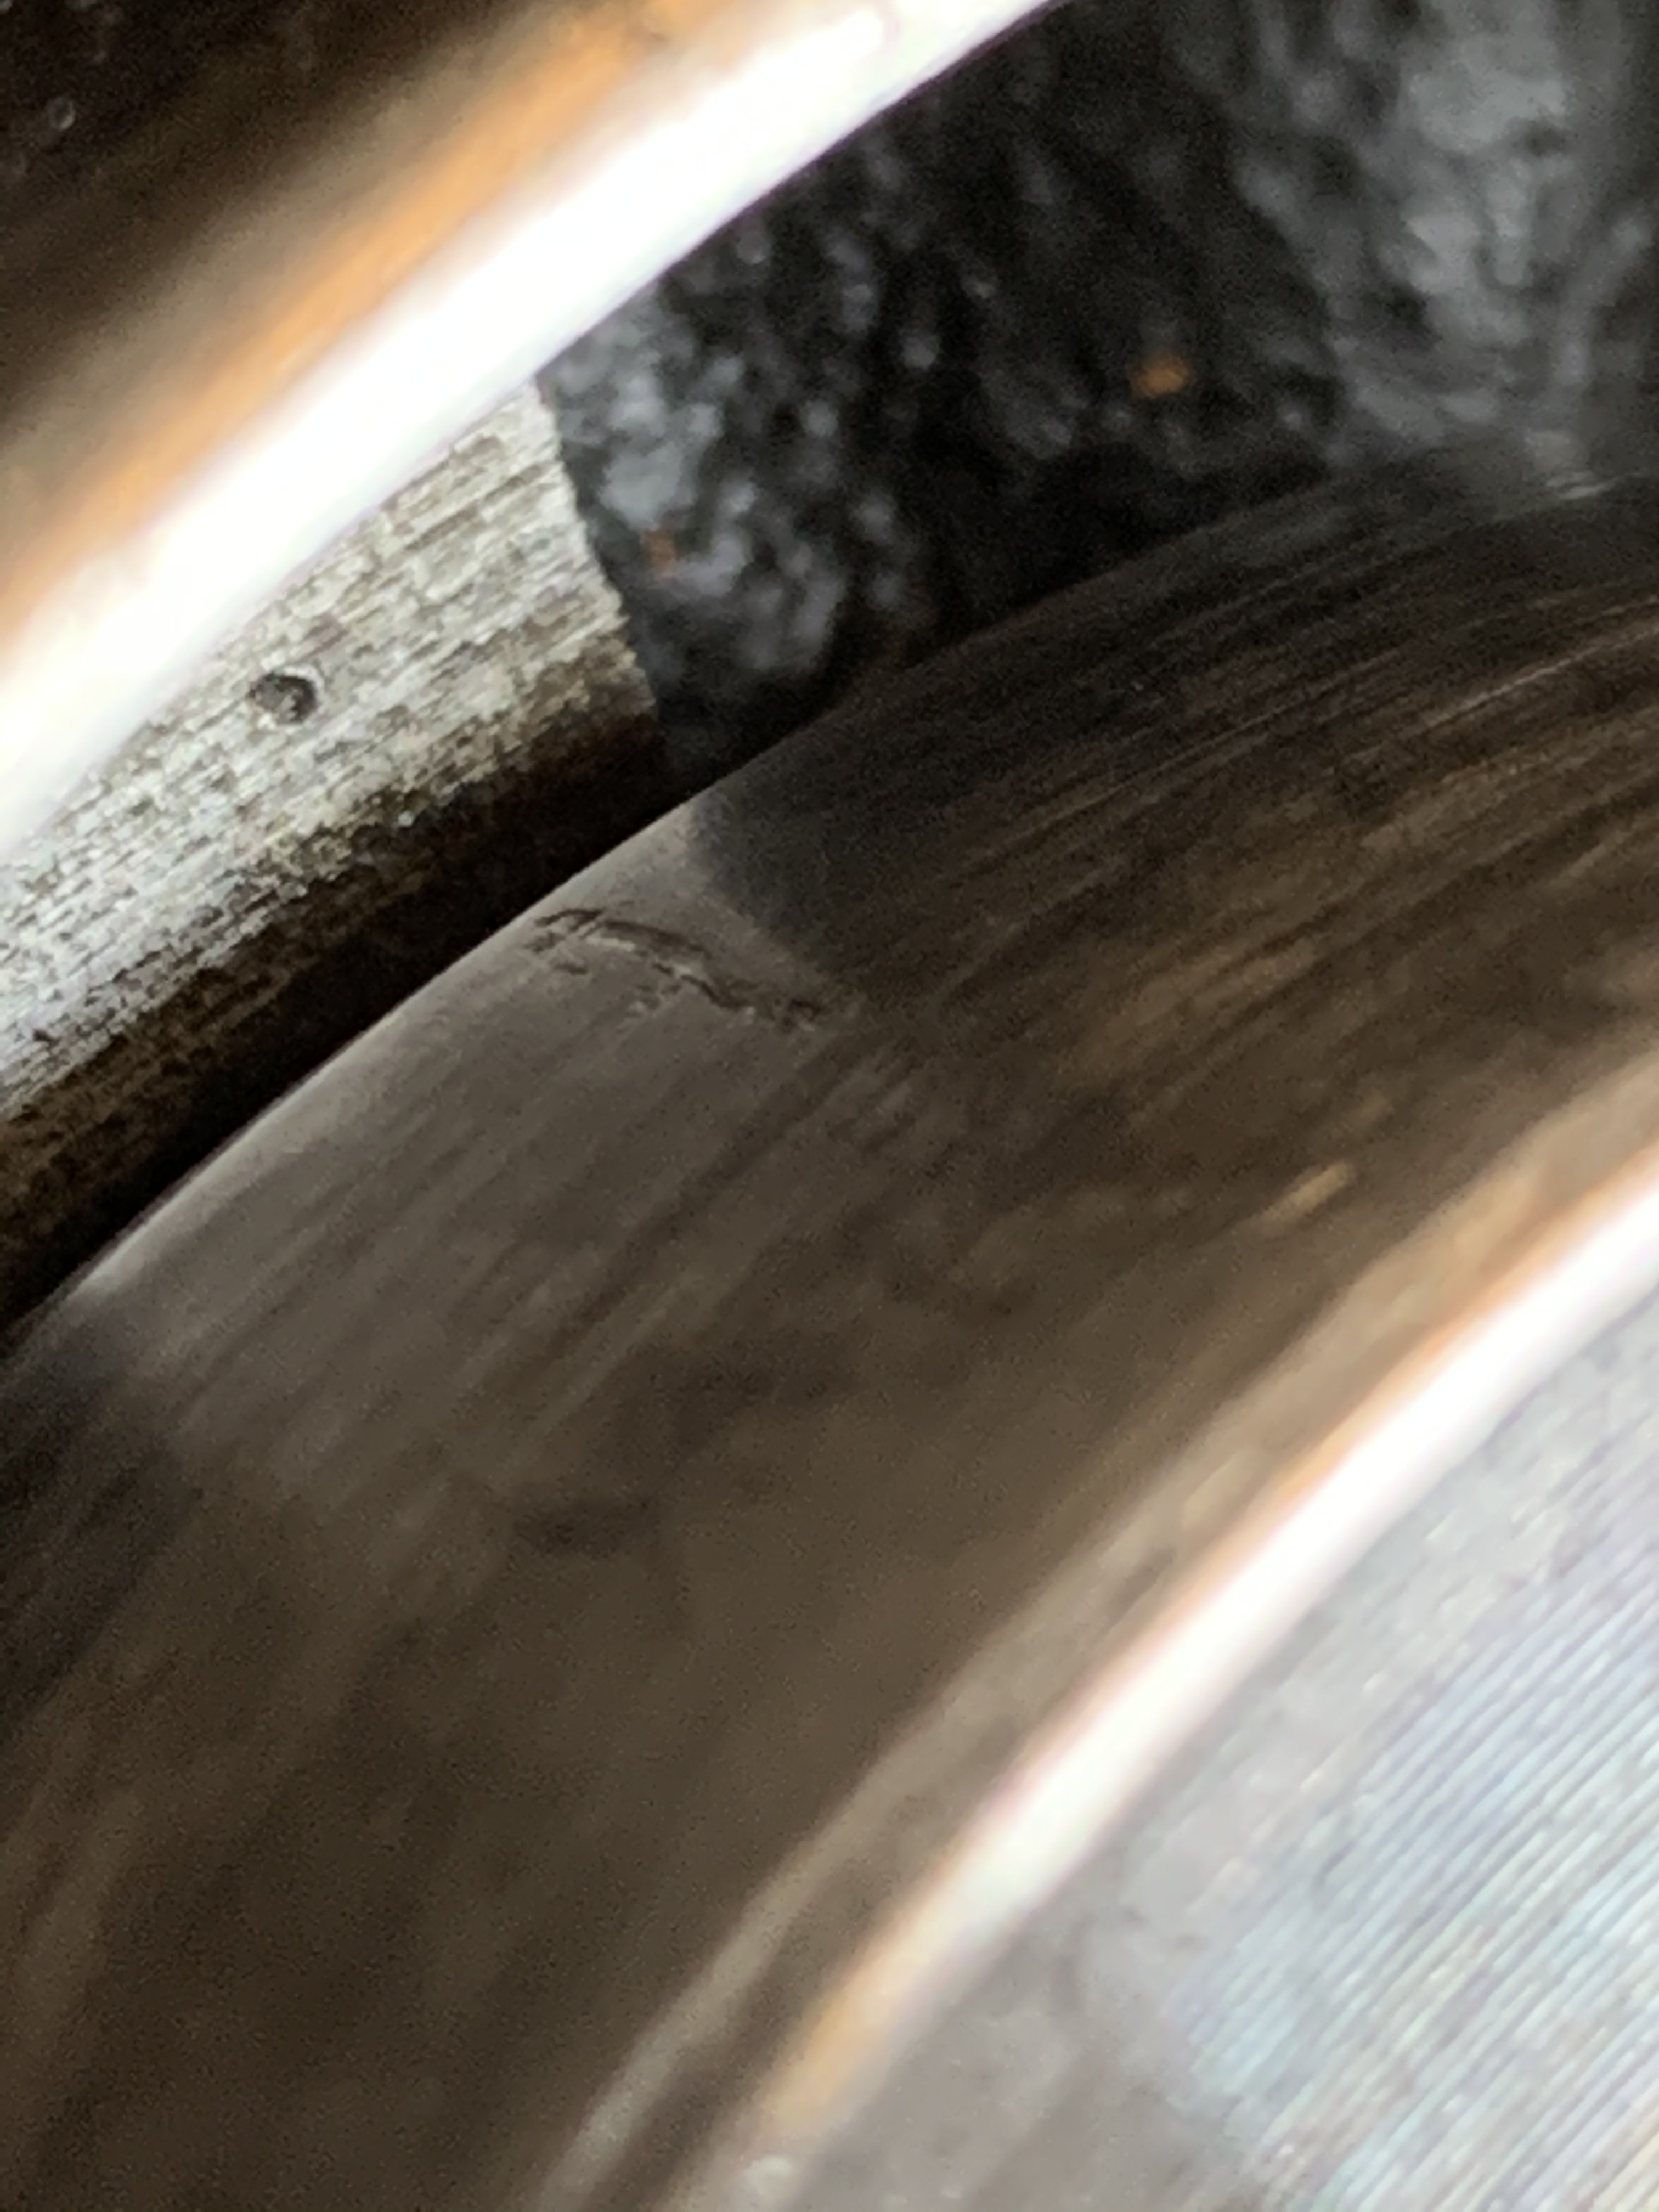
Just spent 30 minutes building confidence with the wet and dry. Went down to 400 grit and thought I had it sorted. Took a close up pic and although it is a million times better, think I am going to have to fill the scratch… What do you think?
Just looking into the steel epoxy putty. It seems it will be like putting blutack into a very fine scratch. Can imagine it working. It looks to me like you wouldn’t be able to get the tiny ammount needed in without leaving a large rock hard bit to sand down…Anyone used these epoxy putties before?
Pretty easy to use, make sure you really squeeze it into the crack. Remove excess with a scalpel before it fully sets, do this before it goes rubbery or you risk pulling it out from where you want it. Then let it properly cure before sanding. Will be easy to sand, but yes, you don’t want to have to take it down more than a couple of mm, so don’t put too much on in the first place.
Just a (bonkers probably) thought, is it worth considering spacing out the seal so that the the lip or lips run on the undamaged part, I’m thinking maybe an alloy ring turned up by a local engineering firm maybe ? It would all depend on the number and position of the lips on the seal and if the seal not being flush to its housing would cause a problem, it would need t be thought through and measured well, also as the seal would have less location surface around its periphery I would consider using locktite or similar if it was me.
If you can make sure the seal doesn’t sit over a scratch it will be better, but if there’s any flat where you’ve polished it will most likely weep at that point the spring on the seal (if it has a spring inside the lip) will not be able to keep it against the surface.
Measure the existing seal using digital calipers. You need the outside diameter, the diameter of the crank and the thickness of the outer part of the seal casing.
Then search here, using those measurements: https://simplybearings.co.uk/shop/?
It might be possible to obtain a seal that’s slightly thicker so the sealing lip sits further out, missing the damaged part.
Alternatively, search the same site for “shaft repair sleeve” using those measurements. It might well be possible to find one to suit of the size you need. These are pressed onto a damaged or worn shaft surface and use the standard seal size. They come with a tool to fit them, in this case probably can be carefully tapped on using a soft mallet. I’ve used them on crankshaft pulleys and also on gearbox output shafts. If correctly fitted they are a godsend; the stainless steel used is very wear resistant and they are effectively a “fit and forget” item.
That’s brilliant Steve, I came back here with the thought that a seal from a different manufacturer may have the lip in a different place maybe avoiding the damaged area. The sleeve idea is great and even if they don’t do a sleeve the correct diameter I would consider having one made by an engineering company transition fit shrunk on (assuming a suitable i/d o/d oil seal is available) I did something similar on a motorcycle gear change shaft once worked fine.
If you use a SKF Speedi Sleeve you use the existing oil seal. These are shim steel sleeves especially made for repairing worn shafts. Just Google SKF Speedi Sleeve. They are regularly used to repair industrial gearboxes where the seal has worn a groove in the shaft and you cannot get the shaft out.
Hi folks. Loads of great suggestions. I asked the same question on miata.net forum and although there were those saying the JB weld epoxy filler was a good option, there was a guy who had fitted the Speedie Sleeve and had the correct parts number I needed.
Looks like it will be about £5 for the epoxy and lots of finger crossing or about £20-30 (depends on the suppler) for the sleeve which if fits is fit and forget.
Seems like a no brainer and not too a costly mistake.
I can’t seem to find the actual factory stated diameter of the crank end anywhere. Googles not playing nicely for me today. Anyone got an idea? My cheap digital calipers (from Aldi!) don’t give me too much confidence and operator incompetence is not helping!