BBR Turbo Stage II NC DIY install

Hi all,

Wanted to share with you, how chuffed i am with my recent DIY install of the BBR stage II turbo kit on my NC.
I’ve benefited greatly from this forum and the club, so i hope you find this useful.

I could make the man maths work, I used some bribery techniques to get what I wanted, so I took the plunge.
I did consider some alternative options, both from BBR GTI and others, but decided that modifications that focused on normally aspirated methods were not what I wanted for a road car. The torque of the turbo was what I wanted.

Before the arrival of the kit, i prepared and started to disassemble my car.

I’m reasonably close to BBR, so i collected my kit.

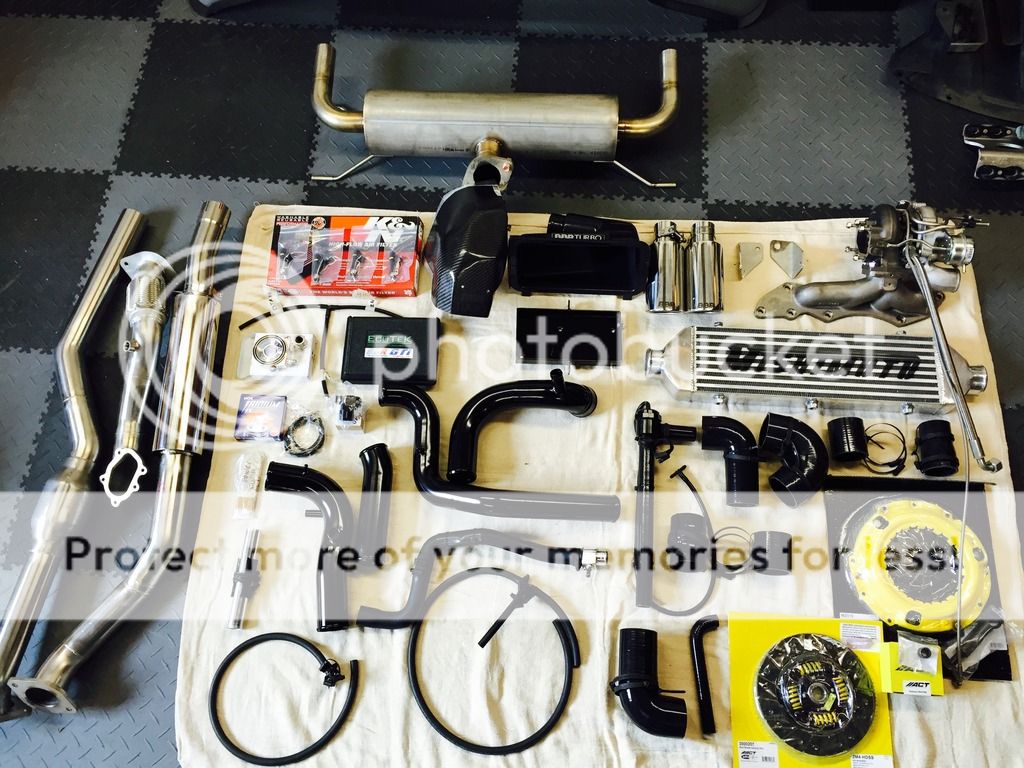
Everything was labeled and well wrapped.
As a stage II, the kit included a new clutch and a complete exhaust.

The main turbo and oil lines were pre assembled, only requiring installation of the downpipe.

A sandwich plate for the oil filter housing is included for the oil supply. The sump requires drilling and tapping as well.

The complete assembly.

Installed in the car.

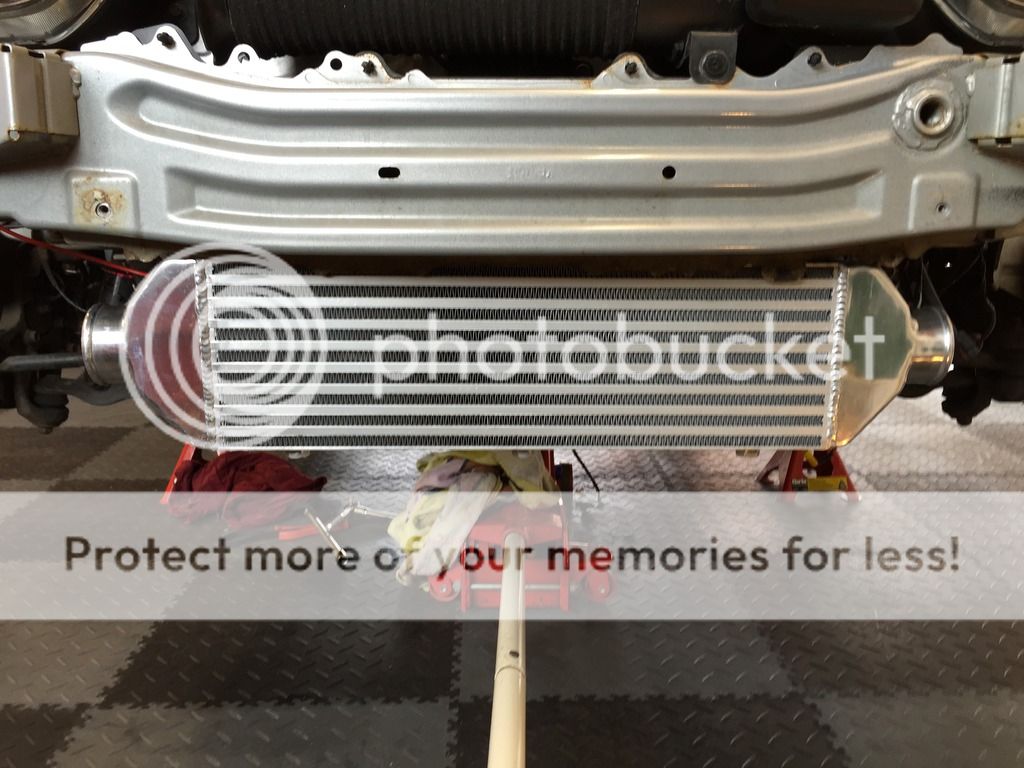
The intercooler, nice and shiny.


The new clutch. 

There are a few coolant pipes to re-route and install some new ones, a single wire to cut and solder, a number of intake pipes to install, new injectors etc.

Here you can see the new injectors on the left, the old on the right.

While checking for coolant leaks after the install, i kind of wish i could have driven it around without the front bumper on 

The first map and logging was done via the ODBII port.

As you can see, it’s a very neat install.


Impressions?

It’s a giggle, it really is. The noise is lovely, the rear silencer is certainly loud when you are on it, but does quiet down when cruising.
The clutch is not appreciably heavier than standard, if there is any difference in peddle weight, i can’t detect it.
The ease with which it picks up speed is hilarious, without trying, without going anywhere near the read line, it wafts along just fine.
Traction control is not unduly bothered, i can make it work for it’s tea, but my tyres are doing a fine job of dealing with the torque. (maxxis Victra MAz1)
I’m beginning to think my coilovers could perhaps do with a bit more travel, or maybe i should just slow down a little, not sure yet.

I can’t recommend it enough, was great fun installing it, even more fun driving it. The support from BBR during the install was excellent.


I hope you find my comments and photos useful.

2 Likes

Very nice 

Love the look with the bumper off, I see what you mean about a drive without it :slight_smile:

Nice job and clearly a great improvement over standard. I’m impressed with the job uou have done. Hope you have lots of fun in it.

Thumbs up for the DIY install.

I’m that close to going for it myself, and this might have been the push I needed.

Nice job!

So, this was a bit of a surprise i have to admit.

Straight onto the rollers at BBR and 300.3bhp straight out of the box. (please note the .3, that’s very, very important Laughing.

I was a little concerned that the installation of the map remotely might have led to a less than optimal tune, but i have to hand it to Neil at BBR, the remote installation and logging were spot on.


I’ve used the remote mapping for sorting an idle issue out on the previous car, it included datalogs at idle, part throttle driving and third gear power runs with WOT. It’s interesting  to me as it involves true road conditions with real engine loads rather than the controlled environment of the dyno run , obviously I’ve no idea how much Neil then modifed the map post dyno but the end results as you’ve shown in terms of output seem very comparable. 

I do hope you are pleased with your efforts. I would class it as a lifetime achievement,

Apologies for dredging up an old thread, but having done the man-maths I’m on the verge of organising a test drive of BBR’s Stage 1 car with a view to purchasing the Stage 1 kit.

I’d also want to fit it myself- its a pretty decent cost saving and I enjoy wielding the spanners- but I’m in two minds about whether to fit an uprated clutch whilst I was at it. I wondered how difficult you found it to change the clutch, working on axle stands?

Neil

If you test drive one you’ll definitely want it! I popped in to BBR a couple of months ago and had a test drive of their demo - which was actually a stage 1.5 running about 280bhp and with their suspension fitted. It went like I think an MX5 should go and the suspension was great too - the car felt much more planted and yet if anything a better ride than standard on my Mk3.5. I’m definitely going to be going for the suspension but can’t decide whether to diy fit and save £200 or get BBR to fit it - though I’m probably going to diy.

I’m also going for a turbo, but again undecided whether to diy or get it fitted. If I diy it I can justify going full stage 2, but if I get BBR to do it I’ll need to stick with Stage 1 (for now at least!).

V6turbo - how’s your car held up since you converted it. I do worry a little that an increase of 88% in power is a lot to ask the gearbox / diff / driveshafts to cope with. Also, how many hours do you think it took for the full conversion, and anything that you found particularly difficult? I have access to a 2 post lift and have done quite a bit of spannering over the years, but finding time is always a challenge and I can’t find any workshop manuals for the Mk3.5 - in particular for removal of the gearbox (hence no torque settings for the bolts. I have access to another car so it doesn’t matter if it takes me a month or two to complete the work.

Any guidance gratefully received!

Cheers
Dave

Dave,

Don’t go for the stage one, go the full monty. If you go stage one, you’ll likely keep wondering what a stage two would be like.

The kit was a straightforward install but there were a couple of things that need some thought and planning.
I changed the clutch with the car on axle stands. It’s was a workable solution but I wouldn’t want to have taken the gearbox off and on without a gearbox cradle for my jack.
Drilling and tapping the sump for the oil return feed required confidence, and a mains powered drill. Flushing out the sump took time.
I overfilled the sump before I drilled it, so the oil draining would hopefully not allow too much swarf to enter the sump and used plenty of grease on the drill bit.
Bit messy but a strategically placed bowl was all that as needed.
I flushed cheap oil through the sump to clean it out, I had loads of left over bits from services over the years and came in very handy. Used white spirit as well to begin with in a pressurised squirter.
Probably the most time consuming part was taking my time and being careful to route the intake and coolant pipes.
I took the front bumper off as it was only a few extra bolts and I would recommend that for access, but it’s not a requirement to do so.
Getting the exhaust manifold bolts torque setting was a challenge due to access. I found that tightening up with the gearbox removed meant I could get to some from below the car, some from through the wheel arch (covers removed) and some from the front of the car with the alternator removed.
Again that is not strictly necessary to remove the alternator but does make life easier.
Gearbox bolts were straightforward, only one at the top of the bell housing required some thought.

It took me three weekends, relaxed and not under any pressure. I think I got through 3, maybe 4 packets of Jamie Dodgers in total.

The gearbox and diff had their oils changed a couple of years ago and I do low miles a year. Over Christmas I’ll change them again out of sympathy.
I have not noticed any issue with diff, gearbox or driveshafts. My gearbox is fine and I do make use of full throttle in second on a regular basis. I went for the loud exhaust and love the top end noise.

Not once, have I been tempted to turn off the traction control, i drive in all weathers and in the wet it’s essential, along with common sense obviously. It works for its tea in cold and wet weather.
I’ve travelled from Wiltshire to the outer Hebrides and back in it, roof down all they way, it was epic. The exhaust is quieter at about 85 than 70, (so I’ve been told, wouldn’t know myself)

The only issue I had, was that it ran like a bag of shit after the install.
Full throttle was hilarious but constant light throttle would just have it surging, traffic was a definite no no. Felt like pulling away with no choke, engine revs just dropped into a hole unless you used revs and slipped the clutch.
I traced it to a failed coolant sender, which is much easier to replace than it looks and just co-incidence.
The remote mapping worked great as well, that was the thing that I had the greatest concern over, but it was all good.
The bbr kit is good quality, I had no fitting issues, everything fitted, couple of phone calls while fitting it, always returned calls very quickly, responded to emails quickly…

Mines a 2006 but I’m planning on buying a 2015 nc and transferring the kit over.

Oh, if you haven’t done so, sort the suspension first if you are on standard at the moment, it’s very very easy to get up to speed quickly, I’m not a mad ass and always stick to red ringed limits and NSL, but I do find that the thrill of accelerating quite addictive, that has shown that things can be a bit “bouncy” at times.

Not had any issues with brakes, they are completely standard and I find them perfectly capable for the road, that’s probably down to my driving style.

Hope that’s useful.

4 Likes

Thanks for such a comprehensive reply.  Drilling the sump in situ and ensuring all the swarf is removed certainly requires confidence!

unfortunately my plans are on hold at the moment - a house extension which has gone off the rails looks like it’s going to use my car budget at the moment :-(.  Hopefully once that’s sorted I can get this done.  Hoping I can get the suspension kit though as my Xmas present from my wife!

Cheers

Dave

Great reply, much appreciated. I’m doing a bit of work down south at the moment which often takes me past Brackley, so I’m probably going to drop in one day this week or next for a chat with BBR.

I’ve already written my letter to Santa asking for some coilovers, and indications from my wife are that I may well be happy with what I get.

Went for the Stage 1 DIY kit in the end. Ordered it today- excited!

I’ll inevitably end up going for Stage 2 eventually but I’m in no rush, so to speak.

1 Like

Congrats, keep us posted on progress when you get started.

So after a few days of working in the worst weather imaginable I’m pretty much done, although I’m having an issue with refitting the MAP sensor. What an absolute pain that is- I’ve dropped the bolt twice and had the mother of all jobs finding it both times.

Just waiting on the sump fitting to turn up (it’s already drilled and tapped, just need to flush it through) and with any luck it’ll be done this week and ready for mapping.


how much were the stage 1 and 2 DIY kits ???


Hi guys, it’s an old topic but i have buy this kit. 


Do you have the installation instructions please?Â