I’ve had my MX5 just shy of 12 months. Being the 1.8 poverty spec, I wanted to give the interior a bit of a lift.
By chance, I found some stone leather seats and door cards for sale locally. I believe they are from a Kendo edition. The seats were in excellent condition. The door cards lacked the front piece of the door pull. That wasn’t a concern at the time. Little did I realise how hard they would be to source. Mazda UK want £68 each, which would be a so called ‘special order’ from Europe. Understandably, people selling door cards are reluctant to just sell the door pull.
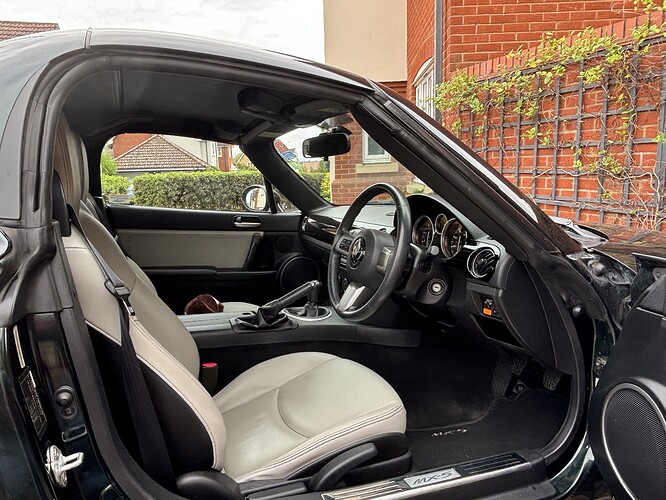
The seats fitted straight in (confession: I had Vincent and Monty at Vincent’s Motor Works fit them whilst the car was in for some other work). You do sit higher than in NC1 seats - about an inch, but that’s not been problematic. They improved the interior really well. For a while, the door cards sat in the garage.
Whilst I continue to try and locate some door pulls, I decided to fit the door cards, modifying the door pull into something useable for the meantime. I’ve not tried anything like this for many years. I purchased the Haynes manual and looked through some utube how-to guides. I cannot be alone in thinking that the Haynes manual is next to rubbish. Nothing like the ones I remember from my younger days. Poor quality paper / photos, and a text which seems more like a reminder for the author rather than a step by step guide. Equally, the utube videos seem to skim over detail - no doubt saving time to promote their website and invite people to subscribe! Consequently, I’ve created this Janet and John step by step account in the hope it may be of use to others.
Having confirmed NC1 door pulls will not fit the later door cards, using my best Blue Peter skills, I managed to make up a passable pair of door pulls - not perfect by any stretch - but good enough for now.
Ok, so now I’m set to change the door cards. In preparation, I ordered spare trim clips (assuming at least some would break) , and internal door cards (eBay) aware that the later ones were revised to accommodate the changed cup / bottle holder. I also purchased a set of trim removal tools. These turned out to be absolutely essential.
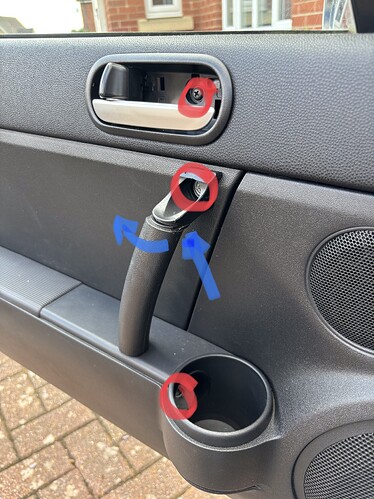
Before pulling the door card off, there are three screws to remove. Two pieces of trim have to be removed to gain access. To remove the cover in the door opener, you need a hooked tool. Pull the lever as if to open the door and pull on the trim from the end the handle hinges. Be careful, because if you catch it right it pings out like a speeding bullet. The second piece of trim is at the top of the door pull. If you push a thin tool upwards to the side as shown, then move it around the bottom (photo), it should come away. You can now remove the three screws NB: the top one is smaller.
Next, take a flat blade to lever off at a corner near one of the clips, then work around to release the others. The card can then be lifted upwards and away from the door. Be careful at this point as the card is connected to the tweeter speaker and the door opener. It is very fiddly to try to disconnect the speaker cable unless you have extra hands to help. I found it easier to unscrew the speaker (two small screws), and once the card is free, disconnect the speaker from the wire and refit. The door opener also needs to be released - it has clips at the extreme ends (photo) Once free, it can be turned and pushed through the hole. NB: it’s a little easier with the door in the locked position.
Now you are faced with the inner door car and a fair amount of wiring. This is the time to take reference photos - very helpful when rebuilding.
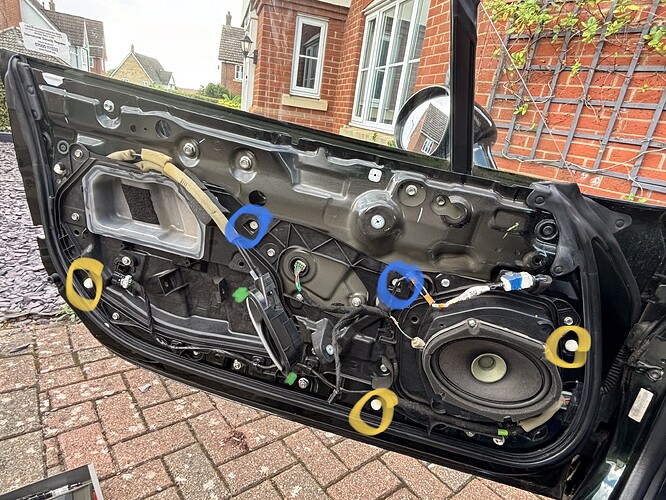
The door card is held on with a dozen or so 10mm screws and a smaller screw near the rearmost wiring connection. Once you have removed these, it is still held by two clips as shown in blue. This is the time to check you have sufficient photos of the wiring layout and routing before disconnecting everything. I decided to remove the large speaker (4 small screws), as I was in two minds whether to replace them. Once you have done all this, you can pop the last two clips and the card should come away.
Blue: last two clips holding inner card
Yellow: broken clips from removing door card
Green: showing where handle piece clips to card
There was a fair bit of debris in the bottom of the door which I brushed & vacuumed out. There was some corrosion on the bottom of the window runner. When I had cleared it all out, I applied some soundproofing patches to the door skin and Waxoyl along the bottom of the door and on the window runner.
This is where things went wrong. The inner door cards I had bought were advertised as from a NC 3.75. Once offered up against the old one, it was clear that they were not. These were also from an NC1. After sitting back to ponder this, I decided to try cutting out some of the inner card to accommodate the drink holder - after all, I now had two spares to practice on!
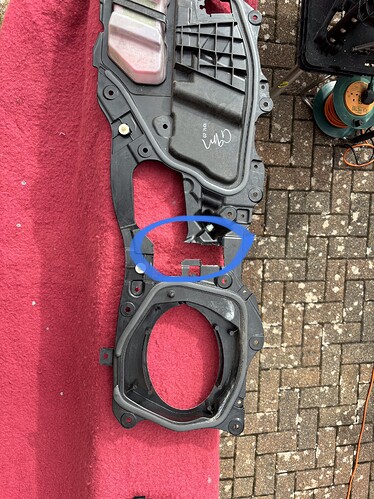
I used a multi-tool to remove the area shown (photo). You need to move the blade quite quickly as the plastic prefers to melt than be cut! I started small, offering it up to the door card until they sat closely together. I also trimmed the protruding part of the cup holder support but I’m not convinced that last trim was needed.
Next task was to remove the broken clips from when the door card came off. I would say I lost 25-30% through breakage. Then I reattached the inner door card - taking care to ensure the wiring was fed through the correct holes. NB: make sure the wiring loom is clipped into the correct holes rather than one meant for a door card clip. Reconnect the wiring and replace the speaker.
Check that there is a clip in every socket on the door card - including the one roughly centre.
Now you can offer the door card up. The tweeter needs to be reconnected and the door opener fed through the gap and clipped back. Hold the card away and slightly above the door before tilting the top towards the window and down. You should feel it click into place. You can then work around the door card, tapping in the clips.
The other door is essentially be a repeat of the the above. There is additional wiring for the mirror adjustment that needs to be unclipped.
Overall, I’m pleased with how it looks. Not 100% but good enough for now. The door pull search continues.


