Engine diagnostics are reliable but you must clear any previous codes.
Make sure you have any relevant access codes to hand before doing the next step [radio, immobiliser etc]
Disconect the negative battery terminal, then press brake pedal for at least 5 seconds.
Reconnect battery and go for a drive to repeat problem, then check for codes.
Note that this may not work for models after 1995
So, what’s up with your engine? Is your engine playing up? Want to know what’s wrong with it? Well now you can find out what’s wrong with your engine, or, at least what the Engine Control Unit (ECU) thinks is wrong with it, which should lead you a good way down the path to correct diagnosis…
To make an indicator so you can read these error codes yourself, without having to bother your friendly local Mazda technician with his expensive special service tools, you will need, a Light Emitting Diode (LED) and a resistor. These can be purchased at Maplins RS or any other similar electronic hobbyist supplier for spare change.
You’ll also need a separate short length of wire. (An unpainted paper clip will do) If you buy a red coloured LED, you will need a 2000 Ohm resistor, or any other colour will need a 500 Ohm resistor. (If you happen to already have a selection of resistors, any value within about +/ - 25% of these will do).
Simply solder one lead of the resistor to one lead of the LED. It doesn’t matter which side of the diode you put the resistor on, but it will pay to take note of which is the longer of the two leads on the diode, as this will determine how you plug it into the car. 
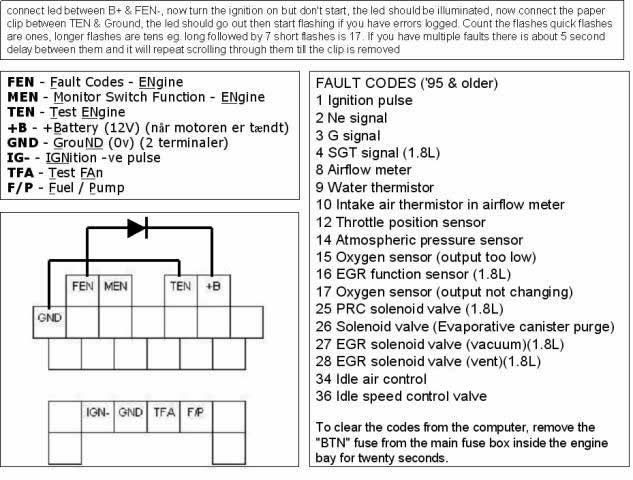
The finished product is shown in the picture - it’s that simple! Now, locate the Diagnostic Connector in the engine bay. It’s a small black box about the size of a packet of matches, near the top of the exhaust side shock absorber, also near the engine air inlet snorkel (and it has Diagnostic stamped on it!). After you unlatch the cover, there should be a label inside explaining what the different terminals are called. 
With the ignition off, use the short piece of wire (or paperclip) to connect the TEN terminal to one of the several GND terminals. Now, connect the indicator between terminals B+ and FEN, with whichever side of the diode had the long lead towards B+ (If you get it the wrong way around, no damage will be done, you’ll just get no light out of it)
Code Meaning
1 Ignition pulse
2 Ne signal [Crank angle sensor]
3 G signal [crank angle sensor ground?]
4 SGT signal (1.8L)
8 Airflow meter
9 Water thermistor
10 Intake air thermistor in airflow meter
12 Throttle position sensor
14 Atmospheric pressure sensor
15 Oxygen sensor (output too low)
16 EGR function sensor (1.8L)
17 Oxygen sensor (output not changing)
25 PRC solenoid valve (1.8L)
26 Solenoid valve (Evaporative canister purge)
27 EGR solenoid valve (vacuum)(1.8L)
28 EGR solenoid valve (vent)(1.8L)
34 Idle air control valve
Now turn on the ignition, but don’t start the engine. The LED will light up for about five seconds (assuming you got it the right way round) before it starts flashing out the error codes (if there are any). This will give you a chance to get around to where you can see the indicator. Count the number of flashes to indicate the malfunction code. If the code is a two-digit number, the tens digit will be displayed first with a long flash, then after a 1.6-second dark pause, the ones digit will be displayed with shorter flashes. If there are multiple codes, they will each be separated by a four-second pause and may include two-digit codes, so pay attention. (For example, one long flash followed by three short flashes would be a code of 13) The codes will repeat after four seconds so don’t worry if you miss them the first time.
Take as long as you need to record the codes and then refer to the Fault Codes chart shown.
Keep in mind that the indicated device may not be faulty itself, but may have a bad electrical connection, or some other fault may be making it have an abnormal signal. The fault codes are stored by the ECU indefinitely, so after you’ve done something to cure the problem, you need to clear the codes by disconnecting the car battery for a minute or so. This will wipe the computer of its error codes. Now you can drive the car again for a while, and re-check to make sure the error code hasn’t come back. (If you didn’t clear the ECU’s memory, it will still have the old codes.) Hopefully, as several others and I have been able to, you’ll be able to use this information to find the cause of whatever’s wrong with your car.
_________________
