They are a bit like cats really.
You think you own them, however, the reverse is the reality. 
2 Likes
Good read, thought I recognised your driveway I followed your Boxster build/ownership on Boxa.net and you mentioned there when you sold the car that you were going to get a mk3 MX5, small world…
Co-incidentally I’ve just started a similar ownership with a black mk3.5 going through all the strange niggles and mods that previous owners have made (LED bulbs everywhere and a HID headlight setup I can’t decide if I like or not) Mine has had the MX5parts reversing sensors fitted and they’re very unpredictable so I wouldn’t bother if I were you!
Interesting that you went back to the original BOSE radio, I’ve been contemplating an updated head unit so I can get carplay and not need to stick my phone to the dash, but the simplicity of the OEM on/off button and rotary volume control & switches you can use by feel rather than take your eyes off the road for a touchscreen is stopping me!
Your ride height still looks quite high, mine’s on Bilstiens and is sitting at about 360/370 with standard springs which looks considerably lower than yours but then it’s a facelift car that might have something to do with it. It would be interesting to meet up & compare!
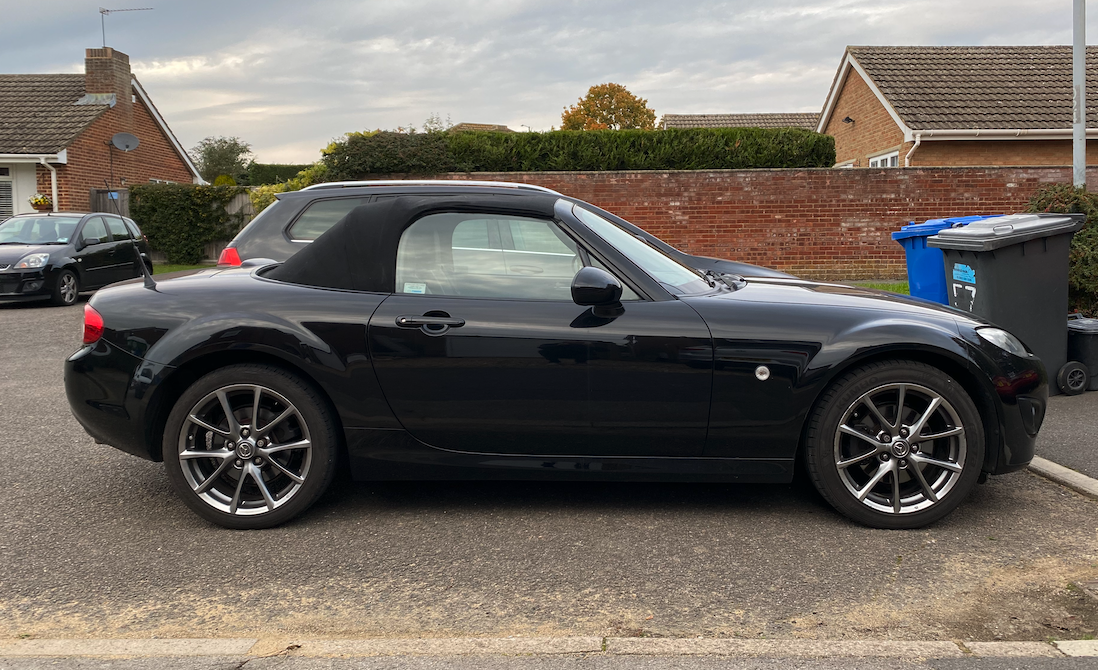
(excuse the dodgy pic with the bins)
1 Like
Lovely to see a follower of my previous car! Appreciate the kind words.
The ride is actually on Sachs shocks, not the Bilstein’s that should have come with the sport, which may explain the height. The previous owner had the shocks replaced but they accidentally put the standard MX-5 shocks on rather than the Bilsteins, but personally I’d much prefer it. Lowering the Bilstein’s can cause problems with the ride quality apparently, but not the Sachs, and lowering the car is something I wanted to do from the off. Owning a Sport model with standard shocks was the perfect combination.
Yours looks lovely though!
Regarding the parking sensors, I’ve used the parking sensors that I’ve bought from Ebay on a few of my previous cars. They’ve been fantastic and haven’t let me down at all on my previous Boxster, so I’ve purchased the same ones for the MX-5.
That’s a BMW 3 series gong. The speaker that comes with the kit is a tiny piezo speaker (like you’d get inside an old computer), and sounds awful. I’ve used this before by simply cutting the old speaker and wiring this up instead.
Power and negative go on two certain terminals (can’t remember which ones, I’ll have to look at it again), then a second negative (jumped from the original) goes to one other pin to get different tones. There’s a certain tone used for BMW parking sensors that works perfectly. I’ll run wires from the rear of the car where the control box is to the the dashboard and will tuck this up behind it, so that the sounds comes from inside the cabin and in front of the driver, as it should.
I’ve got a thermostat to replace on the Focus, but this will be the next job.
I think a ragtop would be cheaper for you
What did you use to clear the marks on the front light lens? I was going to give them a go but not sure what compound to use
I have a PFHT and was a bit worried about the reliability of the folding roof, but it’s very simple and used parts are pretty cheap, a complete roof is like £100, used of course.
The weight is only 35kg heavier than the ragtop, not sure you would notice unless you’re a track wizard.
The thing with the ragtop is it is cheaper but then you will probably buy a hardtop for it, which for the mk3 is going to set you back £500-£1000 for a used one.
Personally I see more negatives with the ragtop than the PFHT, which is why I bought a PFHT.
I had a new soft top fitted on my previous NC1. It cost just short of £800 and looked great after the OEM one that was wearing and just looked bad. I moved on to the current NC2 and had PRHT problems. Cost around the same to fix as the soft top was fitted! New main motor, new limiter switches, diagnostics at the outset etc. Have to say, been perfect since and I really like the PRHT, especially when down as the rear deck plate really ‘finishes’ the look, instead of the gaping holes at either side on the soft top. I did have the quarter pieces that you fasten in when soft top folded down but I felt they were a bit of an afterthought.
Barrie
I used Meguiars 105 then 205 with a DA polisher, but the colours are there due to using a CP lens on the camera.
Very good points there. The good thing about the soft top is how quick it is to retract and no motors to fail, but you’re right with those points. Hard tops are so expensive to buy…
Surprised with those problems on an MX-5. I can imagine the hard top looks great folded, it certainly looks fantastic when it’s up.
2 Likes
There’s always problems on all cars, just with MX5’s you have more chance fixing them yourself or getting reasonably priced used parts. That’s what put me off the Boxster (apart from the fact that like you I found when I drove one it only came alive over legal speeds!) With Porsches there’s a Porsche tax, with MX5’s it’s just VAT
2 Likes
Finally got round to installing the parking sensors.
Off comes the bumper


Normally I’d mark where to drill inside here, but there’s markings like this inside:

And these markings are conveniently on the corners:

They made for perfect locations, so I went ahead and drilled using the provided drill bit.

Popped the sensors in


Nice and neat.
I routed the wires in through a hole that was used by the previous owner’s reverse camera.


All plugged into the module

I didn’t take any photos of how it’s powered, but basically it gives you a red/black wire to crimp into the + and - of the reverse bulb’s wire. When the reverse bulb comes on, the parking sensors come on. Incredibly simple to wire up.
They do give you a speaker, but it sounds awful so I cut it off.

Instead I’m using this BMW gong that I bought for £5

The rear has + and - terminals, then you simply jump the negative to another terminal to give certain sounds. I chose one that’s a constant beep, so that the parking sensors can manually beep this speaker.

I extended the wires and routed them through the boot and into the cabin. I tied the wires to a trombone cleaner (or just a long coat hanger will do) and fed the wires into the cabin that way.

They then route down the side of the sill, and up inside the dashboard where I’ve installed the speaker.

This means that the parking sensor’s beep is that of a proper sound (and not a tamagotchi), and comes from the dashboard as it should.
All finished, barely noticeable with a factory look/sound.


The outer sensors are slightly lower than the center ones, as they should be.
They work superbly. I’ve used these parking sensors on multiple previous cars, and they’ve never let me down.
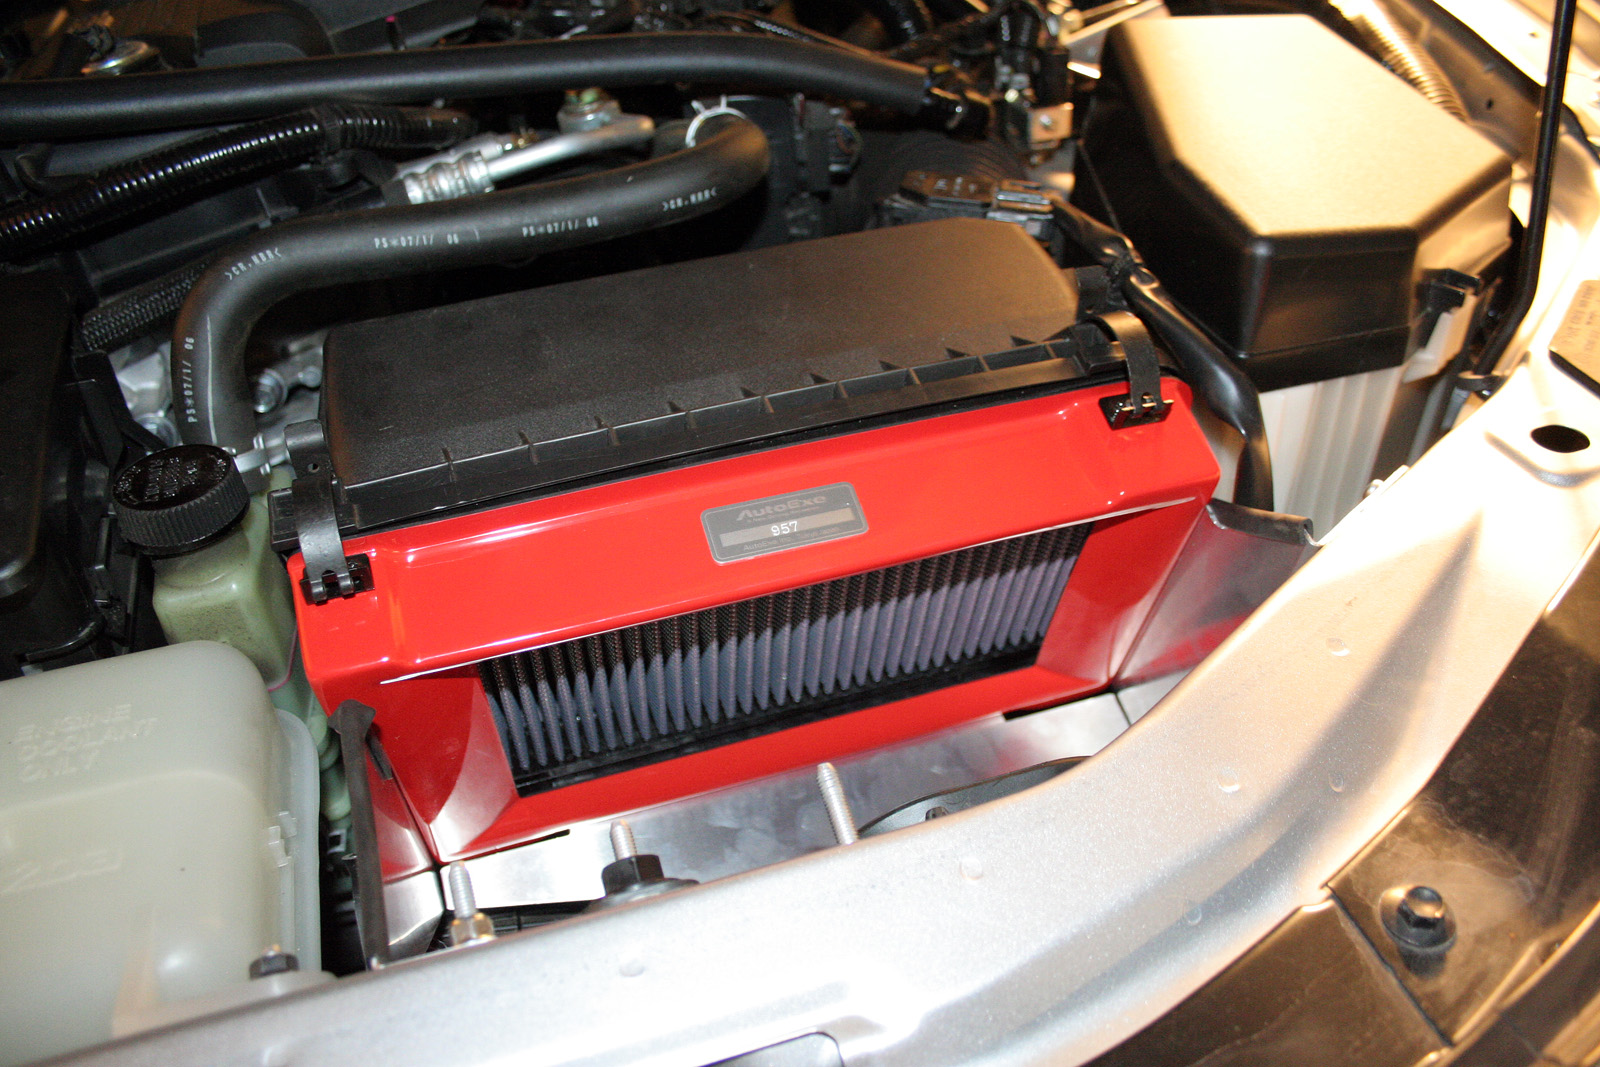
In the meantime, I’ve had an idea about the air box.
Now I’m not chasing performance numbers (though that may change in the future), but I do want the car to sound a little more sportier whilst keeping that standard tone when I’m not pushing it. Induction is the way to go for this, having successfully used it on my previous T-Sport Celica. However, I don’t want to just have a cone filter suck up hot air in the engine bay, and with the prices of the induction kits (for what’s essentially some metal tubing and a cone filter), I’d rather attempt it myself first.
I’ve just been outside and temporarily removed this front half of the air box:

I then taped the air filter to the remaining piece to keep it in place, as the half I removed holds it in place. This now allows the air filter to be exposed and the induction to be heard. Essentially, it mimics this following setup but without the ridiculous £200+ price tag:
I’ve gone for a drive and… oh my. The sound is beautiful, with no difference on light to medium throttle, but an outstanting roar on full throttle.
Now there’s three issues here. Firstly, the part that I removed keeps the whole airbox assembly attached to the car. Without it, the inner half that’s left is now bouncing around in the engine bay. Secondly, the airflow is now not as direct, and therefore not as effective. Third, the ECU is now exposed underneath the airbox, and I’ve now exposed the wires to any potential water coming in through the front of the vent.
My solution is to cut up the original box, but not to simply drill holes. I’m going to cut 90% off, keeping only the surrounding frame that the remaining box attaches to so that the filter is held in place, and the airbox assembly is secure by also keeping the bottom of the airbox that secure it to the car. That’ll also give the original protection to the ECU, and will essentially be the exact functionality of the red surround shown above. That doesn’t solve the air flow issue though, but that’s easily solved by using some air duct tubing to route the air directly into the filter.
For those who are thinking “But the engine bay temperatures are now affecting it as it’s open”, the impact here will be negligible. This part of the engine bay doesn’t get that hot at all; go for a run and put your hand by the air filter box, and that’s the air temperature getting fed into the air filter, and that’s only when idle. When the car is moving, cold air is still directly being fed into the filter as it was before, so there’s next to no negative impact here. In theory.
I’ll get cutting soon and will let you know how it goes. If it goes well, I’ll purchase some edging to neaten up the edges of my cuts, and will purchase a Pipercross foam filter to complete the job.
6 Likes
That is a VERY neat job indeed with those rear sensors, loving the attention to detail as always to get it just right - for example, i totally agree about having the beep coming from the dashboard. One thing that was equally surprising and awesome was that the rear bumper had the guides for cutting there and waiting for you!!
I like the idea with the airbox, never seen anything like this before as that’s all VERY different to the Mk1 - for mine, i have a JDM ARC Chamber (to increase air flow) going to a blitz induction kit that then has a heat shield to protect it from the heat soak from the ‘hot side’ of the engine. This set up gives a deep growl when pushing but also sounds quite subtle when pottering along.
1 Like
You might want to try your experiment by cutting up a another used one: https://www.ebay.co.uk/itm/MAZDA-MX5-MK3-MK3-5-MK3-75-AIRBOX-AIR-FILTER-HOUSING-BUSTING-FOR-SPARES-PARTS/284028262375?hash=item42216757e7%3Ag%3AYdkAAOSweVdfcxQ4&LH_ItemCondition=4
Drilling airboxes used to be quite popular on mk1’s 
1 Like
Appreciate the kind words, thank you. I’m very much one for having things at a factory finish. If someone says “I like what you’ve added there”, then it’s not good enough as it should be unnoticeable. The devil is in the detail!
I’d imagine yours sounds lovely. From simply removing the second half of the airbox, mine sounds fantastic already. With the edition of a foam filter, it’ll sound even better.
That’s the plan if it goes wrong. I can’t really see this going wrong, and currently the car hasn’t even got the second half of the airbox installed at the moment, so if it goes wrong and I want it back to standard I can purchase another then. No need to purchase anything if it’s successful, unless I want to put it back to standard in the future.
Just to further explain the airbox idea to everyone, here’s the part I’ve removed:
I’ll be cutting away the red bits, and will only keep the yellow highlighted area.
Basically, I’ll only keep the surround to ensure the air filter is locked in place, and the floor to protect the ECU. The rest will be open. I’ll run an air duct from the air inlet on the bumper straight to the filter, and will replace the filter with a pipercross foam replacement. This should give it the direct air that it had previously, better airflow thanks to the uprated filter, and a far better sound, all whilst retaining a somewhat factory look. Heat soak won’t be an issue due to the engine heat not effecting that area that much at all, and when moving the duct will push fresh air into the filter. After the edges are cut, I’ll simply apply some rubber edging to give the edges a nice neat look. It all sounds like it’ll go to plan, so I just have to wait and see. If all fails, these go cheap on ebay.
Also I was able to take a clearer photo of the sensors this morning when arriving at work. Last night was getting a little dark.
They work great!
4 Likes
Sounds really well thought out, will be very interested to see the results!
I’ve always had K&N panel filters in my cars but i’m sure they all do exactly the same job
I got round to cutting up the airbox, and it’s worked a charm. This is what I was running for the time being to judge the sound:

Here’s the cut-up box:

Installed:

As you can see from the edges, they’re a little sharp and not particularly straight.

Nevertheless, it’s done its job perfectly. The tray has been left at the bottom to protect the ECU, and I’ve left the top part so that it secures to the front of the car as it used to.
I’ve ordered some rubber edging that I’ll be installing around the rough edges to give a more finished look. I’ll of course be accomodating the slats in the plastic design by cuttting slits into the edging so that it has a tailored fit. Next up is to get the air duct and a pipercross filter, but there’s no immediate rush for either yet.
I took it for a spin, realised how beautiful it now sounds, and then I had a whoopsie.
The car gets taken for a good spirited drive on the open road from time to time, as you’d expect. The drive today was a quick one, and whilst exploiting the RWD nature of the car a little too much on a certain bend, I got it a little wrong and the throttle open for a bit longer than I should have. A bit too much oversteer and I had to correct. I did, usually a bit wobbly but fine, but I was a little too close to the curb when the front came back around and I hit it.

Luckily, that’s all the damage there is. I did hit the curb pretty hard, so there’s no doubt that it’ll need an alignment. There’s no obvious sign that it’s out, but I’d rather get it checked out. I went home with my tail between my legs and parked up for the day.
For those who may be raising an eyebrow, this wasn’t on a town road, nor was it with anyone else around. I drive very responsibly on my day to day driving, regardless of the car I’m in. I live in Wales so there are plenty of good roads around me to stretch the car’s legs safely with no one around as I’d never drive quickly or spiritedly in towns, busy roads or on motorways. I also certainly don’t race others. I simply enjoy the car for myself. But even so it can still go a little wrong, and it’s lucky it was just the wheel. It happens I suppose, we’ve all been there, it’s all a learning experience. That’s also what the track is for, which I’ll be going to sooner rather than later. Not because of this incident, but because I’ve found how fun this car can be and I’d like to explore what it can do a little further than on the public road.
Anyway. I’ve rubbed the area back and re-sprayed the damage.


It’s not perfect at all as the metal itself has created the lip that you see on the inside. I may get a dremel on that to flatten it off a little more, just to take the eye off it. I’ll be changing these wheels eventually and will keep them for track days, so I’m not too beat up about it.
I have a lot of plans for this car, cosmetically and performance wise. Cosmetics will be subtle and will remain with a ‘factory’ look. The idea behind the car is to build it to what the 991 GT3 is to the 991; a track focused ‘edition’ but to keep the daily driver vibe. I’ve been inspired by the ‘Club’ editions of the later NC models, and have mocked up a design.
This is how it is now:

And this is what I’m planning as a finished result:

Cosmetics changes:
- MSW 85 (made by OZ) 17x7 ET45 wheels
- Seat Cupra splitter
- Rear diffuser (not pictured)
- Door stripe
- NC2 rear lights
- Yellow accents (door logo, calipers, fog lights and seat belts will be the only accents)
- Side skirts (not too sold on these in the picture, may swap with NC2 skirts)
Performance changes:
- ST Suspension (made by KW) 30mm drop springs
- EBC Yellow Stuff pads and MTEC coated discs
- HEL braided brake lines
- Rear roll bar
- RX-8 anti-roll bars
- Pipercross foam filter
- Tubular exhaust manifold (with remap)
- Redline gearbox and differential oil
- Millers engine oil
- ATE 200 brake fluid
This is all ‘in the future’ stuff that I’ll slowly be implementing over the years, but it’s what I’ll be aiming for. The standard exhaust will remain as I don’t want it to be loud if I’m pottering around town. The manifold, filter and remap could allow gains of up to 180bhp (similar to BBR’s Super 180), which is all I’ll be aiming for. The list isn’t including things such as Xenon headlights, and other small bits and bobs.
Thought you’d all like to see what it could look like in the future. I’m quite excited from looking at it, so I need to start saving…
6 Likes
That’s a fine plan and looks good in your render.
I will enjoy seeing your project develop.
1 Like
Nice subtle render. But have you forgotten a chuffing great drift wing for the full GT3 look? 
That looks spot on i’d say, not over the top, yet looks very ‘purposeful’ … i like 
Really enjoyed this thread.
I nearly contacted you when your Boxster was for sale on boxa.net. but decided not to part with my NC.
Interesting to hear your views on the NC coming from the Boxster!
Much as I still fancy a Boxster I will stick with the NC I reckon