My headlights, 2007mx5 look like they need a clean inside, anyone done it or know how to get to the inside?
Are you sure it’s inside? As these are plastic lenses, they have a tendency to go a bit cloudy on the outside of the plastic lens unfortunately. Some folk open up the headlight unit and remove the orange plastic indicator shroud To achieve a cleaner appearance, replacing the indicator bulbs with the silver ones. If you really want to get inside the units themselves, you have to remove the entire bumper first, then only 4 (I think) bolts gets the headlight off after disconnecting the bulbs. You then need to place the headlight on a baking tray and pop it in the oven. This softens the mastic/adhesive that joins the lens to the main unit. They can be gently prised apart then, allowing you to work your magic. In the oven again to soften the adhesive once more and then clip the two halves back together. Everything then is the reverse of taking it all apart.
Taking the bumper off isn’t too bad to do. I’ve done it several times during the ownership of my 2007 car.
I once did a similar thing on my mk1 indicator/sidelight units and forgot about one of them! Let’s just say it was beyond redemption! Salvador Dali melting watch springs to mind
Good luck
Barrie
Many thanks Barrie, not going to attempt that!
To be honest, no, I am not sure, it just looks that way, but looking at u-tube videoes, American ones, they suggest using progressively finer wet and dry, starting at 400 grit, then 600, and finally 2000 to return the plastic to its original clarity, then sprayed with one of their proprietary products to retain the finish permanently.
Are bulb changes as problematic, as access looks difficult.
Sarnia
Ive recently purchased PlastRX from Halfords. Recommended to me by a friend. Yet to use it but heard good things.
No problem, unfortunately, unless you have the skills of a gynaecologist, bulb changing can be an issue. I have replaced all mine with brighter bulbs and managed to cut myself in the process several times. You need to take the relevant wheel off, after properly supporting the vehicle. Then pop off the arch liner along the front, you then have far better access to the rear of the headlights. There are work arounds, you can remove the washer bottle at offside front, giving better access and I think, loosening the main fuse box at near side front. I managed to do it without but severely restricted access and most of it by “feel”
Personally, I’d go somewhere like Halfords, buy the bulbs and let them fit them at a nominal charge, get the 10% OC discount too which might cancel out the fitting fee!
Barrie
I googled it, if it is as good as the blurb suggests then well worth trying, thank you.
I did a ‘quick reply’ which seems to have disappeared…
Halford sounds the way to go when required, can you tell me which bulbs you replaced and the sizes, I like headlights that show a good distance ahead when night driving.
Sarnia
Ignoring the change of bulb, which does not remove the cloudiness from the lense.
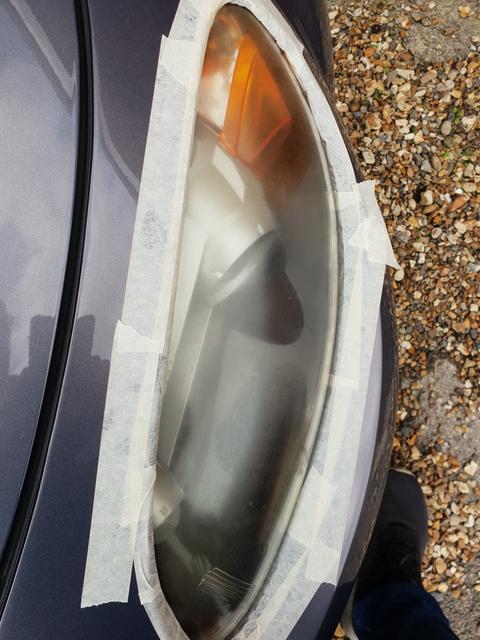
Mask around the light lense then polish with T Cut.
Plenty of elbow grease and small circular motions.
The haze will disappear from the lense.
Then apply a good wax coat on top to protect them.
This ^^
Hi again, the bulbs I purchased were from a company local to me that do automotive clamps, hoses, cleaning gear, all sorts really. The bulbs were all XENON performance bulbs by apbulbs.com blue lense, clear white beams.
H7 55w
H9 65w
TBH, not sure I’d fit these again? Whilst they are better than the ones they replaced, I’m sure there are far superior ones out there? EuroCarParts or their sister company carparts4less supply quite a few alternatives, or as said, Halfords and forget the hassle of fitting yourself. I really just wanted white light rather than the yellow “glow worms” that were in the car when I purchased
Barrie
I’m sure OP understands that replacing bulbs will not cure his discoloured lenses? It was a follow on regarding difficulty of changing bulbs as well as sorting the lenses out. Give the man some credence, please!
Barrie
Very honest advice, like yourself mine are not as bright as I would wish, will follow your suggestions when seeking replacements, the most attractive being the fitting by Halfords option, times was when I would have relished the challenge, and of course the 10% currently available.
And, thank you for your support, yes, I do appreciate the fact that replacement bulbs will not overcome discolored lenses as suggested elsewhere, which I am sure was made with helpful intentions.
Sarnia
I recently restored my lenses. It didn’t take long but really happy with the results. I used Meguiars PlastRX with a cordless drill and pad attachment and then some UV sealer and polish. Just take your time and give it a couple of goes.
Not sure how long they will stay this clear but it’s been about 6 weeks and still looks good.
My 5 before:
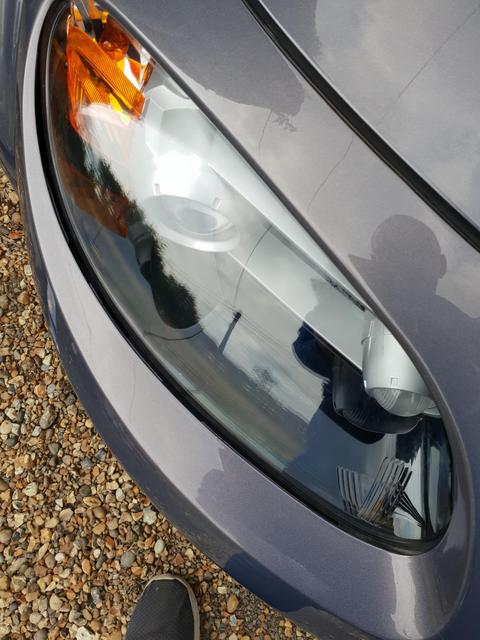
After:
[/quote]
[/quote]
They certainly look very good, photos look like showroom condition. A previous poster also suggested PlastRX although he is yet to use it.
I will now definitely buy a pack, thank you.
I thought I had lost this thread, it started in MX5 Chat but now moved here?
Thanks Sarnia. At least you understand when someone is trying to help.
Please do not misinterpret in your favour my tounge in cheek response to Barries reply to your post.
Barrie, along with others here, has been very helpful in reply to my enquiries for which I am most grateful, anyone who posts here I must give the benefit of the doubt to are doing so to be helpful, but are nevertheless, by venturing their opinions, rightly open to critiscism from others, if others feel justified so to do regarding the content of others posts, whether you feel it right or wrong is another matter.
If I can make it perfectly do not wish to become a focus for any possible ill feeling between other members here, but look to all for help as and I require it, and to play a useful part if the opportunity presents itself.
Sarnia
They certainly look very good, photos look like showroom condition. A previous poster also suggested PlastRX although he is yet to use it.
I will now definitely buy a pack, thank you.
[/quote]
Having given thought to the lens cleaning, I find, as others also have, it basically comes down to using a very fine abrasive material that will polish the lenses, and it is to that end that the recommended packs aspire to.
Having been some bodywork polishing (I recently purchased the car) and using T-cut suitable for the colour, why not try it on the lenses, as T-cut is a fine abrasive, so try the lenses.
I gently did a small area near the top corner, then cleaned it off and what a marked improvement, continued in the same way with more vigour on the whole area, wiped it off and bingo, a gleaming lense. I re-did the lens, using the body polish I used on the bodywork following the T-cut, I cannot say how delighted I am with the results, doing a small section at the beginning showed up just how opaque they had become. A final soapy wash to finish.
Sarnia
[/quote]
As I suggested in post #8 and was belittled in post #11