Hi ,Hope this is some help to anyone changing front suspension arms & balljoints.
This is a post detailing how I changed the upper front arms & balljoints on my Mk1 1.8is ,problems I encounted & how anyone can hopefully avoid a repeat.
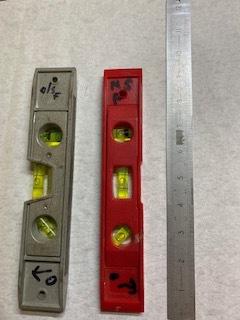
First jack the front of the car up on a flat level surface & place axle stands under car so that when the weight is on the axle stands the car is level (this was checked by putting a spirit level up against the front crossmember).This is very important as you will see when measuring both camber angles.
Remove front wheels & clean front face of the disc where the wheel touches so that you can place a small magnetic spirit level vertically against the face as this will allow you to see the camber angles of the car BEFORE you strip it down. By using a marker pen against the bubble you will show the current setting.
Clean lower wishbone mounting bolt positions (camber & caster bolts) & note them down or photograph them (better if you highlight them with some tipex or white paint with a fine brush.
(this means you can now put the bolts back in their original position when reassembled)
Follow instructions in manual to change components & reassemble.
I used aftermarket top arms (good well known make) & on reassembly it was found that the N/S was good but the O/S was out of alignment with the spirit level & could not be reset by moving the camber bolt.
Old arm was refitted & readings were correct showing problem was with new arm.
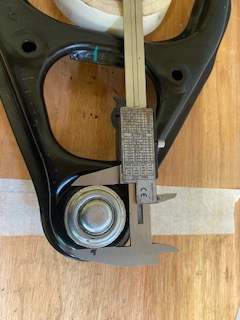
To prove arm was defective it was placed on a flat bench & up against the wall as seen in photos.
First measure the bottom of both ball joints on the machined surface as shown to make sure they are the same (see photo). Using a ruler or thin piece of wood up against the machined part of the balljoint & make a mark on bench I used a piece of masking tape stuck to the bench (Photo)
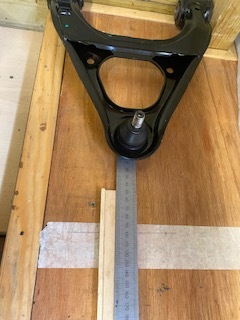
Swap the arms & check the measurement against the one you have just made.
Look at the photo & you will see 2 marks on the tape which show that their was a difference in length of the arm which was causing the problem with the camber angle.The arm was replaced with a genuine Mazda part & when it was rebuilt the spirit level marks lined up in their original positions.
Car was then sent for full alignment check to make sure all settings were correct as the above work is only a guide to achieve original setting.
Morale of this topic, measure arms before fitting !
Please let me know if the photos do not show & I will email them to you if its any help