My car was ok on level gound and could not be moved when the handbrake was on.
But, when I parked the car on an incline with the handbrake on, the brake wouldn’t hold the car from moving backwards, no matter how hard I pulled on the hand brake.
The brakes had only been adjusted recently, so I decided to start again, from the handbrake end and lubricate all linkages and cables, and to replace the rear callipers because I believe the adjusting mechanism was damaged or broken inside the calliper. The adjustment screw would not withdraw the pistons back into the calliper, which was a bit suspicious. (This was proved correct when I eventually removed them.)
The callipers were an exchange unit from MX5PARTS.
This is how I went about it.
I slackened the hand brake adjustment nut right off inside the car. 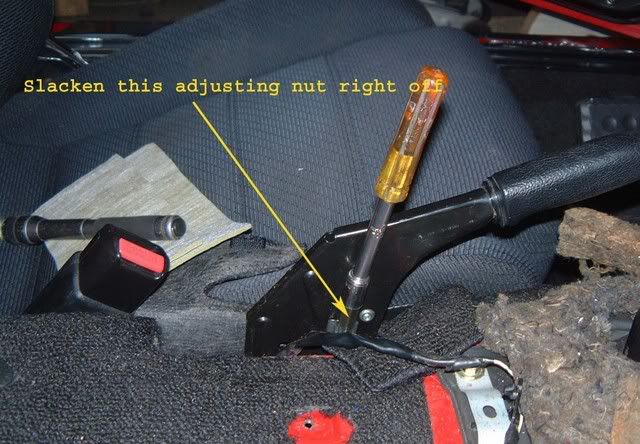
I jacked up the car onto two axles stands and removed both wheels in the normal way. Don’t forget to chock the front wheels.
Remove the plastic cover, shielding the petrol filter so it is easier to see where one of the handbrake cables run. This cover is held on with plastic screw buttons. 
The brake cables at the calliper end were removed next. 
The bolts holding the outer casing of the brake cable to the chassis, to the right and left were removed
The cable was removed from the other end under the car by unclipping the tensioner spring at one end and pulling the clips downward that hold the cable in place.
Disconnect the inner cable from the slotted round hole then it can be removed from the car. 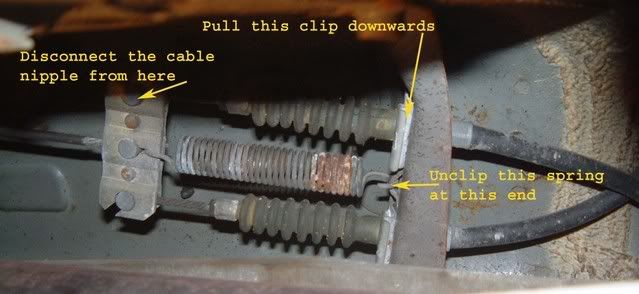
Note, I only removed one cable then lubricated it and refitted it before working on the second one. I think it is better to remove the nearside brake cable first. (Can’t remember why)
Care should be taken when pulling the cable and rubber dust shield through the hole in the bracket it was fastened to, so as not to damage the rubber dust shield.
Pull and fasten back out of the way the rubber dust shields on both ends of the cable so that the inner cable is exposed. 
I lightly fastened the outer cable into a vice and filled a hypodermic with transmission oil to be able too keep a check on how much oil was needed to lubricate each cable.
I stood an electric heater blower fan near to the cable to get it nice and warm, and then I warmed the oil in the hypodermic to make it easier to flow into the cable. I used an electric paint stripper for this but a good hair drier would do the job too if, your wife will let you borrow it.
Start with the end of the inner cable raised up and put as much oil into the cable as it will take, which isn’t much, then “puddle” the oil down the cable by lifting the inner cable up and down two or three times. Continue doing this ‘till the oil comes out the other end.
If the cable and oil is kept warm this should take about 15 minutes for the oil to seep out the other end. 
When this happens push the rubber seal, hand brake lever end, with the round nipple on, back onto its spigot then squeeze a drop more oil into the seal. Let the cable stand for a while, to cool down, with both ends up in the air in the shape of a U.
After it has cooled down it can be fitted back onto the car by fitting the hand brake lever end in first.
Grease the round nipple and the slotted hole it fits into, in the bracket, and also both sides of the clip that holds this end to the bracket. Put the round nipple into the slotted hole first, then insert the clip around the outer cable and into the bracket. 
The cable can now be refastened to the chassis with a greased bolt.
Note, on checking the rubber bellows on the calliper end of the cable I noticed it was split and even if you could get a replacement I don’t think it could have been fitted on without resorting to removing the nipple and re brazing it back on again.
I found that where it was split, it was attached to a brass hexagon ring that was pushed onto the outer cable spigot. I cut this off so it couldn’t foul the cable. A piece of bicycle inner tube 700 x 35 size is just the right size to push and be a snug fit over the existing bellows. If it is cut to a length that makes it a good fit between the adjustment nut and bracket, with the nipple end of the inner cable, it makes quite a good seal. I put some stainless wire around both ends so the tube is held in place on one brake only. This is just to see which is the better of the two methods. 

Repeat the above for the other cable, and remember to clip the spring back on to the bracket when the second cable has been refitted under the car.
Adjust the brakes as per the reconditioned callipers instructions. See copy of their Handbrake Calliper Fitting Procedure below. 
The tricky bit was getting the gap between the stop and the handbrake lever to be no more than 1mm, as shown in this picture with the calliper in a vice. 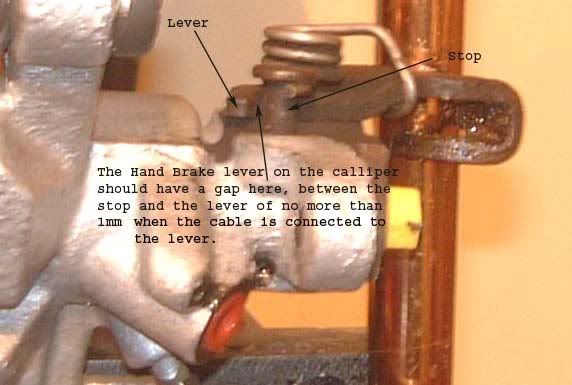
This is how I did it.
Lightly tighten the two nuts holding the outer cable to the bracket on the calliper.
Check to see that the compensator is still at right angles to the
front hand brake cable then look to see how much the gap is between the lever and the stop. A 1mm feeler gauge will give you some idea how large the gap is. If it is 1mm, that’s fine. If it isn’t you need pull the shield back along the outer cable, put a spanner onto the exposed hexagon shaped sleeve and adjust the nut on the end of the cable to it’s limit then tighten the other nut up to the bracket to hold the cable tightly. Now check to see if the gap has decreased, it should have, and to about 1mm.
Check both brakes like this. You will also see in the picture below the rubber shield made from the cycle inner tube. 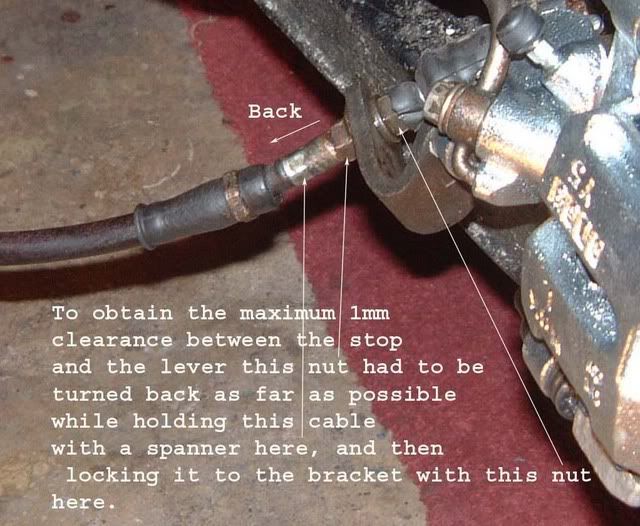
Last but not least, adjust the handbrake cable, in the car, so that at five clicks the hand brake locks the rear wheels.
Drive the car for a few miles and then stop and check that the rear wheels are not getting hot, they may be slightly warm, but if they are hot the brakes need to be readjusted.
On my test drive the wheels were cool but the handbrake took 8 clicks to hold the car on an incline so I had to re-adjust the hand brake in the car.
It might seem to be a difficult job to do but I would suggest that you jack up the car as high as is safe, to give yourself room to remove the cables while lying on your backs. I found that a small stool for sitting on while working on the callipers is more comfortable than kneeling and a torch and inspection light helps let you see better what you are doing.
MAKE SURE YOU HAVE BOTH FRONT WHEELS CHOCKED FRONT AND BACK.
_________________