Hard Top
Here are some instructions for the fitting operationIt is always difficult to improve a perfect design, so the MX-5 hard top has not changed since 1989 but it has been improved by little details. For example, in 1993 the heated rear window was introduced.
Hard Top Installation
The latest MX-5 hard top will fit to any MX-5 from 1989 to 2001. A new hard top (part no. NCY1-R1-81X98) comes just with black primer on the outside and can be sprayed in any color.
If your MX-5 has never had a hard top, you may require additional parts for installation. You need the two chromium plated rear deck bolts (2x NA01-R1-38XB), one right side latch striker (NA02-R1-361D), one left side latch striker (NA02-R1-371D) and the four TORX bolts (9944-10-820B) to hold them.
Now install the rear deck bolts. Use a drop of Loctite to secure the bolt and make sure. The o-ring will seal against water leaking into the boot.


Next you will have to install the side latch striker. For this you will need a T-40 TORX tool.

A new hard top comes with two black quarter trim panels with the necessary cut-out. If these are not available or if you have interior trim in tan colour you can make the cut-out yourself with a little fret saw following the line on the rear of the quarter trim panel.

Install the side latch striker temporarily but do not tighten the TORX bolts.
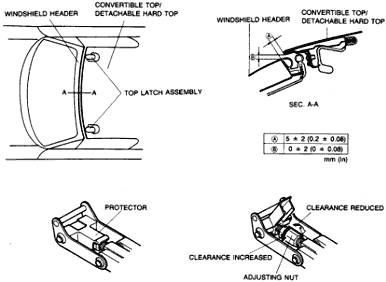
With the aid of an assistant lift the hard top into place and slide the rear latches over the deck bolts. Push the hard top forward in windscreen direction and check the clearance between windscreen frame and hard top.
If the clearance at A is more than 9 mm, do not adjust the front top latches!!
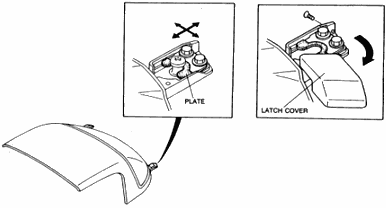
First start with rear latch plates. Open the latch cover and loosen the two bolts that fix the chrome rear deck bolt with a plate.

P7
With the plate still loose, adjust the front top latch assembly as shown:
P8
With the front top latch assembly properly adjusted and still closed, you can proceed with the adjustment of the rear deck latch:
Push the plate forward against the chromium deck bolt and then tighten the bolts that fix the plate.

Close and secure the rear deck latch cover.
The Side latch adjustment is the last step.
Try to close the side latch assembly. If too much tension is applied, loosen the adjusting nut accordingly. The side latch striker plates should always be loose when you close the side latches for the first time. When closed, they will settle in the right position and you can tighten

Hard Top Storage
To prevent damage or scratches to the hard top when not in use, Mazda offers two different storage possibilities.
Hard Top Stand
A hard top stand (3600-77-614) safely holds the hard top in vertical position. Its rolls will allow moving it around. When not in use you can fold it away.
A dust cover to protect the hard top is included.

Hard Top Wall Bracket
A pair of wall brackets (4100-77-099) safely holds the hard top on the wall at its rear deck latches.
This item is especially room saving and recommended for the use in a standard garage with limited space.
