How to make your own Radiator Grill
<?xml:namespace prefix = o ns = “urn:schemas-microsoft-com:office:office” /><o:p></o:p>
To make your own grill you will need the following tools and bits and pieces.
A piece of aluminium the width and length of the mouth in the front bumper, 720mm x 130mm x 2.5 mm thick. (Too thin and it will be difficult to work with) Obtainable from any one who works with aluminium sheet, eg Caravan repairers, or horsebox and cattle trailer manufactures.
It should cost about £5.00 (try to get your supplier to sell you a piece without any or very few light scratches on it.)
An electric drill and drill bits 6mm and 2mm, 2” wide masking tape, a jig saw preferably with a saw blade for cutting aluminium, two 6mm x 50mm long hexagon headed bolts, two 6mm a 25mm hex bolts, two dozen 6mm washers, two 6mm dome headed nuts, Two pieces of 20mm x 50mm x 6mm aluminium or steel would do, a 6mm tap and wrench.
The drawing below will give you an idea of the shape of the grill for Mk1 cars and possibly for Mk2 cars too.

<o:p></o:p>
If you use the drawing for the two fixing brackets it would be a good idea to make these first, as they will determine the position of the grill. Mine is set quite a bit foreword of the original grill.

<o:p></o:p>
Initially it would be advisable to cut the grill outline shape from a piece of stiff card to make sure that it matches the mouth of your car. This can then be fitted onto the bolts attached to the two brackets. Make sure that the outside edge is clear of the mouth by about 4mm all the way round so that if it vibrates it will not scratch the paintwork of the mouth.
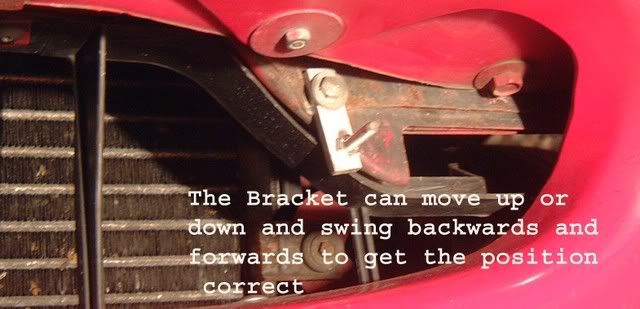
The above picture shows where the grill bolts and brackets fit. The lower bolt head may need grinding back a little to give just enough adjustment of the bracket to fit the two holes in the grill, as shown in the grill drawing. The bracket is fastened to the car using the existing tapped holes that were used to fasten an original grill to.
<o:p></o:p>
If you are satisfied with your card template you could use this to transfer the shape to the aluminium sheet. Before you do this, cover the best face of the aluminium with strips of the masking tape so that it is covered all over. Now you can transfer the shape onto the masking tape with a pencil. The two most important holes to drill are the two holes that are used to fit over the two bolts on the two brackets. These two holes want to be about 7mm dia, just enough to give a small amount of clearance for the 6mm bolts.
The next thing to do is to draw your design onto the central part of the grill. When you have done this you will then have to mark on horizontal pencil lines where all the holes are to be drilled that will allow air thro’ to your radiator. The holes I drilled were 6mm dia. and spaced at 11mm x 11mm horizontally and vertically. Try to make the lines of holes balanced on either side of your design and also above and below it. (Take a look at my grill to see what I mean.)
<o:p></o:p>
When all the above is done you then have to cut the design out with the jig saw and drill all the holes carefully. I found that using a new 2mm, gold coloured, drill it was quite easy, if using a drill stand, to just mark the centre of the holes sufficiently to act as a guide for the larger diameter drill. If you don’t mark the centre this way then you will need mark the centres with a small centre punch. You will also find that you should file the burred edge on the back of the grill where you have drilled the holes.
If you can, chamfer all the holes as it makes the grill look better.
The final cut is to cut the outside shape of the grill.
Then it is a case of filing and making smooth all sharp edges with files and P500 wet & dry papers.
When all this is completed remove all the masking tape, and check that the grill fits your brackets etc and doesn’t catch the paintwork.
If the front of the grill is not scratched at all you can use any aluminium polish to get a good finish on it.
If it is scratched you will need to use P1000 and P1500 wet & dry paper wrapped around a joiners cork-sanding block to improve the finish.
Finally, DO MAKE SURE THAT YOU TEST DRIVE YOUR ENGINE WITH A NEW GRILL TO MAKE SURE YOU ARE GETTING ENOUGH AIR TO THE RADIATOR SO AS NOT TO OVERHEAT YOUR ENGINE . A LOT WILL DEPEND ON THE SIZE OF THE CUT OUT LOGO.>
This is one of many pictures of grills I have posted on the forums.


