As there seem to be a lot of questions and interest in rust, sills and water sloshing about with MX-5’s I thought I would take some pictures and write a small guide as I sorted mine today. Thanks to everyone who offered advice with mine.
The whole process was only about a mornings work (3 hours inc tea breaks) but was spread over 2 separate days to allow the carpet area to dry out.
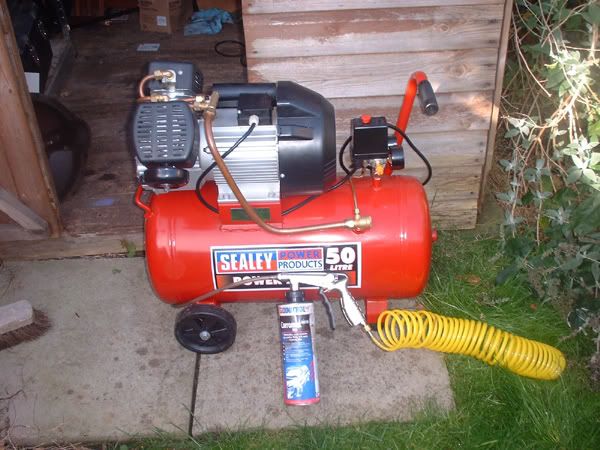
Here is the equipment I used- a compressor, 2 litres of Dinitrol 3125 and the appropriate spray attachment.
I use Dinitrol as it is the best available rust proofing treatment. Waxoyl is fine but has been superseded by Dinitrol really.
Use a compressor- borrow or rent if you have to! The hand pump style you get with Waxoyl treatments are not really worth it. A proper compressor will be quick, easy and also do the job 10 times better.
The Dinitrol and attachment are available at www.frost.co.uk but you can get a cheaper attachment from Machinemart.
Also you need a socket set 8-12mm, screwdrivers and possibly a Torx bit.
First I removed the seats and pulled up the carpet. To remove the whole carpet requires removing the center console- I didn’t bother as I could get to what is needed without doing this. My interior floor is in excellent condition- I feared it may need treatment after being so wet but it is fine.
Seats are attached buy 4 bolts- Move the seat back as far as possible to reveal the first 2 and then forward as far as possible to reveal the other 2. These bolts round very easily- take care!
Carpet is fixed on each sill with about 5 screws.
After peeling back the carpet on both sides I left a dehumidifier in the car to dry it all out. If water has been sloshing around you will need to do the same or, if possible, leave the car running with the heater on for a few hours. The carpet and soundproofing hold a LOT of water.
Next I removed the quarter trim around the seatbelt towers. This is held by 2 10mm bolts, 2 Torx bolts and a plastic clip. The Enthusiasts manual is very detailed on how to remove this section but it is straightforward once you see it.
Then I separated the front wings from the sill- 2 10mm bolts here: 
And then 2 8mm bolts that fix the wheel arch liner. The bottom part of the wing can then be (gently) bent away from the sill.
Inside will be enough dirt to fill a window box. I cleared mine with a wire brush then sprayed with water, then sprayed Dinitrol behind it, covering the wing and the sill. This is an awful dirt and water trap and I will be clearing mine every 6 months.
Then I moved onto the sills. I covered the newly cleared drain holes with tape first to stop the Dinitrol leaking out- remember to remove the tape and reclear the holes after!
It is easy to treat the sills as there are so many access holes, some covered by rubber bungs: 

Just poke the nozzle through each access hole and spray away until you feel the whole sill is covered: 
Once you finish the length of the sill you can reach the rear area by this hole you uncovered when you removed the seat belt tower trim: 
Spray lots through here, again making sure the whole area is covered.
Then repeat with the other side. Refitting is the opposite of removal as it says in Haynes manuals.
Then I sprayed Dinitrol into the box sections that run along the length of the car- these are reachable without jacking the car up and again have lots of access holes.
There are other areas- the doors, access holes when the hood is removed- that I will be doing next week. I will also be painting on POR15 onto the wheel arches and floorpan next week.
Like I said this was about a mornings work, with another morning next week to do the arches, floor and doors. The hood area can be left until you are removing the hood anyway and also behind lights and other fittings if they are removed.
That’s it! I used slightly over 1 litre of Dinitrol and the whole thing was straightforward and easy. Mazda have created 2 horrendous traps at the bottom of the front wings and also included very poor drainage for the sills. On the plus side access to all areas is very good and the metal, paint and original underseal all seems to have lasted extremely well.