So repaired my heater hose problem and looking forward to using the car again when the charging light stays on …… sometimes!
Car starts and runs ok, sometimes light goes out but other times it stays on although not as bright as at ignition on. When off car charges (voltmeter fitted) when on no charge, so an intermittent fault.
My guess is something in the alternator electronics is failing, which means a new one, what are peoples thoughts and do I go for a s/hand or aftermarket unit as obviously OEM will be more than the car is worth. I suspect the latter for peace of mind.
There isn’t much else in the charging system is there and given that it works sometimes, or am I missing the obvious here? Anyway it’s going dark and started raining so I have given up for the day.
Rhino is probably right, but it would do no harm to check all the connections. Battery connections, make sure they are clean an tight. Battery earth and the earth strap at the back of the PPF frame. Engine earth connections and obviously the connections to the alternator. Was everything working okay before you repaired the heater hose problem, if so could you have disturbed something? How many miles has your car done? These alternators seem good for over 100000 miles at least. Maybe a build up of carbon dust ( from the brushes ) give the alternator a blast with an air line? Just my thoughts. Good luck. Dave.
And always check for damp in the passenger footwell by the ECU !! I think your models charge is controlled by the ECU.
Thanks Rob/Combemartin, never taken an alternator apart, the MG Midget had a dynamo.
Hadn’t thought of it being a brush problem, to be honest I was not aware that they had brushes, dynamos yes.
Have consulted the Mazda W/shop manual and they helpfully give the brush details ie min length but no indication of how they are removed/swopped.
Need to search uTube for a tutorial.
Don’t see how I have disturbed anything with hose problem as wrong side of car and all was well before so I suspect coincidence. Out tomorrow but I will explore in more detail next dry day and check all connections etc before removing the alternator.
As usual I will report on progress.
Just a thought if these things come in threes, what’s next?
I seem to remember reading in the Rodders manual that he was able to strip the alternator down but could find no way of holding the new brushes back so the rotor could be put back in. Don’t have the manual to hand so might have dreamt that. Maybe a local firm could refurbish. I know of a place in Barnstaple that does this sort of stuff.
Very interesting, I will follow your progress with bated breath??
I’d still check the connections and for damp in the footwell though.
Good luck and keep us updated.
D
Hi Dave, another thought.
I see from your previous thread that you have just replaced the two heater hoses at the back of the engine. The main engine earth is under these two hoses. You can see the end that bolts to the engine bay just below the right hand hose and the air con pipe. Could you have damaged/disturbed this earth while replacing the two hoses? Looking at the pictures in your other thread that earth looks pretty corroded.
On another note, looking at the picture you posted with the two hoses removed, do you know what the pipe ( or is it a cable ) that is held in place by a bracket under the two pipes is? It just seems to end at the bracket. I seem to remember my car has that bracket but nothing attached to it.
Oh, and another quick thought, I assume you have checked the alternator drive belt tension.
Good luck.
D
Just dismantled a Mitsubishi alternator. Not the same as your A2T80391 but a very similar designed A5T03777 with the same regulator and brushes.
I would advise to make certain that the alternator is the problem before removal and dismantling as a reasonably involved job that will take time and require some specialist tools.
In brief…
undo top pulley nut(24mm) preferably with an impact wrench/nut runner. You will need to grip pulley when doing this. Remove top nut and pulley.
Carefully undo 4 x 8mm long bolts that hold case halves together. These are normally easy to remove on the Mitsubishi alternators but use a penetrating fluid if you consider it necessary.
Tap off top half of casing. I use a hide mallet and tap the top case half wings to clear it from the central steel field coil frame. Remove top case half and steel spacer that sits below it.
Remove armature. I found this quite difficult because the bottom bearing attached to armature securely held in the bottom case half. Had to put a ring spanner on the shaft, refit the 24mm nut and clout a few times to get the bottom bearing to let go.
Take plastic cap off main pole side extension and undo 10mm fixing nut. Gently lever the side extenstion off and try to keep it square to avoid damage.
Undo three philips head securing screws that hold regulator and rectifier to bottom case half. I left these soaking in plusgas overnight. The harder one to get at on the rectifier luckily came loose with my snap-on ratchet screwdriver but the other two holding the regulator needed persuading with a hammer operated impact driver.
Tap bottom case off the central steel field coil frame. Gentle taps to protruding aluminium bits worked for me.
As my alternator is overcharging will probably try a combined brush/regulator unit for about £20. Not really worth it for me but its a bit of fun and saves the part.
Regulator is soldered to rectifier. Took quite a while to soften up solder to remove the two legs.
As you can see in photos below various bits covering the brush ends on the regulator - soft plastic cap and rubber insulation. Brushes are soldered on at the back and can be removed/desoldered easily. They are shown in the second photo - 8mm x 5mm. These were servicable at min 12mm long, but only just. This proves the point that even the very reliable Mitsubishi alternator will wear out brushes. A new set apparently measures 21.5mm to same point. As you have found easy to install and you can use a piece of wire to hold back when re-installing the armature.
If you need help to find brushes let me know and I will add a link.
[quote=Combemartian]
Hi Dave, another thought. I see from your previous thread that you have just replaced the two heater hoses at the back of the engine. The main engine earth is under these two hoses. You can see the end that bolts to the engine bay just below the right hand hose and the air con pipe. Could you have damaged/disturbed this earth while replacing the two hoses? Looking at the pictures in your other thread that earth looks pretty corroded. On another note, looking at the picture you posted with the two hoses removed, do you know what the pipe ( or is it a cable ) that is held in place by a bracket under the two pipes is? It just seems to end at the bracket. I seem to remember my car has that bracket but nothing attached to it. Oh, and another quick thought, I assume you have checked the alternator drive belt tension. Good luck. D
[/quote]
Hi Combermartian,
As far as I am aware nothing was disturbed with the earth strap, but I take your point it looks a little crusty and would benefit from a clean up.
The hose is the top end of the flexible clutch pipe to the slave cylinder which I replaced a couple of years ago. I took the opportunity to fit a s/steel flexi pipe and as it was another winter job left the existing pipework across the bulkhead in place. With the heater pipes out it was easy to remove the redundant rigid pipework.
Has yours got a similar set up or is it an automatic?
The belts were replaced last year and although there is a slight squeak on startup it soon goes, I will check these as well.
[quote=Combemartian]
Hi Dave, another thought. I see from your previous thread that you have just replaced the two heater hoses at the back of the engine. The main engine earth is under these two hoses.
Hi Combermartian,
As far as I am aware nothing was disturbed with the earth strap, but I take your point it looks a little crusty and would benefit from a clean up.
[/quote]
They are braided wires and if crusty they break down and resistance builds up - especially when wet - I would replace it and any that were similar with insulated cable/lugs
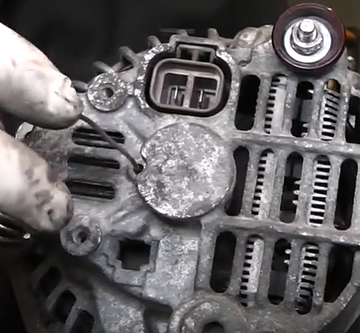
Braved the cold and had a look at the situation today, as suspected it is impossible to determine what type of alternator is fitted due to very tight access, very little light and a coating of crud.
The only way forward that I can see is to take the alternator off and look for identification marks which I am sure are there, then strip it down and replace the brushes. (found some on eBay)
Now in an ideal world with a centrally heated garage this would not be a problem, but the reality of working on the drive, on the north side of the house is not an appealing thought.
Added to this I have started the car on numerous occasions since and the light has gone out each time. Now I am not for one moment thinking that the fault is fixed but the old adage ‘if it ain’t broke don’t fix it’ keeps crossing my mind.
So a decision has been made, leave well alone for the moment bur restrict outings to short hops so that if and when it finally packs up I can limp home on the battery, then take it all apart when the weather is kinder.
Thanks all for your thoughts and help, if I was 40 years younger and this was my only car I would be out there now, but I am not and it isn’t so it will have to wait.
Will update when I know more, but don’t hold your breath.
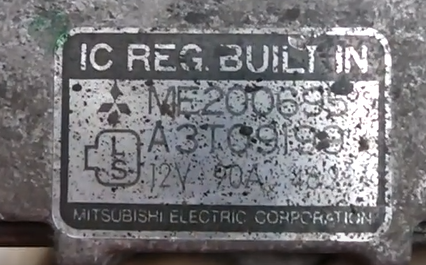
There is an identifying label on the bottom aluminium casing near the main pole. Try and find that to be sure it is a Mitsubishi A2T80391 as expected. All Mitsubishi MK1 original spec alternators have their identifying label in the same place. Check out pictures of clean examples for location.
Check out item number 223610634963 on ebay if you actually need brushes and get the alternator apart without issue.
I would also cover your bases by locating a potential replacement alternator if this all goes pear shaped.
The one I mentioned earlier would do as 65A as required and just needs the correct pulley fitting.
As mentioned it has an overcharging issue and needs a new regulator. This means I need to buy and fit + test on my car before I let loose on anyone let alone a valued forum member
I know exactly what you mean as sorn my MX5 typically December to March/April. Do more or less the same with the motorbike.
I did do cambelt/waterpump, seals, hoses, etc this time last year but generally no work on car and no driving unless pleasant ambient conditions. These things are meant to be enjoyed in my humble, especially if other vehicle available.
Take your time but please check out that Mitsubishi label for peace of mind as these are easy to work on and in my opinion well worth the effort. If its a replacement aftermarket alternator My advice will be different.
The alternator on my NB started to fail but as the red warning light went out at about 2000 rpm I thought it was still charging. I was wrong and came to a halt after the lights started getting dimmer. I would therefore not in your case rely on the red light going out to indicate the alternator is still ok. It probably was the brushes but I got a new alternator that had been made by ASP in Poland for £104 as I damaged the original one in removing the lower mounting bolt.
I know the NA alternator is different and if you can get it apart it is well worth trying to repair it.
The MK2 OE Hitachi alternators are completely different to the MK1 Mitsubishi.
The MK2 70 amp LR170 and MK2.5 80 amp LR180 seem to attract moisture, corrosion and problems. I have now stopped refurbing these as too many thrown away. Just selling off the last of my parts.
Buying a good aftermarket new alternator is probably the best way forward now. These MK2 alternators still have the regulator on the alternator but controlled by the ecu. MK1 alternators have a different configuration and alternator controls its regulation.