Mk1 rain rail replacement.

It would appear that I have a leak around the rear window.

The hood was replaced a couple of years ago but upon examination it would appear that the existing rain rail was reused along with a lot of plastic and sticky tape.

Having looked at the cost of a new replacement I decided to go for a more robust second hand version from a later model, DP of Milton Keynes supplied an almost new one for a very reasonable £30 inc p&p. Now begins the fun part as I have to complete the job within the day as the car lives outside, so before I start a few questions:

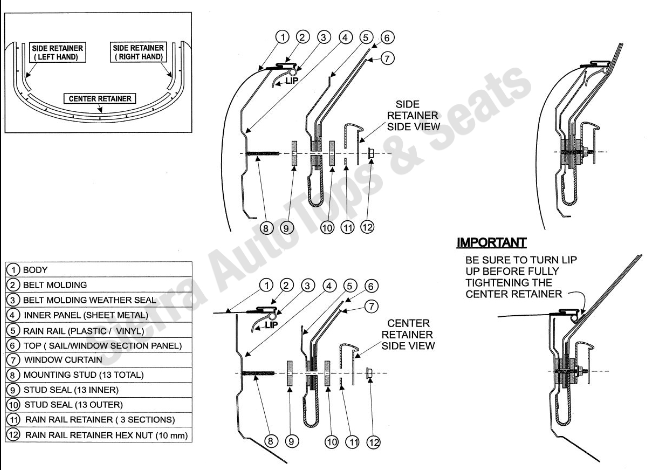
What else do I need? From a drawing I have downloaded it would appear that there are silicon washers two for each stud, what size are these?

Do I need some silicon sealant as well?

The drawing shows a lip seal under the belt line that has to be positioned correctly, not sure if this is present.

What is the window curtain No 7?

And finally does anyone have or know where to find a decent set of fitting instructions. 

As usual thank in anticipation of your help 


Rod Grainger’s Workshop Manual for the Mk1 has a reasonable couple of pages on removing and replacing the rain rail. I can

happily scan these for you if you let me have your email address in a private message.

EG


Thanks EG that’s the problem with this information technology world we live in, I looked everywhere on line and completely forgot that I also owned this excellent book. Although RG’s book makes no mention of the washers or ensuring the correct location of the belt line lip. It is at least a start and I suspect that I will learn more as I remove the old rail, many thanks once again.

I think that diagram is making it seem more confusing that necessary, it really isn’t too hard to do if you’re just swapping the rain rail over.

The best way to describe what the rain rail does is like a gutter that runs round the back of the cabin and the hood is sandwiched in the middle of the ‘gutter’.

Here’s a few photos of mine when I replaced the rain rail, like you with one from a later car.

Hopefully it’ll give you an idea how it’s fitted.

First thing I did was to thoroughly clean the new rain rail out as there will be a load of gunk in the rail. You need it totally clean as you’ll be sealing some holes with tape and if it’s not spotless the tape won’t stick. The holes you need to seal up are where the rain rail was originally riveted to the hood by Mazda at the factory when the car was assembled, it was just to make it easier to fit the hood on the production line and isn’t necessary so the holes need to be sealed off. Aluminium tape is good, I used some white tape I had to hand, the holes can be seen in some of the photos.

On the car, lower the hood and remove the cap above the door seal behind the door (b-pillar), it’s held on by a phillips screw and one of the tenax screws for a tonneau cover. It’s this part.

http://www.mx5parts.co.uk/beltline-cover-mazda-mk1-p-1203.html

Unclip the hood clasps as if you were about to lower the hood but leave it up, it’s so the hood isn’t under tension. 

Inside the car remove the parcel shelf carpet (several plastic clips round the back edge, 4 or 5 along the front, and the round hood stops either side secured with a phillips screw), followed by the 3 hood retaining bars at the back of the hood (13 x 10mm headed nuts). The hood can then be pulled carefully out of the rain rail and off the studs.

The only thing holding the rain rails in is a plastic clip down below where the cap was on the b-pillar, it goes through the metal lower part of this cap.

http://www.mx5parts.co.uk/beltline-mk1-25-p-1202.html

Once removed the rain rail can be pulled out, the new one put in and everything put back as it was. There is a certain order you have tighten the retaining bars at the base of the hood but I can’t find the diagram it’s on at the moment.

You do have to flex the new rain rail a bit to get it in place but once in it’ll slot into place with no problem. Make sure you tuck the rear edge of the rain rail under the belt line moulding that goes round the cabin.

I’ve probably forgotten something but hopefully it’s give an idea, hope it makes sense it’s about a year since I did mine last and I’ve been up 18 hours as I write this so my brain is frazzled.

Martin.
Good description above, some more here if it works.


http://www.miata.net/garage/MiataTop2/index.html#removal_2

Thanks guys the photos give me a good idea of what’s involved, just need to order some washers and await a fine day.

I found I didn’t need washers, used silicone seal. Just place a blob around the base of each stud protruding and a blob over once you have it all back together on each stud before you clamp it back together with the plates and retaining nuts.

Worked for me TBH I don’t think mine had the washers if I remember and it was the original hood as it was riveted on too. Completely watertight after the repair of the rain rail as described above. I used a strong clear plastic tape from a camping/caravan shop, gorilla tape is good too if repairing a rain rail.

Plumbers washers (thats all these are) are an aftermarket “innovation”. They’re just foam washers, to enable aftermarket rainrails and old rainrails with enlarged holes, not to leak.


Probably more important to following the tightening sequence shown on miata.net.