PRHT deck seal leak

Hi all

I have a 2013 PRHT mx5

I have a leak in the boot, coming from the back of the boot (toward the cabin) near the strut towers

It’s originating from the PRHT deck seal , I’ve had a look online and noticed the PRHT seal is bonded on

How do I remove it - is it a pull and hope job or has anyone done it that can guide ? :joy:

Thanks!!

I wouldn’t remove the deck seal unless it was visibly damaged. Looks like the aerial is visible in that picture, have you investigated any leakage around there, more likely?
Give all the seals a clean and treat with a rubber solution, it has worked for me on an MX-5 but that was on soft top rubber seals.

It’s not the aerial, as it leaks both sides (both where the strut towers are) water pools around the strut tower and leaks down from there into the boot. The aerials at the front of the boot this is at the very rear and again- both sides

Further to that, I’ve got water trail evidence coming down from where the coat hanger test was.

Theres a chap in America who’s had exactly the same thing , the deck seal never looks damage on the top because that’s not the issue, the factory bonding that bonds the deck seal on perishes, water leaks under that then slowly down this is why you cannot replicate it with a hose test and it’ll leak maybe a day or 2 after rain.

It’s 100% the deck seal

This explains it probably better than I have but exactly the same

Probably try cleaning all the rubber seals then, I spy a mucky seal which could have had some water build up in the past, maybe a leak passing in there.
The only other entry point could be the harness that passes through from inside the boot to the boot lid.

I cleaned all the seals after the photos :joy:

I need to remove that deck seal for a new one and bond it on with that 3m job - that’s what seems to be the issue I’m just unsure how’s best to remove the seal

Well if you’re 100% sure it’s the seal bonding, how about warming the seal with a hairdrier and then using dental floss?

I’ll give that a go, I’m buying a new seal so not overly fussed how it comes off per say

Hi, did you manage to resolve your issue with the deck seal? I think I may have the same problem also on a 2013 PRHT. I found that the seal will pull off quite easily but I’m not sure what sort of mastic or sealant to use when refitting or replacing it.

Hello, another PRHT owner here (2008) with the same issue (boot leak, water coming in near strut towers).

Did renewing the deck seal fix the issue, and any tips on removal and replacement? The seal is currently out of stock on MX-5 Parts, and I was thinking on removing, cleaning and resealing as a first step before buying a new one.

Thanks!

This is exactly what I did a few days ago.
Can’t say if it’s fixed yet, because it hasn’t rained much lately.

The seal is made up of 3 parts; the long narrow part and the 2 end parts on either side by the doors.

I can post some photos later if you need.

You start by detaching the 2 end parts from the body. :warning: Caution: there are 2 tiny (light green coloured) micro-switches residing under the two end parts.

1- Pull out the 2 rubber grommets securing the two end parts, which are where the doors shut.
2- Pull out the white plastic clips which are on the inner side of those 2 end parts.
3- Just lift off the long part.

The end parts are glued to the long part and will probably separate, which is best anyway when when you get to cleaning them.
I used some black silicone afterwards and placed some tissue, wedge between the doors and the end parts, to make sure it stayed in place until the silicone dried.

4- Clean out the old sealant from the seal and from the car body, clean out the end parts and let everything dry properly, (I used a hairdryer to help with the drying).

5- Apply new sealant to the seal.

Reinstall everything…

That’s great insight, thank you! I was planning to have a go this weekend.

My main concern is damaging the seal on removal, leaving me a bit stuck (MX-5 Parts say new seal not available for another 6 weeks or so).

If you’d be happy to share pics that would be great :+1:

The long seal is just wedged on the body and I believe there is possibly a wire that runs inside it (giving it strength), so it wont be damaged just by pulling it off the car.

My first reply was a bit rushed; so here goes a better one:

Starting off, with trying to explain why & how this leak occurs.
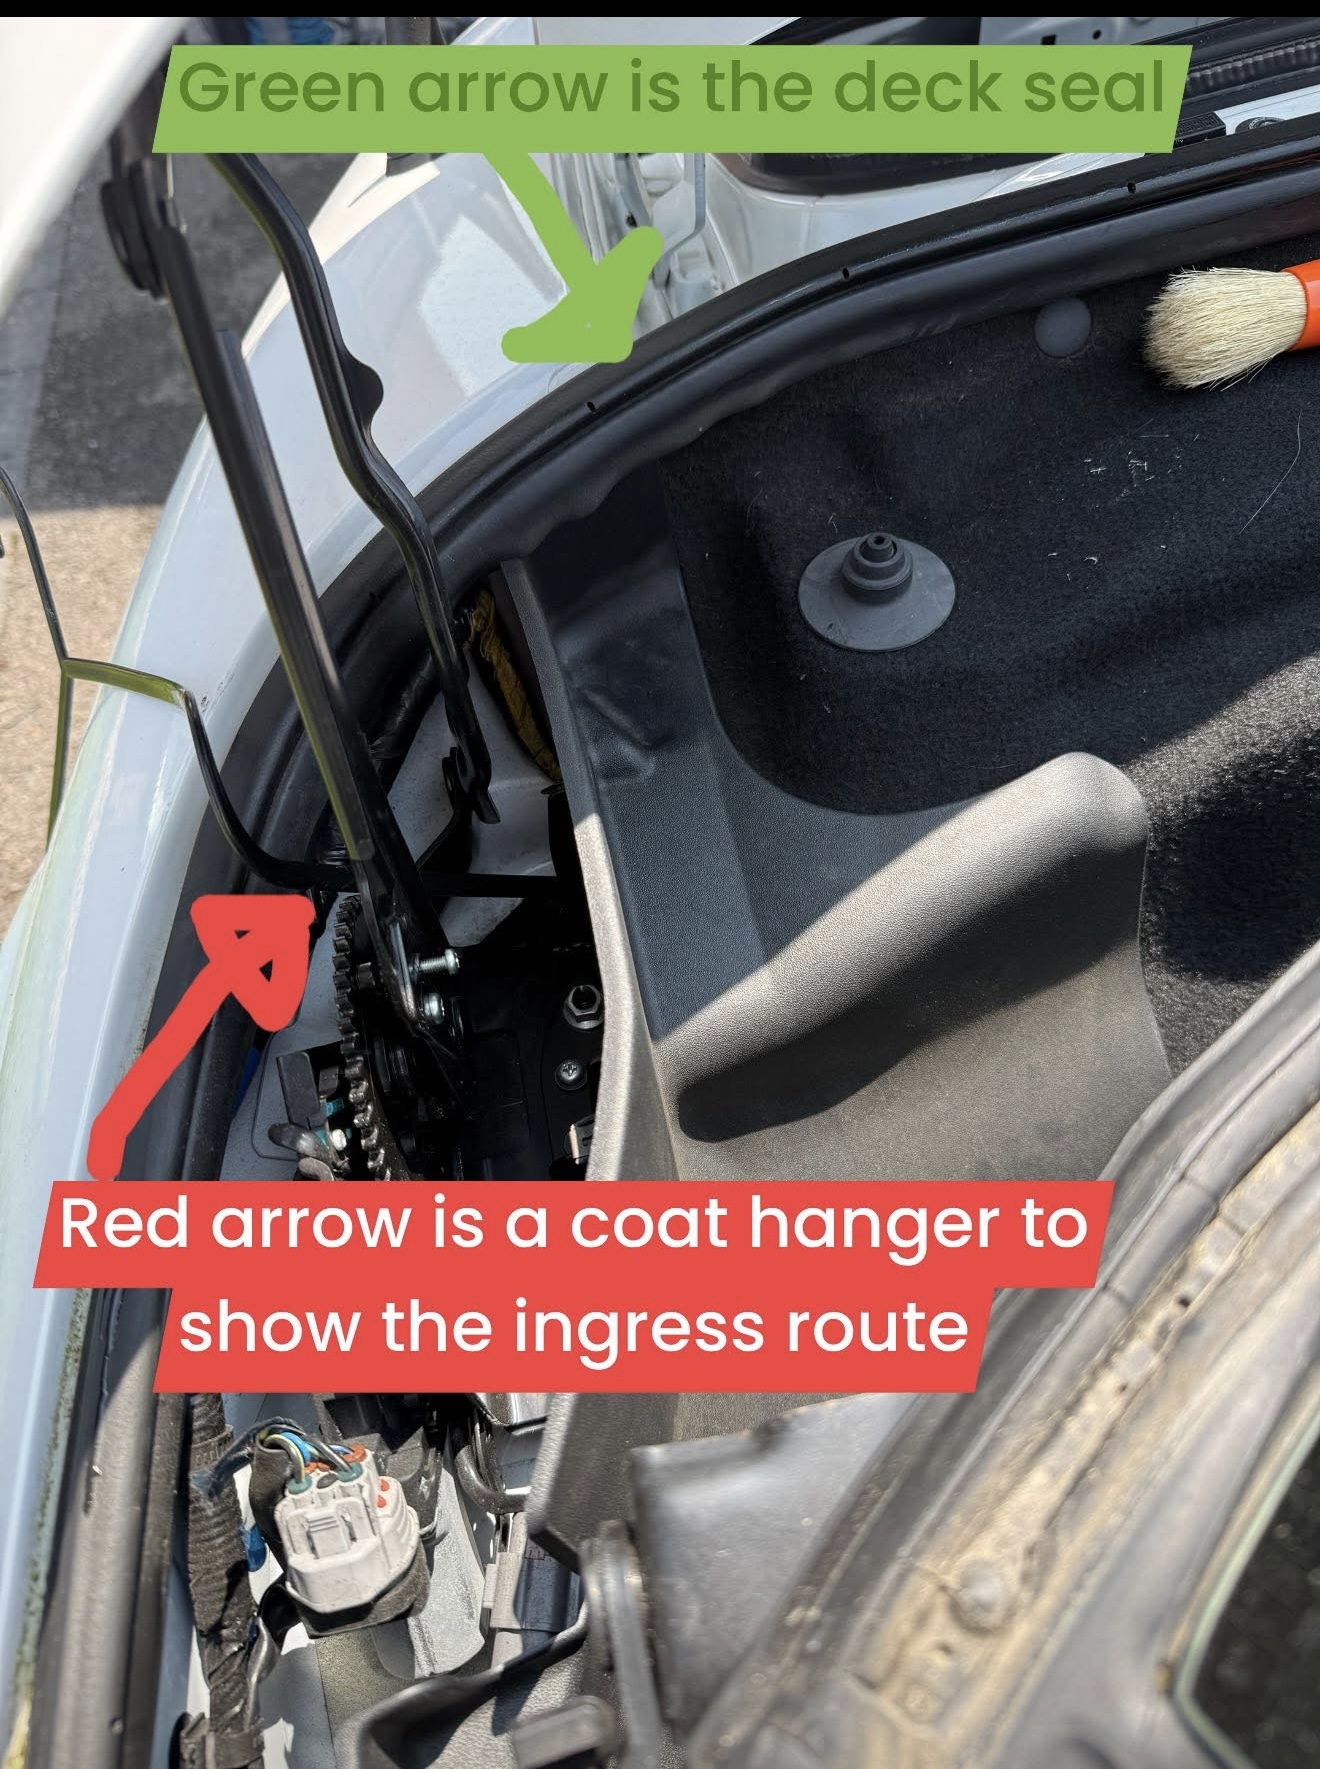
The PRHT deck seals, appear to come from factory with some sealant in them, which over time will dry up and under certain conditions, water will pass under the seal and eventually into the boot.
I say certain conditions, because this seems to happen more often to those of us that park our cars on a slope, when the cars are facing up-hill. This means that water collects over the seal instead of draining out the normal way, which is by the doors.

Here’s a photo of my car parked on my driveway. Because it’s on a slope, the back end is lower than the front, so water just sits there until it finds its way under the seal:

Tools & materials needed:
You’ll need some sealant for the seal, (I got some Dowsil DC785+ White Sanitary Silicone Sealant from Toolstation) and some black silicone/gasket maker, etc to join the end parts to the deck seal. A thin brush is useful for cleaning the groove in the seal. A blunt, small flathead screwdriver may help too, but be careful not to damage the seal. A long-nose pliers will be useful, as will some rags to clean the car body too.

The wire brush on this photo is what worked best at removing the old sealant, which can also be seen on there:

1- Lower your top and stop its operation before the deck lid goes back down.

:warning: 
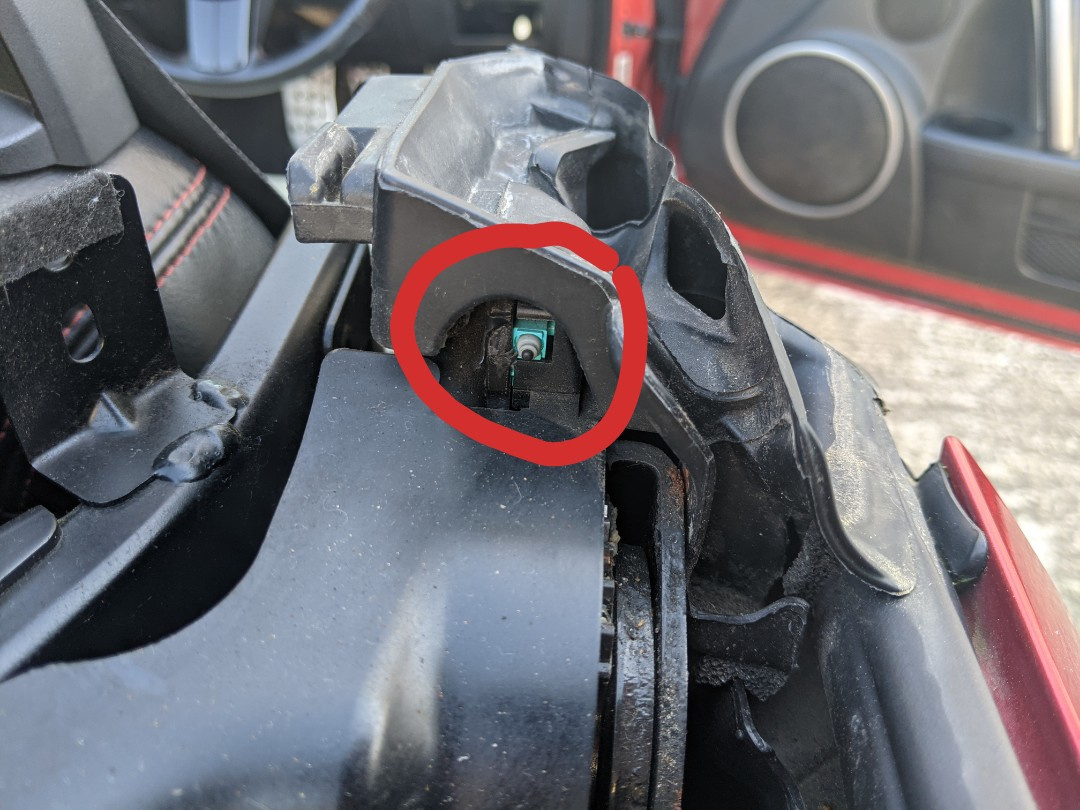
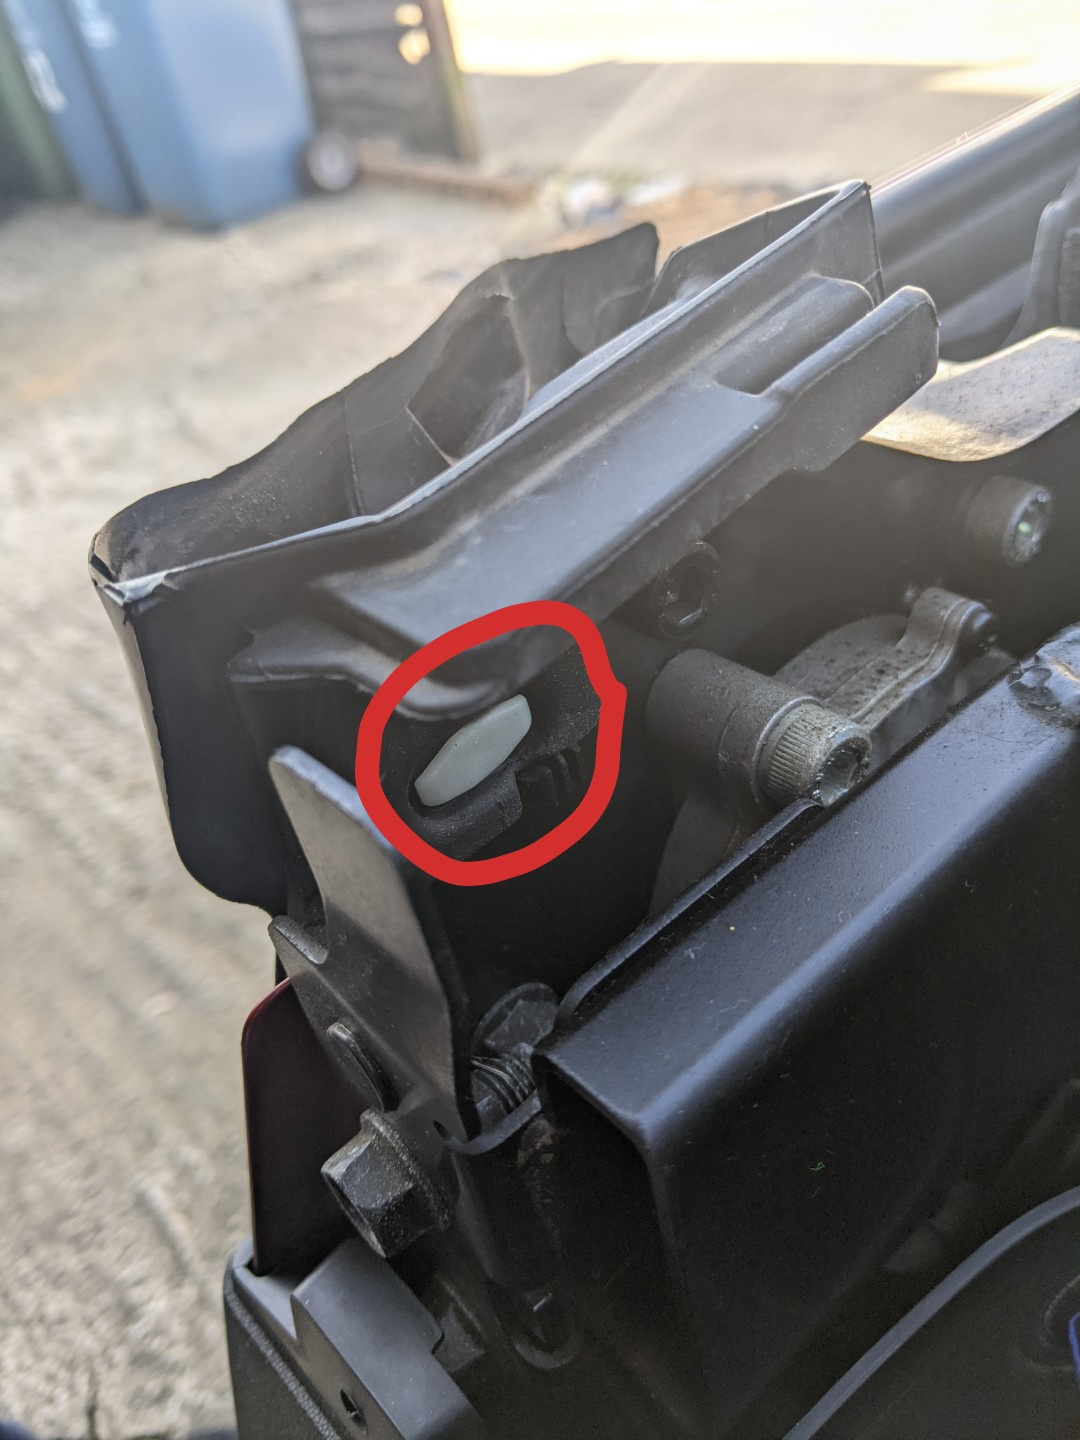
Note the Micro-switch here:

:camera_with_flash: Take a couple of photos of how the end parts attach over the seal and how they sit on the car’s body; this will help during refitting.

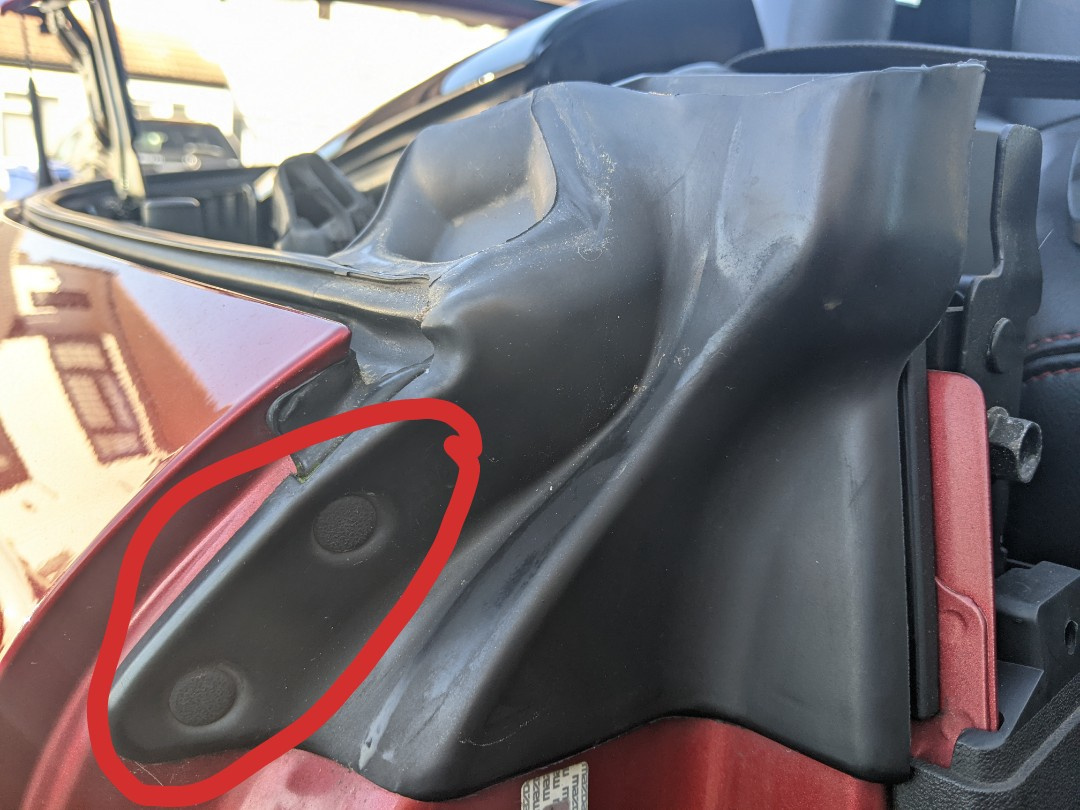
2- Pull away the lower ends of the 2 end parts from the car body, by pulling the 2 rubber plugs on them (Circled).
Note where sealant/glue has been applied to the inside of the end parts; that will need to be replaced.

3- Unclip the white plastic clip from the car body. I used long-nose pliers to get to the tangs on it from behind.

4- Once both end parts are free from the car, you can either separate them from the long seal, or remove them together with the seal as one piece, but note that these are just stuck on to the seal; then simply lift off the seal from the car body.

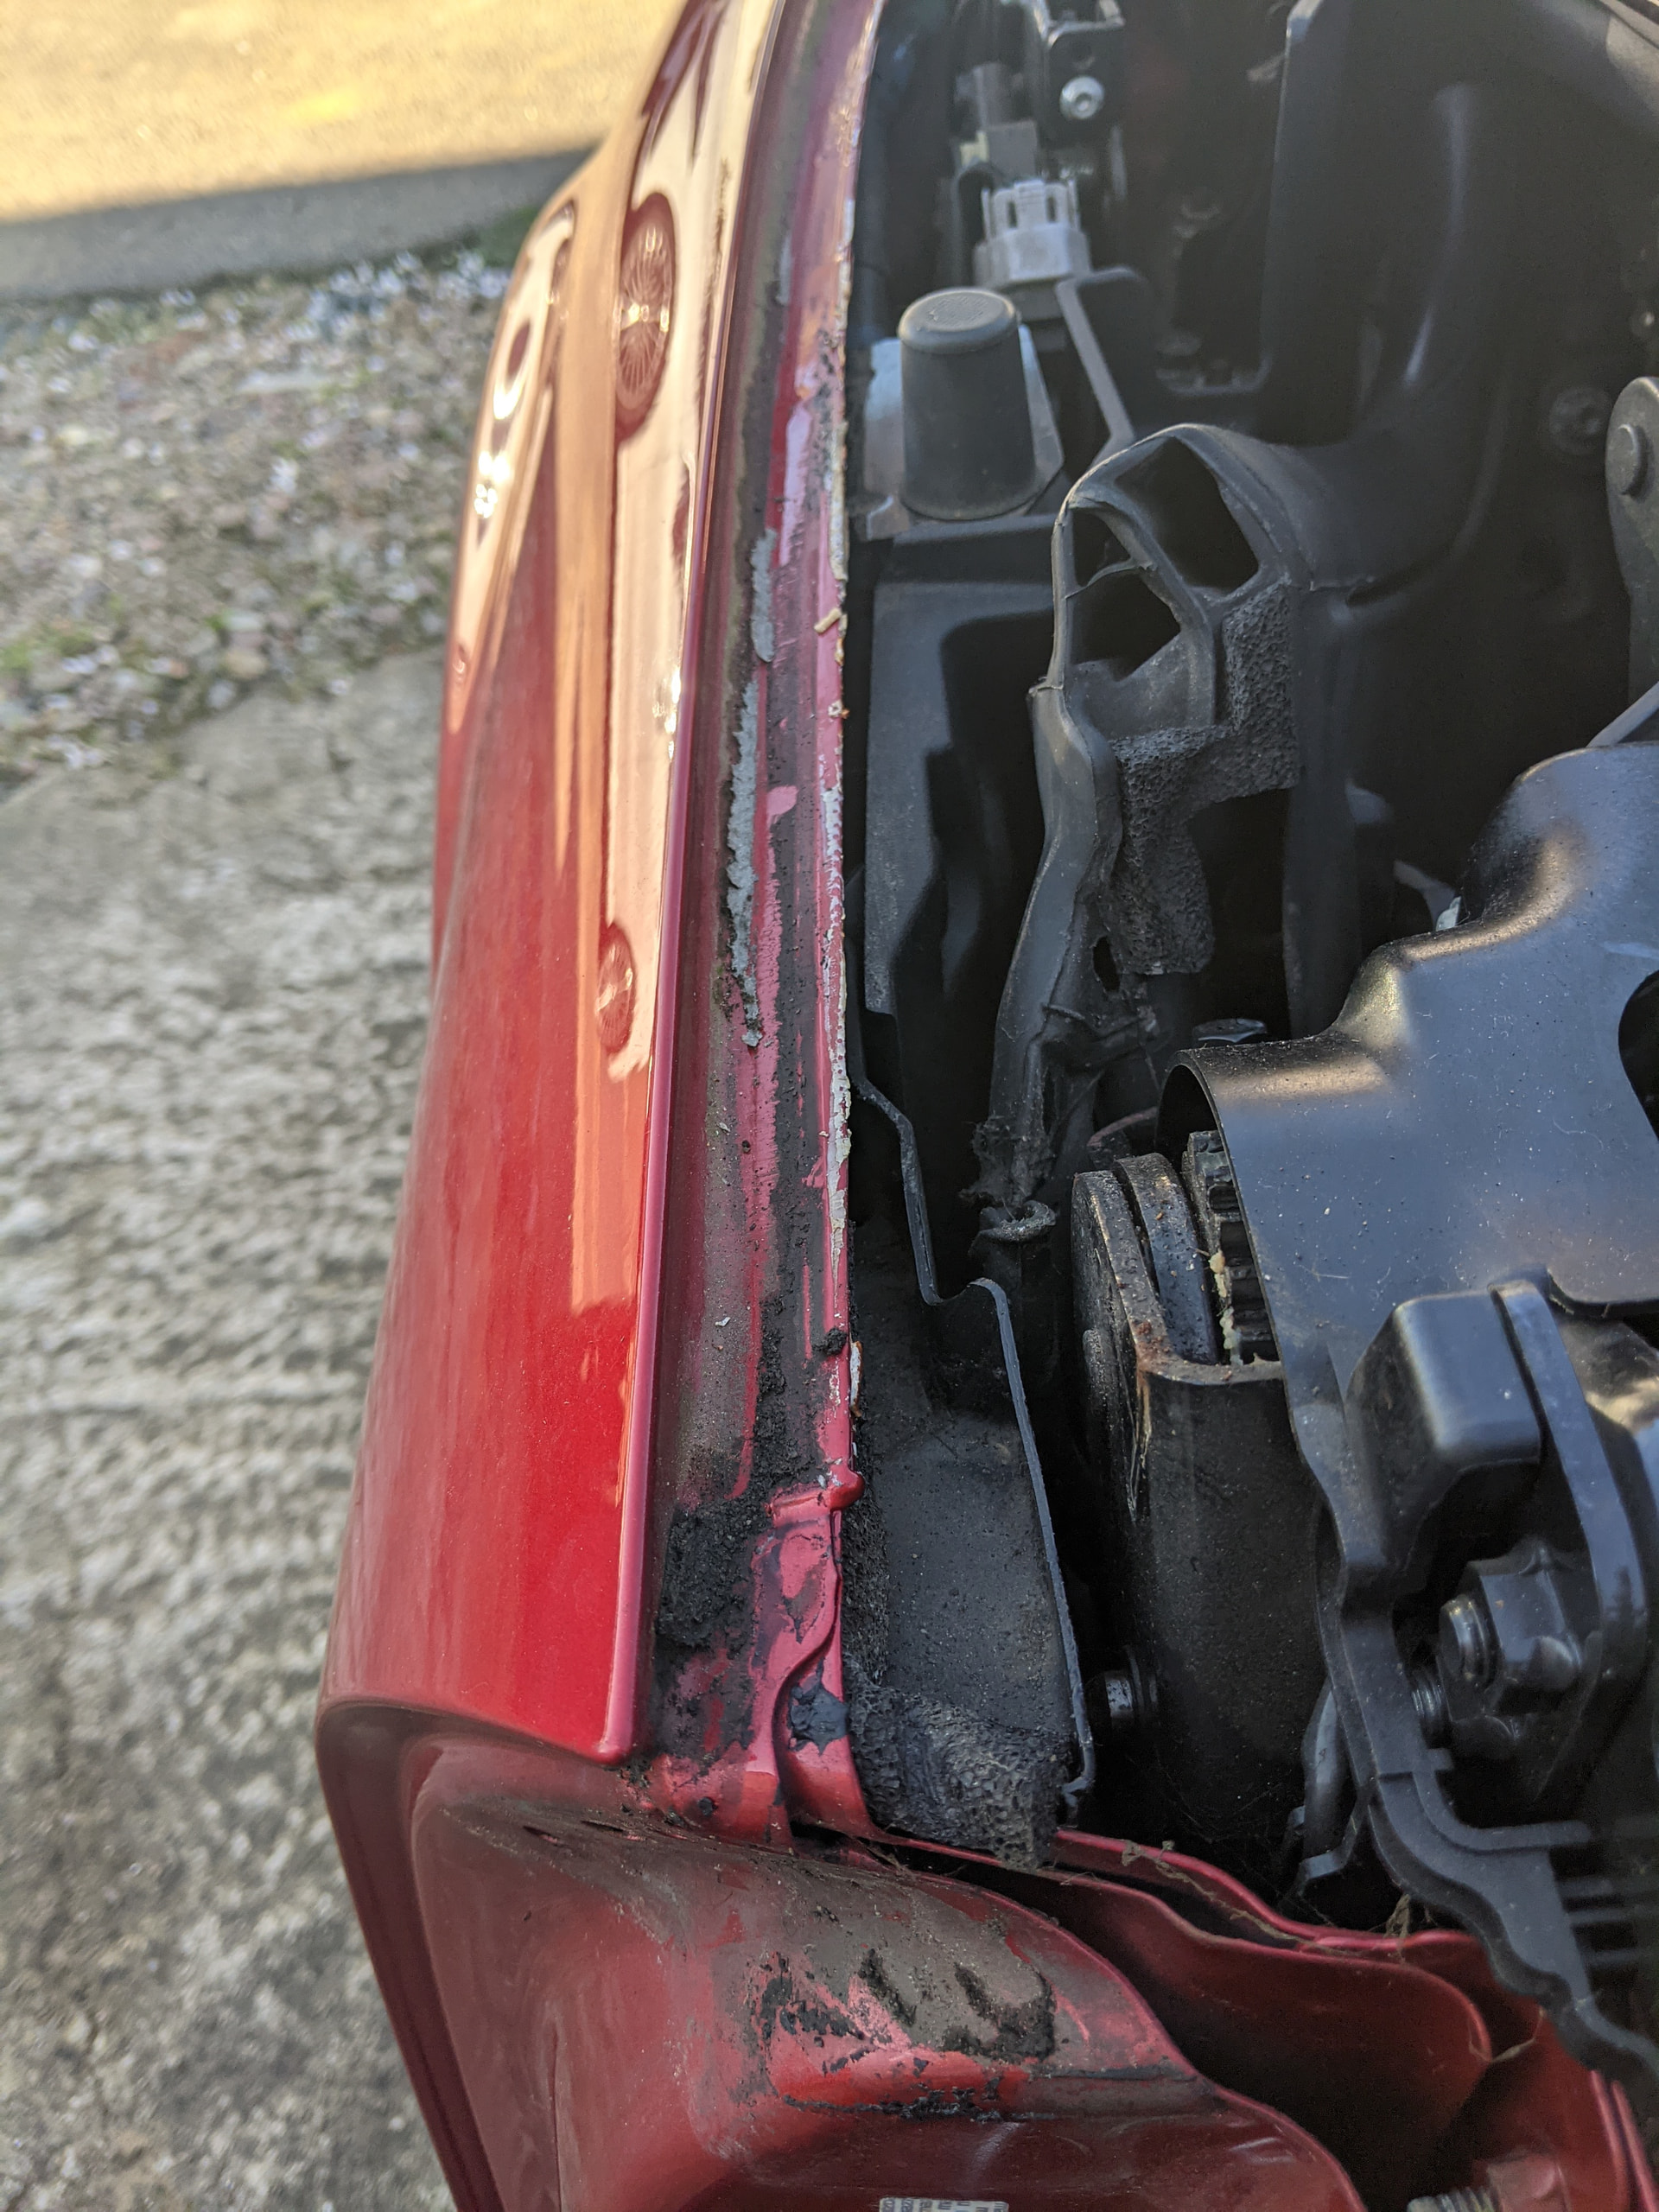
This is the mess I found under my seal and end parts:
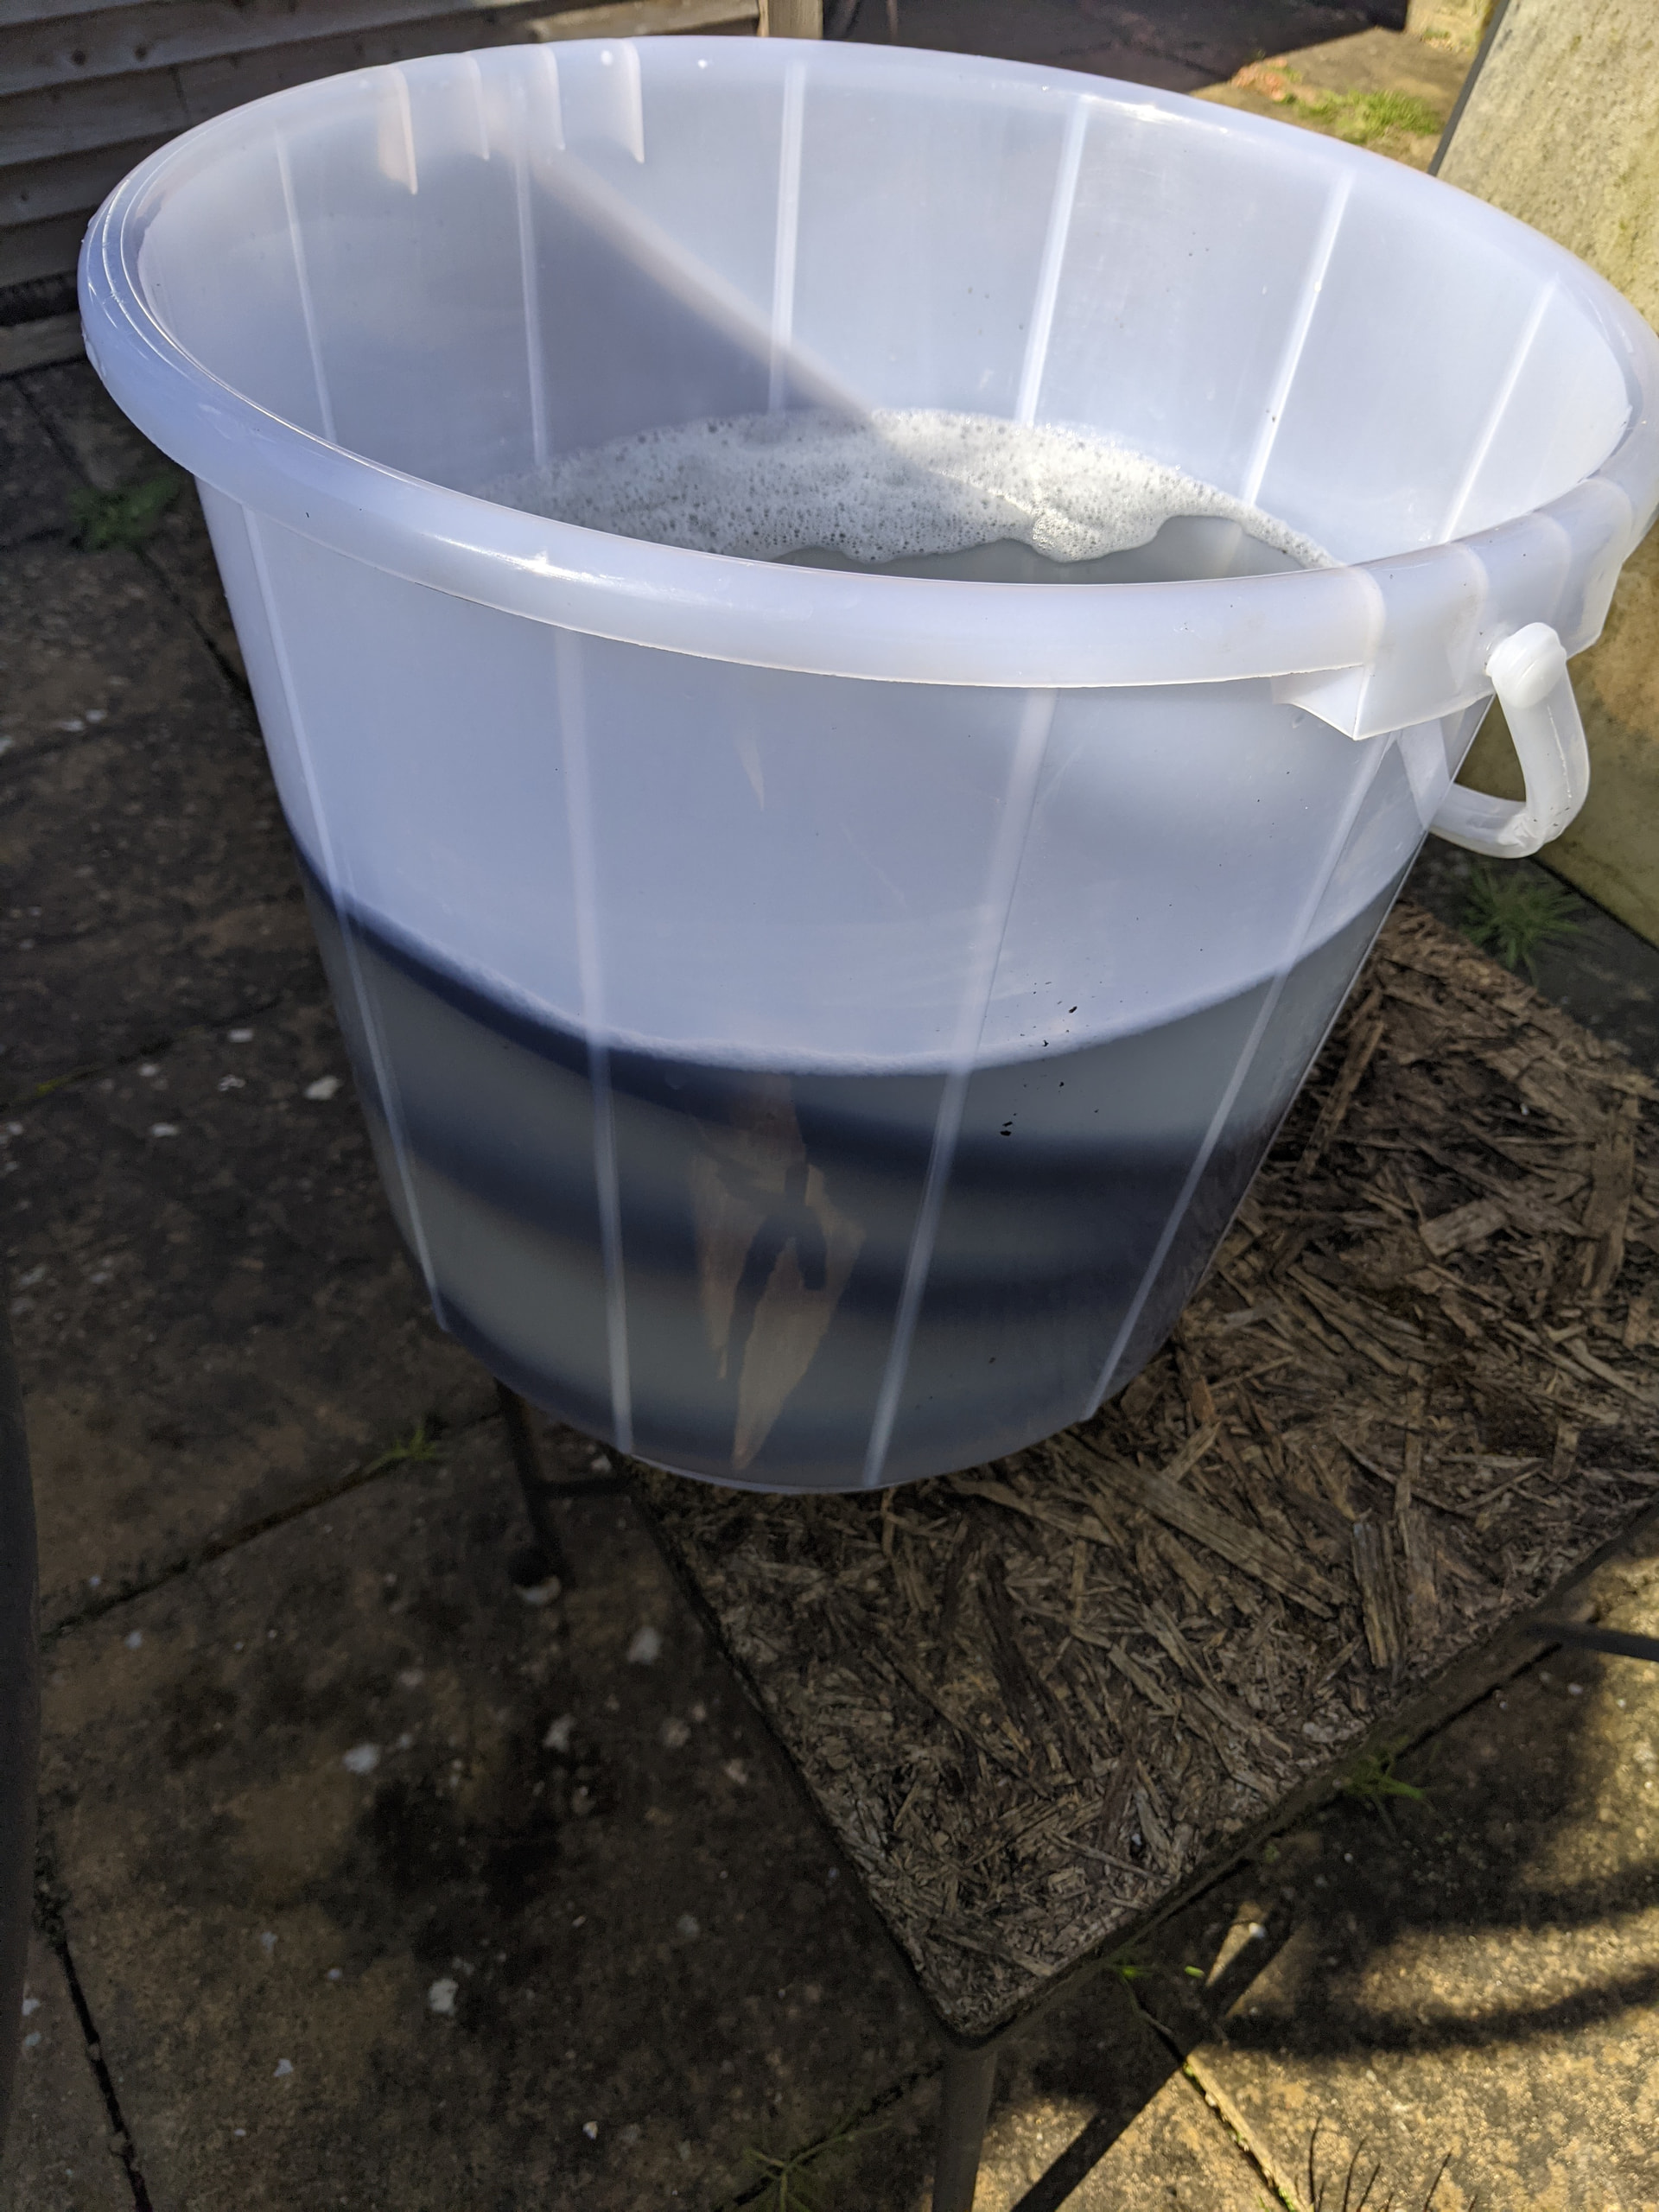
5- Time to clean.
First get the seal in some hot water to soften the old sealant, (I got some washing-up liquid in there too):

Then clean off the car body and get it all dry.
Now remove as much of the old sealant from inside the seal as possible; dry it all up properly, then apply the new sealant to the seal.

I recommend applying the black silicone to the inside of the end parts, after refitting the seal.
Use the end parts as guidance on where the seal starts and ends, then lift the end parts again and apply the black silicone where it’s needed.

And finally refit the end parts by pushing those 2 rubber plugs back into the car body and the white clip on the inside too. Apply some pressure to where the black silicone was applied, to help it spread and stick properly, then get some paper tissue and stuff it between the end parts and the door, to keep pressure on there until the silicone dries up.

Good Luck. :+1:

3 Likes

Amazing, thank you, will have a go this weekend. No shortage of rain here in Manchester so will quickly know if it’s worked..

I spent yesterday evening doing this, following MX-5-0912 guide. It went well, fairly straightforward job, just cleaning the old sealant being most tedious part. A few very minor points:

  • I decided to add a length of Gorilla waterproof patch tape along the edge of the deck, to help seal it. Cut to about 20mm width and wrapped over the length of the seam.
  • I used a framing silicone as it said it tolerated movement well (Bostik S41)
  • Noticed that there are moulding lines on the end parts to indicate where to place black gasket silicone.

Left overnight to dry. Hosed the car thoroughly this morning, left for an hour and…no water in the boot :+1: so hopefully this has fixed the problem.

Big thank you to the community , and MX-5-0912 in particular for taking the time to write neat guide, super helpful.

This topic was automatically closed 24 hours after the last reply. New replies are no longer allowed.