- With the carpet removed, you will see 3 spreader bars, secured by
10mm nuts on studs. It may be this just needs tightening. Pour some
water on the roof and see if there is a leak. Retighten the bars in the
following sequence:
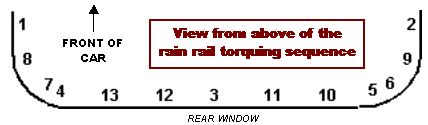
-
Removal of the rain rail if it is attached to the hood by rivets
might be a bit tricky, as you will need to remove the entire hood, or
drill out the rivets in situ. Its better if you can to repair the rain
rail in situ. The rain rail sits on a series of studs. You should be
able to work out where the leak is. Good quality gaffer tape works well
to repair cracks. -
If you really want to remove the rain rail, and presuming the
rivets are drilled out, you need to reach behind each seatbelt tower,
and locate a trim plug securing the end of the rain rail to the body.
This is very difficult to get out in one piece. The rain rail can be
removed; be careful, it is a composite of a rubbery section and a very
brittle plastic.
-
Alternatively, you can remove the hood and frame; you probably
need an extra pair of hands for this. Remove the carpet and spreader
bars as above. Remove the seat belt tower trims; its fairly self evident
which screws and fittings to under. The trims are held in place by pop
off clips. With the trims removed, on each side, you can see 3 15mm
bolts. These secure the frame to the car. Make sure the hood is free off
the studs around the deck, and lift off the frame; it may snag a bit.
Now you can attend to the attached rainrail with ease. -
Refit is a reversal; make sure you tighten the studs in the above
sequence. There is a torque setting, but In find its impossible to get a
torque wrench in here. Instead, just tighten the studs “enough”; if you
overtighten, you risk snapping a stud.
There are loads of pictures and how-tos here:
http://www.miata.net/garage/garagetops.html