Hey - I dropped you a message earlier.
Bidding is currently at £500 for the seats with less than 24 hours to go.
Andrew
Hey - I dropped you a message earlier.
Bidding is currently at £500 for the seats with less than 24 hours to go.
Andrew
Yep, the original 1.8 and gearbox.
Hi team.
I hope you are enjoying the lovely weather. It means that a) I can work on my car and b) I can work off lockdown (and the previous 11 years of binge-cake-eating).
As mentioned previously, I was having some starting issues with my car. After much scratch heading abd a chance meeting with an STI owning neighbour, we discovered it was the battery after all. Even though the voltage was showing as 12.6+ V, the battery has some sort of fault so isn’t providing enough cranking power. Buying beware - I got this Wesco battery brand new from MX5 Parts last summer and have barely used it.
Lots of work has been going on in the interior.
I swapped out my Lotus Elise seats and got a Tillett B5 which i’m really happy with. Seat pads are on their way!

I also removed my tired door cards and ahve replaced them with some aluminium ones courtesy of a guy in Greece selling through Etsy. Quality is good and so is the fitment.


I grinded out he rusted on bolts and brackets from the old front bumper fitting! My first time using an angle grinder and now I find myself looking for thinks to cut, great fun!


I then tried a test fitting of the ‘new’ bumper - aside from the colour being slightly different, fitment is decent.


Brand new genuine Mazda tombstone fitted along with final fitting of my lazer dash with new dials in the original surround instead of the Carbon Miata one.


Tomorrow I have some new LED sidelights arriving, along with my new seat cushions and air vents. Hopefully i’ll find time to properly fit the air duct, front bumper and undertray.
The new battery (Yuasa YBX5063) arrives tomorrow, which means I can get her started properly, check the fuel pressure, find the source of the radiator leak and the source of the exhaust leak in the engine bay.
The end is semi in sight!
Great stuff. You’re making terrific head way.
Keep it up ![]()
Thank you ![]()
Hi guys.
Latest progress report.
We DO have a grounding issue which was somewhat masked by the battery issue. It seems that when the battery is at absolutely full charge, it cranks and starts but anything less than that and it can be hit or miss whether the starter engages. And this is with an uprated battery. So I am going to very going around the car over the next week or so with some contact cleaner and a torch to check that a) all grounds are present and correct and b) they have a good connection.
Aside from that I continue to get my front bumoer fitted.Ineeded some new bumoer reinforcer bolts which arrived courtesy of Autolink, and once that was fitted it meant that I could get the air duct and bumper itself fitted.
As i’ve said previously, I have pretty much changed every original screw and nut on the car for Genuine Maxda items - my feelings are that when you are going this deep in to a rebuild of your car, you might as well start from the best possible place.


The bumper is now attached to the front of the car, the air duct and the reinfocer. I still need to work on the side mounting areas where it joins the wing, but it is looking like a car again.


I purchased some of the new IL Motorsport side lights and some new Wipac headlights, a)for safety reasons, b) because the old ones are looking tired and c) because i’m a tart. I’m still unsure how I feel about the sidelights as i’m generally not a modify guy, but I will have a black front lip at some point which will make them look a bit better. What do you guys think?


I’ve also done a bit more to the interior; passenger seat mount is in, I removed the air vents and replaced with some chrome ones and i’m swtill working on the carpet.


If I have time today, I am going to fit my inline fuel pressure regulator to check enough fuel is being pumped (I have a new fuel pump to fit also) and do the ground investigations.
As ever, watch this space!
Andrew
As an aside, my battery cable is looking a bit worse for year where it meets the battery terminals. This could also be having an impact on starting etc.
Is this an easy job? The things that make me think it isn’t:
I can’t just cut off the dodgy bit, re attach the terminals because there is not enough length in the wiring.
I’m guessing (?) I can’t simply cut out the dodgy bit an add some extra battery wiring because i’ll need to use special pastes and cabling to ensure a good connection.
Can I check anything using a multimeter? I Know that the alternator and starter are receiving good voltage, but could a loose or dodgy connection at the battery end cause these kind of issues? There is obviously chassis ground by the battery which could also be affected and thats where this all started.
Anyway, was just a thought!
At low currents a slightly dodgy connection does not drop many volts, but at high currents, eg on starting it can be a killer.
Simple test 1. Put voltmeter across battery and ask someone to crank the engine, just to turn it over. If it holds it’s voltage well, less than a few tenths of a volt drop, it is good.
Simple test 2. Do the same at the starter motor. If there is more than a volt drop then investigate the connections!
NA and NB. Look at where the battery earth cable carries on and goes through the boot floor to the PPF just in front of the diff. This often rots off, fix that for a major improvement. The thick, aluminium PPF is the lowest impedance earth path to the starter motor, much better than the body.
If you’ve replaced the battery, did you also run some fine emery round the inside of the battery terminal clamps for some nice bright clean lead on the contact area, like on the new posts?
Making up a new fat cable with new fittings going from battery-terminal to PPF might be the answer.
Thanks @RichardFX Richard, i’ll give that a try.
I cleaned up lots of the grounding points tonight and sanded back to shinier metal but still no improvement.


When I jumoed the car a couple of weeks ago it started, so there is obviously a grounding/earth issue with my car. It’s so frustrating and demoralising.
My previous toy was a Ducati 999.
The oem starting circuit cables on Ducatis are awful and as a result you can buy replacement kits that transform the cranking from reluctant to eager.
I used one of these high quality kits on my bike but I believe you can buy pretty reasonable cables with crimped on fittings from Halfords.
The earth cable should be pretty simple to replace Id have thought. I would expect to simply remove the existing cable, measure it and buy a replacement.
The positive cable could be a little trickier but at least you should have plenty of room for heavier cables on an MX5. Space is a real problem with Ducati battery boxes, especially the 999.
Thanks @999to5 , I have no interestsd in Motorbikes in general, but I have ALWAYS wanted a Ducati. Amazing looking machines!
I’m now starting to wonder whether it is that white box ground in the engine bay. Because it looks like a connector, i’d always forgotten it was a earthing point. When I was working on my car last winter in the temporary garage, moistyre certainly got in to the engine bay, so I wouldn’t be at all surprised if that connection wasn’t great. I’m starting to think i’ll never get to the bottom of it, but that seems like the next place to look!
Cant do any harm and replacing the earth cable can’t do any harm either and will only cost a few quid.
Good luck
Wow, beautiful. Still riding them?
Yes that is very true, i’ve also got some contact cleaner so will mercillesly use that around the car!
Andrew
says the man who’s fitted a V6 into an MX5 ![]()
![]()
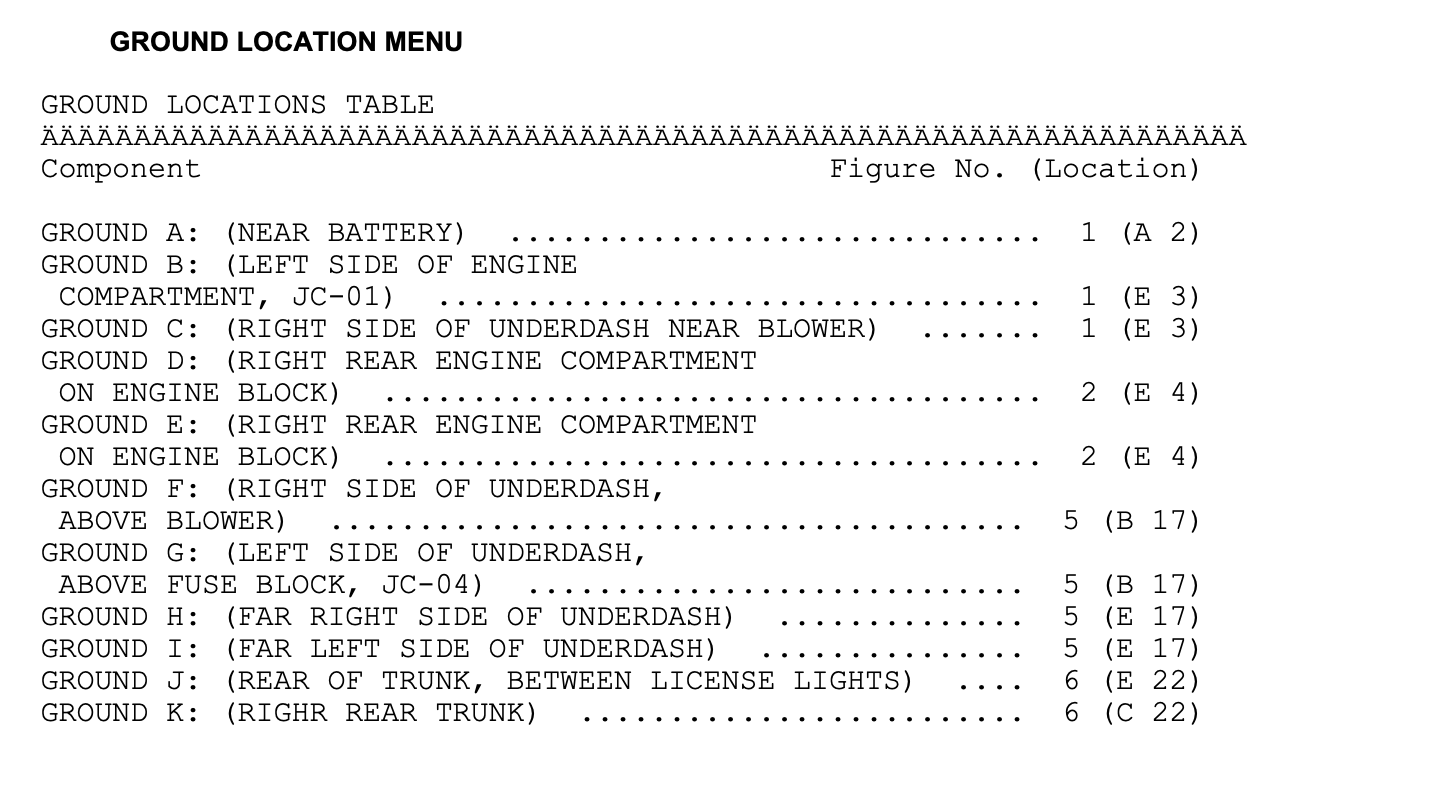
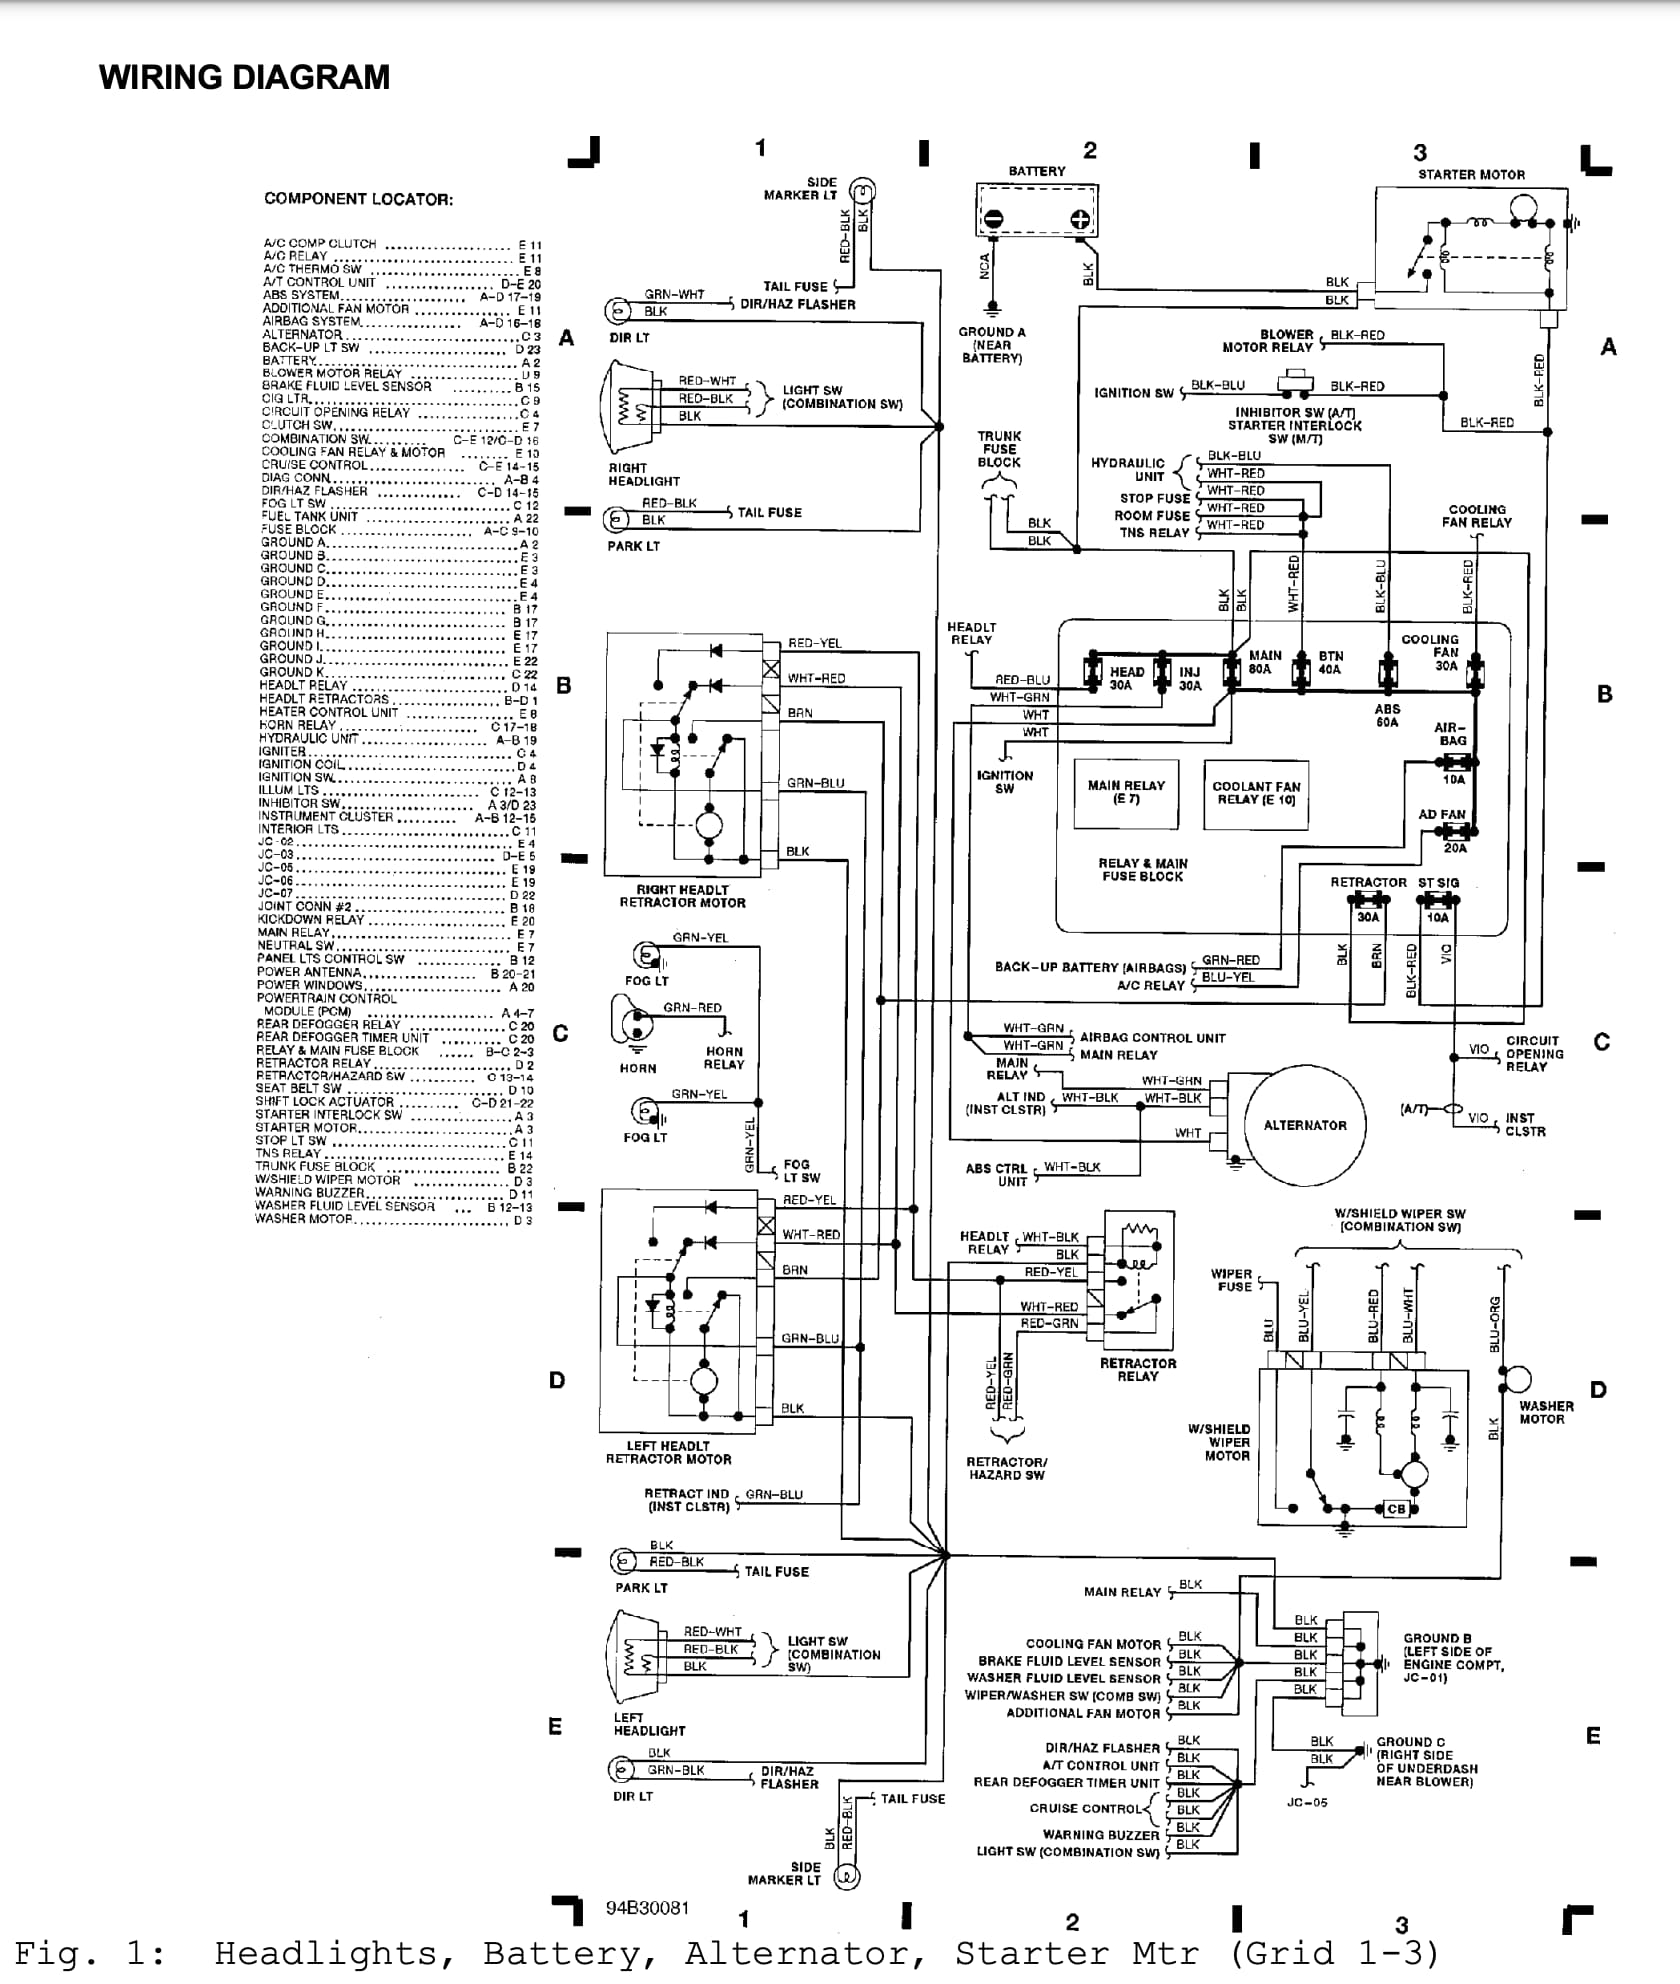
I’ve always said you have a grounding issue with your car Andrew ![]() Here are all the places to check (this is a '93 but you should have most of them) particularly the one under the windscreen wipers in the engine bay is easily missed. Also make sure that the original engine bay loom you disconnected for the Rocketeer conversion doesn’t have any earths that are needed. The (Location) section of the first table refers to a grid ref on the diagram below.
Here are all the places to check (this is a '93 but you should have most of them) particularly the one under the windscreen wipers in the engine bay is easily missed. Also make sure that the original engine bay loom you disconnected for the Rocketeer conversion doesn’t have any earths that are needed. The (Location) section of the first table refers to a grid ref on the diagram below.
@carl_s ![]()
![]()
![]()
![]() Fair point.
Fair point.
Thanks for those, I looked through all my wiring diagrams but didn’t find the first page - very helpful!
Just to be clear, am I trying to get a bare metal contact for all of them as much as possible?
Andrew
The photo of the end bolted to the PPF is interesting.
I zoomed in maximum and it looks possibly as if the insulation was stripped too far back and exposed the strands which are frayed or corroded, remember copper is attacked by salt and there might not be a lot of it left there.
However the lighting could easily have fooled me. A close-up with the flash would reveal a lot more.
But think through the whole high current loop. It goes from battery to starter solenoid and nowhere else, and the solenoid is also the high current switch.
The best ground path is battery-PPF-gearbox-bellhousing-starter, lots of meaty high conductivity metal all the way once on the PPF.
The best +12V path should be a fat cable direct from battery to solenoid. If it goes anywhere else in between with junctions, any of those could also be a problem.
Draw a picture of what you have and tick off the bits that checked OK at high current. What remains should be the problem.
Yes two things will make the earth work, no matter where it is. One is the bolt threads that hold the terminal to the chassis, the other the faces of the terminal and the body you’re screwing it to.
Best bet if you want to make sure is to dremmel a bit of paint off where the terminal bolts on, wire brush the terminal itself, and don’t forget to wire brush the bolt threads themselves as they also make contact (arguably just as good as the terminal itself)
This is where the dedicated starter body earth that Rocketeer fits in Andrew. But as Richard says if the other end of the ppf earth wire from the battery is weak it’s useless and must get it’s earth return through the body via the main engine earth strap.
What’s going on under that fabric tape? That’s quite a common place for wire strands to break. And what’s the connection between that main earth wire and the battery negative terminal like?
Thanks guys, very helpful!
So, I removed the bracket from the battery earth and as @Roadster_Robbie predicted they were knackered:

So I cut off the bracket, hoping I could repurpose it when i’d trimmed the cable but that crimp is so damn tight I can’t open it up! So i’ve ordered some industrial ring terminals and i’m going to do it that way.
Ther negative battery terminal wiring was also looking a bit shonky, so I trimmed off the dodgy bit to reattach to the terminal.


The engine bay ground connector is also looking quite messy.

How do you remove the wires from this? I removed the clips from the rear of the connector but couldn’t work out how to get the wires out to check them.
Anyway, thus far - no change. I’m going to get her back up on the ramps today and check the PPF ground and then do some voltage/resistance tests on the starter itself.
Have a good weekend chaps.