I have fitted a Pioneer head unit which accepts reversing camera input.
I wonder if anyone has experience fitting a reversing camera. I am considering fitting it on the boot between the number plate lights. I’m not sure of the best place to tap the reversing light circuit. Also how difficult it is to feed th cables from the boot lid to the head unit.
I should mention I have a retractable hard top MK3.
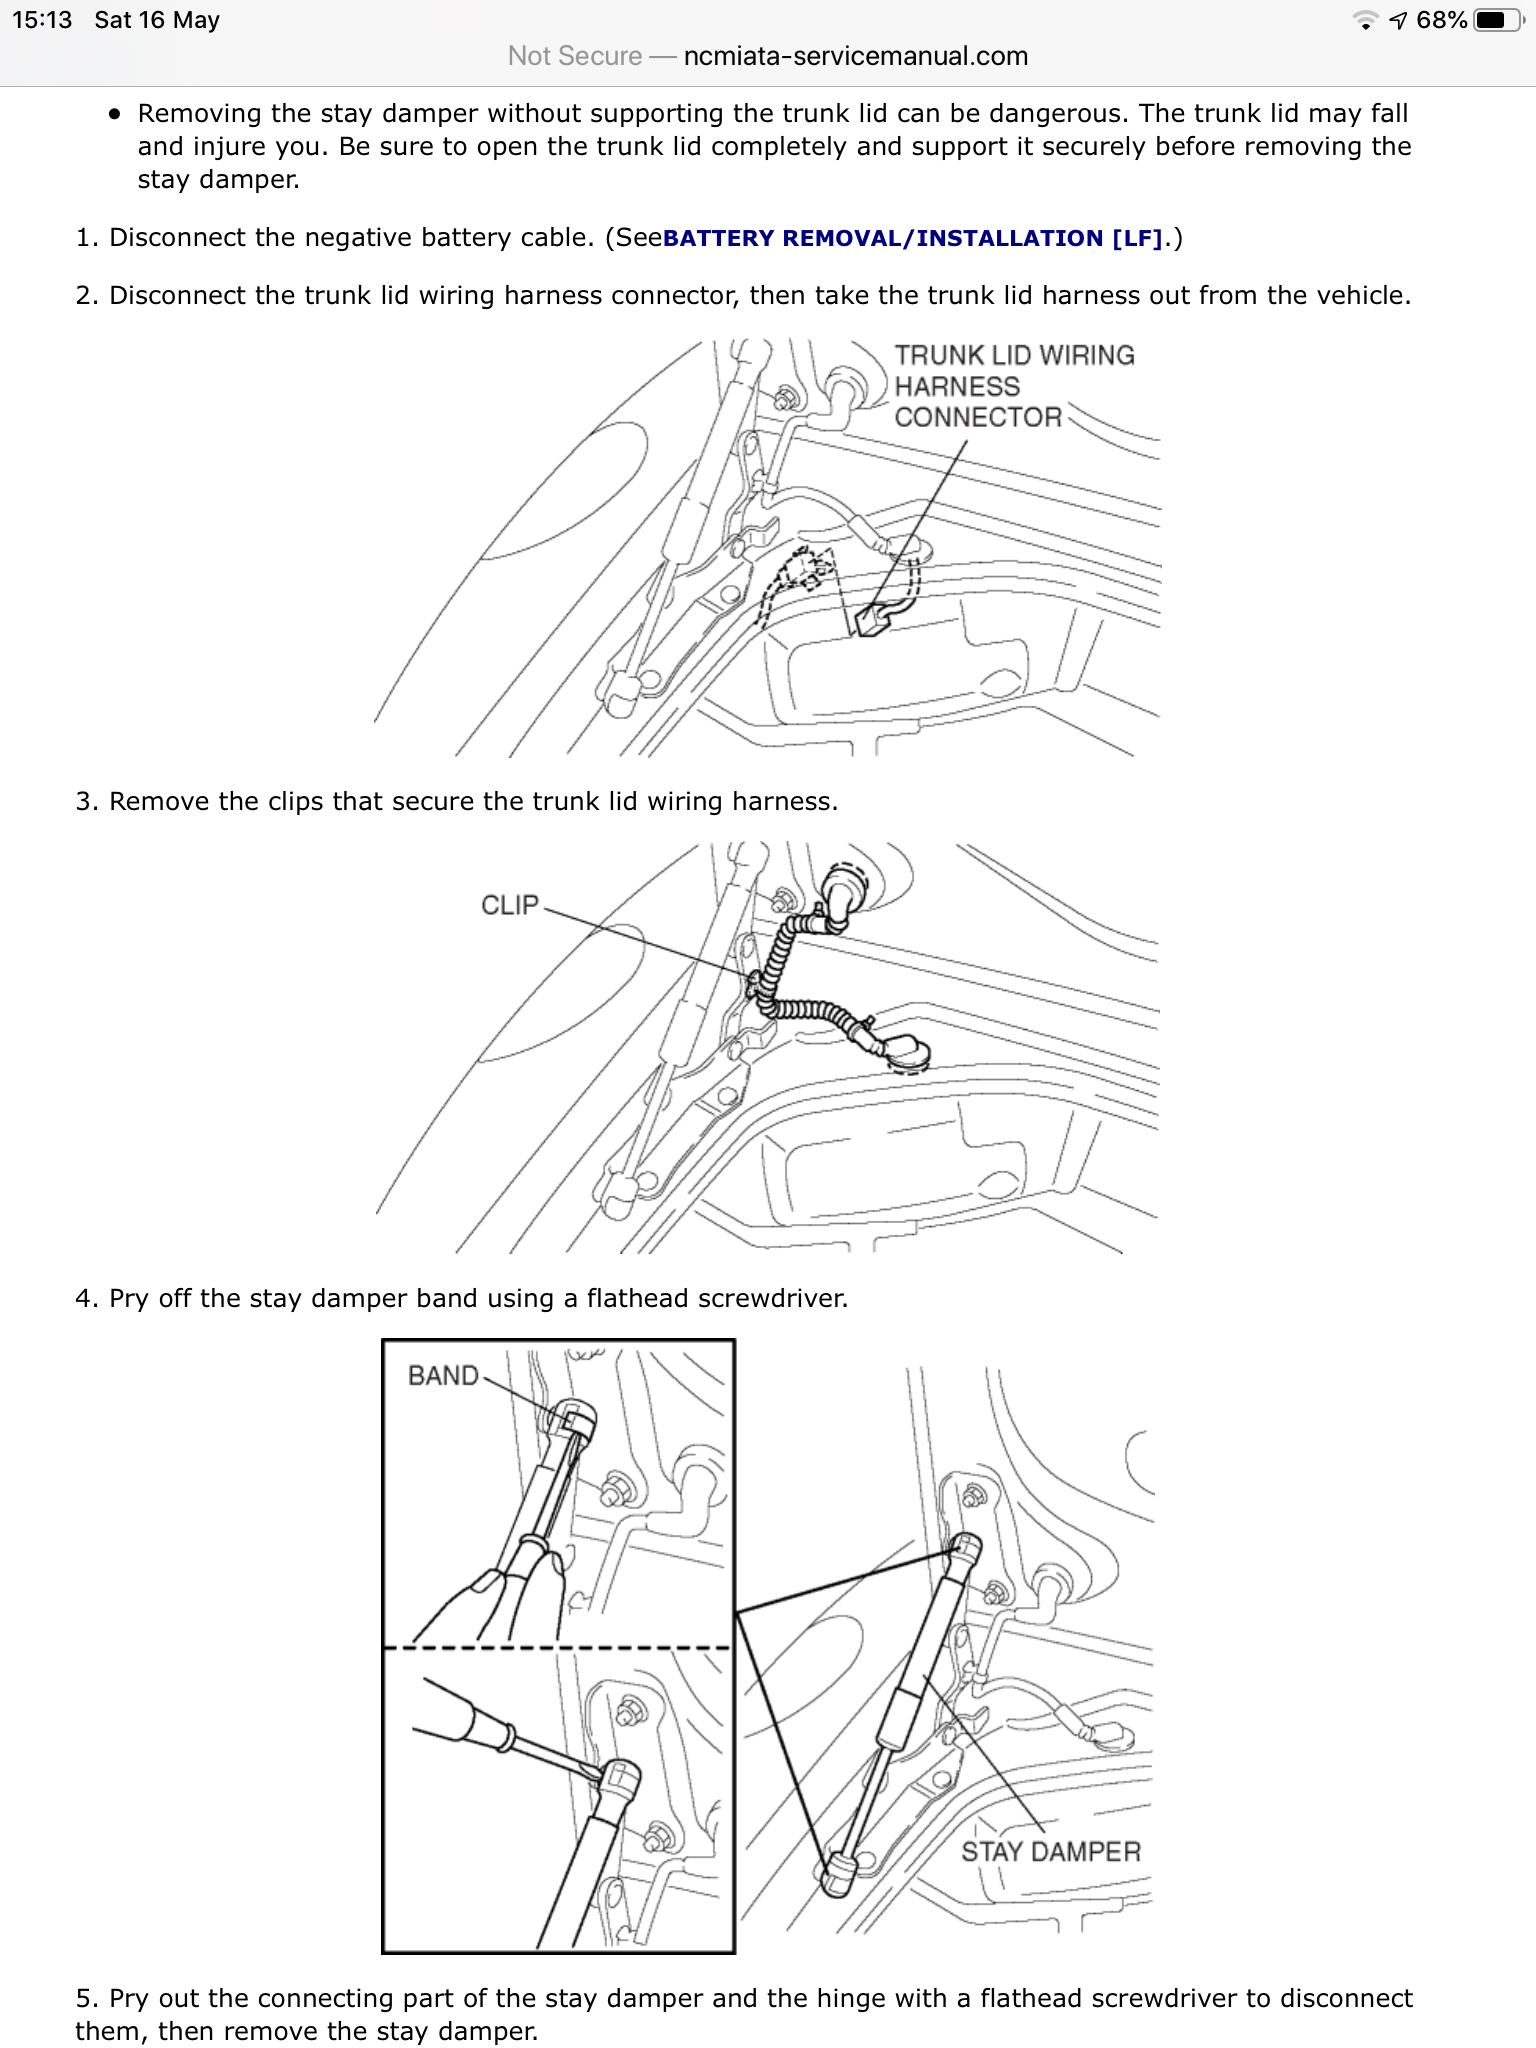
I had a camera mount printed for about £17by a local company - needed a little fettling but the results look super clean.
I tried a wireless sender from the camera but found the picture kept breaking up so ended up hard wiring the camera via the boot lid hose (which needed replacing with a slightly wider tube). The camera is just tapped into the reversing light.
It sounds a hassle and getting the extra wires through the replacement hose required patience but the results are superb. No visible wires - everything looks oe and the mount holds the camera at the perfect angle.
I fitted a reversing camera off eBay to the plastic blank between the number plate lights and fitted a wireless video transmitter connected to it in the boot lid braces, both powered from a wire connected to One of the reversing lights. This single wire fitted through the existing cable feed tube. The video receiver fitted behind the head unit easily. My Panasonic head unit detects when a video signal is present and switches automatically. Don’t know if your unit will do this.
I manufacture and sell reversing camera kits for the Mk4 ND MX-5s. I don’t sell anything suitable for your car but can offer the following advice.
While the dome type cameras are perfectly suitable for the ND they don’t work well on the Fiat 124 which has a similar boot mount with a similar lip to the NC. The camera isn’t adjustable so the lip on the boot gets in the way. That’s why it has been previously suggested to use the 3D printed mount. A simpler solution is to use the type of camera which is cube shaped with an adjustable bracket. These are widely available on eBay and elsewhere. I supply these cameras to customers who wish to fit my kits to a 124.
Most aftermarket cameras are NTSC standard although PAL standard cameras are also available. If a listing doesn’t state which it is then it will likely be NTSC. NTSC cameras are the only ones which work correctly with the ND and 124 but make sure you have checked which you need for your Panasonic head unit.
Hiya, did exactly what you suggest on my previous NC1. The only issue I had was the lens got very dirty, very quickly. I moved the camera to where others suggest, using the black blanking plate for a mounting point. Camera lens still got dirty but nowhere near as bad as when mounted at the bottom of the bumper
Thanks for your experience. That’s what I feared. Looks like I’ll need to see if I can improvise a way to mount the camera on the boot lid or return it and get a smaller one.
I too am planning on fitting a reversing camera to my NC and like most people I think the blank plastic panel between the number plate lights looks like the ideal place.
My head unit is a Pioneer and so I got the Pioneer camera to go with it and that has an adjustable mounting bracket.
My only concern is how to then run the cable down into the boot. The obvious route is down the existing tube for the number plate wiring harness but I’m not sure how easy it is to disconnect that. Has anyone managed to do that successfully?
Hi SM, the NC and ND are very similar in their construction and configuration underneath the outer body panels and trim. An example that you can easily see is that the jack mounting inside the rear right boot area is identical. So it may be useful to read the instructions within this post here MX-5 Mk4 ND Reversing Camera Kits For Sale £64.98 inc P&P paying particular attention to getting the wire from the front to the rear.
Also worth a watch is an instruction video which can be found in a link within this https://www.mx5parts.co.uk/reversing-camera-mk4-p-4242.html
A quick compare may help, obviously the trim and it’s removal will be different but when you get behind it, my guess is that things will be very similar. Nothing to lose by checking it out.
Have fun and stay safe.
Hi Roadie, my suspicion is that the actual frame around the rear bulkhead will be the same on both cars so the routing of the wires may well be the same as well.
I doubt whether there will be any common parts but Mazda design style might have come up with a similar layout again. A bit like arty people recognising a painter by the brush strokes.
The internal panels around the area where the jack mounts and the jack mounts appeared to be identical. My suspicion is that the basic structure is the same on both models and that some of the substructure uses the same pressings. Obviously I could be completely wrong, not for the first time I might add.
If there are any body shops that have had to get in and close to both models please let us all know what if any similarities there are.
I think in principle both models are similar even if the panels differ in shape etc. I’m not too worried about running the cables from the head unit to the boot, that seems pretty straightforward. However, ideally I’d like to mount the camera between the two number plate lights which on the NC are mounted on the actual boot lid itself. (I believe on the ND the number plate and lights are integrated into the bumper but I may be wrong!).
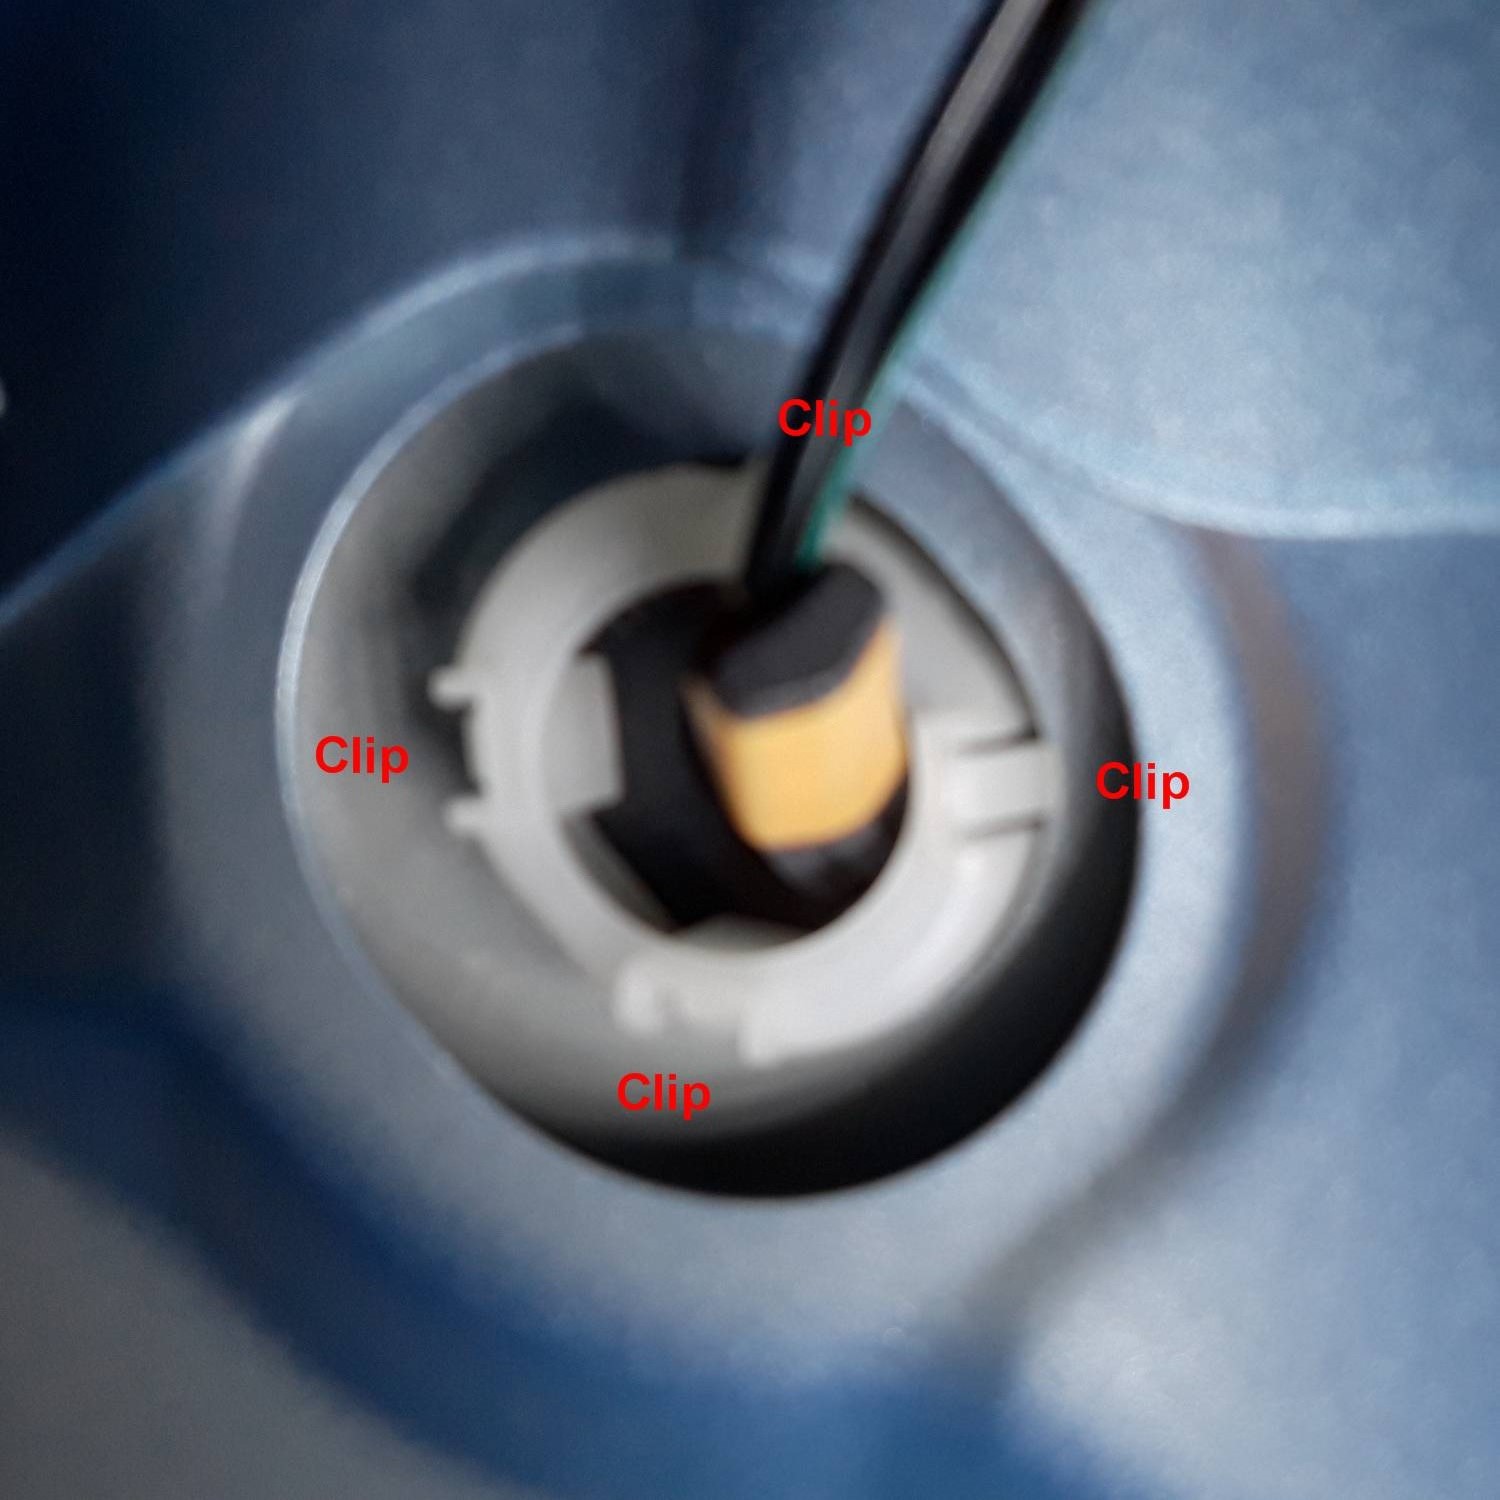
Therefore, I need to find a way of getting the cable from the boot lid into the boot itself and the obvious place seems to be via the number plate light wiring harness. The attached image illustrates this in item 3. Unfortunately, it’s not obvious how the harness detaches at each end which I’d need to do to feed the cable through.
I see your problem now, thank you.
Is there the possibility of using the other side with existing mirrored holes or drilling new ones and using grommets?
Getting another cable through the existing rubber pipe is going to prove very difficult. Are there similar blanked off holes on the other side? The ND has blanked holes both sides of the boot and the panel that it closes to. No cabling at all to the ND boot. If so, a couple of grommets should do it.
There is only one blanked hole on the right hand side - on the boot lid. Also, the shape of the panel on the main body is slightly different on that side, i.e. it doesn’t have a corresponding flat section where the grommet on the left hand side sits, which would make it difficult to get a good seal. In any case I’m loathe to start drilling holes in my beautiful MX-5!
On the NC the stiffer flexy-outer is held into the cunningly shaped grommet at each end by cable ties. The grommets can be removed by squeezing most of the four plastic clips retaining it, but these are only easily accessible in the boot, and not in the lid.
See the fuzzy pic of the underside of the one in the boot
I looked at this a couple of years ago when deciding between fitting a reversing camera to boot lid or sensors to bumper. A simple measure proved there was not enough room inside the existing flexy-outer to squeeze in the video cable and power cable needed just for the camera, let alone keep the two existing thin wires, so I gave up and chose the sensors.
However,
IF you can find a thicker flexy with more room inside, then it might be possible to adapt the grommets to take the extra wires.
OR find a reasonably supple multicore video cable with power, ground, video coax, and two spares for the boot light wires, and use this to replace the wrinkly flexy altogether. This will need neat surgery at both ends.
The main wiring loom goes along under the UK passenger sill cover and up over the wheel arch. There should be plenty of room for access and adding the extras once this cover and few more have been removed.