My Mk1 Eunos S-Package

I’ve just added about 10 bhp to the car by adding this;

.
.
.
.
.

:rofl:

Obviously i’m joking about the bhp, but for a fiver i actually think it looks cool. I just needed ‘something’ else red due to the rather in your face cam cover and this will do nicely!

It got me thinking though, in a couple of weeks it will be a year since I bought the car. How life has changed for us all in that time! That said, I think only me and my wallet can truly know all what’s been done to this car in the last year, whether it be new parts, labour paid at the garage for fitting new parts or just my elbow grease with cleaning and tinkering on the drive, but even though i’ve had a lot of cars, this is the car i’ve done the most too myself. I do really like the relative simplicity of it and love that I can get stuck in with little jobs myself - besides, if i break something, it won’t cost the earth to replace :sunglasses:

October 2019;

October 2020;

Small update time, we’ve not been able to do much or go far lately for obvious reasons, so haven’t got many new photos of the car. I did take it for a quick drive at the start of lockdown 2.0 however when it was clean so thought it would be rude not to get a photo;

Another little upgrade i’ve sorted and fitted is some CNC machined Delrin door bushes, to replace the old standard ones;

As can be seen here, the old standard ones were a bit soft so for only £25 ish, it makes sense to do these as people seem very positive that they DO make a difference. These were a bit of a job to remove, but got there in the end with plenty WD40, a small selection of tools and some effort;

Cleaned and polished the area but was still left with an outline, which made fitting very simple;

Fitted… usual story, tightened up the fixings so there was just the smallest bit of give and then closed and opened the door three times to nudge them into the corect place then tightened!

3 Likes

I’ve never put together a spec list since owning the car, so just been through the history folder and added everything together in one place!

ENGINE AND EXHAUST;

K&N PANEL AIR FILTER
WRINKLE RED ROCKER COVER
STAINLESS STEEL ROCKER COVER BOLT SET
JACKSON RACING PLUG LEAD SET
NGK SPARK PLUGS
I.L. MOTORSPORT OIL FILLER CAP
BLACK SILICONE COOLANT HOSE SET (FITTED BY PREVIOUS OWNER)
JDM PASSWORD SILVER WASHERS (USED ON FRONT WINGS)
MX5 PARTS STAINLESS STEEL SINGLE EXIT EXHAUST

SUSPENSION AND CHASSIS;

NEW OEM SHOCK ABSORBERS (x4)
TEIN S-TECH LOWERING SPRINGS
ULTRA RACING WHITE UPPER FRONT STRUT BRACE
DELRIN DOOR BUSHES

WHEELS, TYRES AND BRAKES;

JAPAN RACING JR7 (15x7/ET38) 4x100 WHEELS
PIRELLI P1 TYRES
STAINLESS STEEL BRAIDED BRAKE HOSE KIT (FITTED BY PREVIOUS OWNER)

EXTERIOR;

REPLACEMENT GENUINE MAZDA ‘EUNOS’ AND ‘ROADSTER’ REAR BADGES
LOTUS STYLE BLACK AND SILVER FRONT ‘EUNOS’ BADGE
CUSTOM ‘S-PACKAGE’ GEL DOMED REAR BADGE
I.L. MOTORSPORT CHROME SIDE INDICATOR RINGS
FORD MAVERICK MIST WASHER JETS

INTERIOR;

NARDI ‘CLASSIC’ STEERING WHEEL
HKB STEERING WHEEL BOSS KIT
STEERING WHEEL SPACER/ADAPTOR
JDM CHROME TEARDROP SPEAKER COVERS
JDM ‘ROADSTER’ STAINLESS STEEL KICK PLATES
I.L. MOTORSPORT BLACK LEATHER GEAR LEVER GAITER
I.L. MOTORSPORT BLACK LEATHER HANDBRAKE GAITER
CUSTOM GEAR SHIFT PATTERN DOMED DECAL
JASS PERFORMANCE ‘TYPE-R’ GEARKNOB
JASS PERFORMANCE HAZARD/HEADLAMP TOGGLE SWITCHES
MIATA BLACK ARM REST CUSHION
‘ROADSTER’ LOGO RUBBER FLOOR MAT SET
‘ROADSTER’ LOGO RUBBER ACCELERATOR PEDAL COVER
CUP HOLDERS
I.L. MOTORSPORT AUDI TT STYLE AIR VENT RINGS
I.L. MOTORSPORT MESH WIND BLOCKER
B M W E36 CLOCK AND STORAGE COMPARTMENT FRAME

AUDIO;

ALPINE CD PLAYER/RADIO
AUDISON PRIMA 17cm CO-AXIAL SPEAKERS
AUDISON CO-AXIAL HEADREST SPEAKERS

MISCELLANEOUS;

REPLICA TAX DISC (1995 EXPIRY)
BRIDE RED RESERVOIR COVER
REPLACEMENT HEADLIGHTS AND BULBS

1 Like

Hi Suggs,
Have you noticed any difference, good or bad, with the new door bushes? Also, where did you get them from?

Thanks,
Rob

I only fitted them today but overall, it gives a more solid feeling opening and closing the doors and i’m told they DO make a noticeable difference!

These are the Delrin ones, available on eBay, £23.99 from Bulgaria - worth the wait for shipping as they are very good quality. I got them from the recommendation of another Mk1 owner and so far I agree

Thanks for the info, I would be interested to know if there’s any difference when you get to drive it.

Thanks again

1 Like

hi, i’ve read about a potential issue seeing the displays if you buy the wrong size wheel. yours looks spot on. can i ask what size it is? :slightly_smiling_face:

1 Like

Yeah no problem, my wheels are JAPAN RACING JR7’s, which are 15x7/ET38 4x100 :sunglasses:

1 Like

Have been out in the car and all is good with the bushes, doors feel nice and solid when opening and closing yet no major difference when driving, you just know it’s all just a bit more solid - that is a good thing i think!

I’ve got a couple of upgrade engine bay bits planned for the car and the first to arrive was the JDM ARC Chamber i’d managed to source, it also included the red hoses that the previous owner had on his Eunos, which saved the hassle buying more hoses when I already know these fit. So that was very handy! :ok_hand:

It’s a bit 50/50 I know if these actually make a key difference but if nothing else, they look very cool! I was reading a thread on ‘Mazda Menders’ from back in 2014 where Skuzzle Motorsport had dyno tested one of these and reported a small increase in mid range torque, albeit no HP increase. BUT! The Jackson Racing kit had also gained torque but dropped HP making the ARC the better of the two.

Anyway, i’ve taken some time to give it a good buff up and it’s come up really well, all done by hand but Autosol worked wonders and I finished it off with some Autobrite Metal Worx, a new one I’d bought to try a few weeks ago and also gave good results. I think it’s very hard to beat Autosol though!

Always satisfying when you see this;

Soapy hot water sorted these out a treat;

… and finally, done and ready for fitting! I could go further with it but my engine bay is clean, not immaculate so i think this will look just right. It doesn’t need to be like a mirror!

1 Like

Great, thanks for the update.

1 Like

I mentioned above that I now have the ARC Intake Chamber to fit, well the other parts I was waiting for have now landed so yesterday was lockdown car parts day!

The original plan was to fit the ARC whilst still keeping the original air box with the K&N panel filter, however the more I looked at a photo of my engine bay and compared it to the photo of the ARC fitted to the previous owner’s car, I just wasn’t convinced it would work due to the angles and besides, ARC did their own air box to fit to the chamber if that’s the way the buyer wanted to go. So with that in mind, I decided to go for this;

It’s the Blitz SUS induction kit, this one massively appealed due to the quality and the fact it had a heat shield. Just a shame about the price :zipper_mouth_face:

Anyway, as we can see here, the instructions were very useful, literally only had three small diagrams for help from two full sides of A4;

… and this is what we started with;

The ARC Chamber went on really easily, which I was confident it would as I knew it had already come off a 1.8 NA8C like mine, plus in addition to this what also made it so simple was that the red hoses were included which of course slipped straight on. The only thing we did was cut a small section off the left silicone hose, to shorten the length and pull the chamber back from hitting the radiator cap. I’d purchased a Jass Performance manifold heat shield as well, so the rusty old one came off and was replaced with this while there was lots of room and clearance.

The Blitz was another story, it took us ages to get it just right, seemingly endlessly taking it all apart, changing the angles of the brackets, moving it up, moving it down, even more stressful as it went dark - in the end, the source of our issue was the strut brace. Gutted! It had to come off to make the extra bit of room, but the induction kit was more important to me than the strut brace plus with some light modification, I am sure I can get it back on the car.

This is how the engine bay is now looking after a wipe round and quick buff this morning;

I also bought these recently so that’s another ‘mod’ … i bought them as Rays takes me right back to old skool Gran Turismo!

Updated spec list to include the shiney bits!

ENGINE AND EXHAUST;

ARC INTAKE CHAMBER
BLITZ SUS INDUCTION KIT
WRINKLE RED ROCKER COVER
STAINLESS STEEL ROCKER COVER BOLT SET
JASS PERFORMANCE MANIFOLD HEAT SHIELD
JACKSON RACING PLUG LEAD SET
NGK SPARK PLUGS
I.L. MOTORSPORT OIL FILLER CAP
BLACK SILICONE COOLANT HOSE SET (FITTED BY PREVIOUS OWNER)
JDM PASSWORD SILVER WASHERS (USED ON FRONT WINGS)
MX5 PARTS STAINLESS STEEL SINGLE EXIT EXHAUST

The camera has been very complimentary here as to how clean the car actually is!

2 Likes

About a month ago I tracked down some ARC decals for sale on eBay USA (only ones I could find anywhere) and these were $9.99 + $30.00 postage to the UK (i know, but I wanted them) in pretty much any colour you wanted. So having just bought the ARC at that point, I went for the red. One month later, they landed on Saturday. I purchased two, but they sent six which was a result!

So i’ve put one in the obvious location, but also stuck one on the back as well as I had some spares - note the dedication to getting it straight on the rear window :smile:

Nice read and a great transformation, well done.

1 Like

Thanks Kevin, much appreciated! :slightly_smiling_face:

Today proves yet again that sometimes, it’s the small jobs that can give the most satisfaction. My headlights needed re-aligning as had drooped a bit. Before and after pics;

I had a good excuse to clean the car again a couple of weeks ago as we took it out for the yearly Christmas time garden centre adventure (no jokes please as this one does have some lovely Christmas stuff to buy :laughing: ) and due to being in the countryside, the car was ruined - this photo is very deceiving to the state it was in especially the back end!

So that was all cleaned and made nice again, then…

Engine bay update, number 212! More cleaning and tidying of bits here and there this week and again, I know these updates are nowhere near as interesting as a turbo conversion or new racing bucket seats, but compared to when I bought this car, i’m really starting to notice the difference now. Progress has been seen over several updates but the strut tops were next on this list. Nasty rusty nuts, chipped paint on the lip/edge either side bla bla.

So bought 4x genuine Mazda strut top nuts from MX5 parts, these at 3 quid each were not cheap but oh well! Also carefully painted around the edges either side with the genuine touch up stick, in code PT of course for chaste white. Then bought the I.L. Motorsport chrome strut top covers.

Still hardly a show car, but an improvement all the same!

BEFORE;

AFTER;

One thing I do want to replace is the bracket that the diagnostics plug clips onto - could take it off and paint it but something that big and in view, i think it’ll look rough. Need to keep an eye out for a newer or better condition one to swap like for like;

The eagle eyed there may also spot the cambelt sticker, not a bad thing to have to remind me when it was changed, but also quite cool that it’s a Japanese one and yes i looked up how to fill it in correctly (rofl)

Lastly, we have another classic example of how a small job ends up taking ages as went to put some screen wash in the car earlier (i don’t use much so the remainder was still from the previous owner) and looked in the bottle and the filth all around the inner sides was real but wasn’t noticeable from the outside, odd! Anyway, out came the syphon pump, got all the old stuff out, then got a small mop to get in the empty bottle and clean it all out, then refilled with plain water and then syphoned all that out too as had loose bits in it, then finally refilled my sparkly clean bottle with fresh B-M-W screen wash, nothing but the best right? Ha! Was for my other car but had some left.

My question is, is this a bit OCD or is it doing things right? I hope the latter, but it IS Christmas Eve. We go into tier 4 here on boxing day, so the car won’t be going far now for the rest of the year, that’s for sure!

3 Likes

When it comes to saying this car is ‘done’ i’m just going to stop saying it now - as with all MX5’s, there is always something else you want!

So, when a rare JDM Runabout (Type 1) fuel lid appeared, i snapped it up and to be honest, it does look pretty smart after a coat of Autosol… or two!

It cleaned up well but of the two little rubber feet, it only had one perished one, so robbed the two of my standard lid and fitted them so job done there. When it went on the car it had clearly been played about with for another car in the past as didn’t sit right, sat a little tall one side and too low the other - but after several very small adjustments bending it very carefully the right way on the hinge, I got it sitting just right! :+1:

So, photos… it wasn’t a bad place to start, i’d already made a start cleaning inside here a while ago and bought a new red cap upon first purchase of the car. It was just where the hinge is and all the chips around the edge!!

The only thing that would shift all the old crud was Autoglym Tar and Glue Remover but it’s been buffed up again after and touched in the chips best I could with the proper Mazda ‘PT’ Chaste White touch up stick;

Lid wasn’t terrible, but just like the ARC Chamber for what came off when polishing…

Done - top looking bling bling, didn’t fuss for quite as long with the underneath;

… and on the car;

Certainly sits a bit taller than the standard factory item;

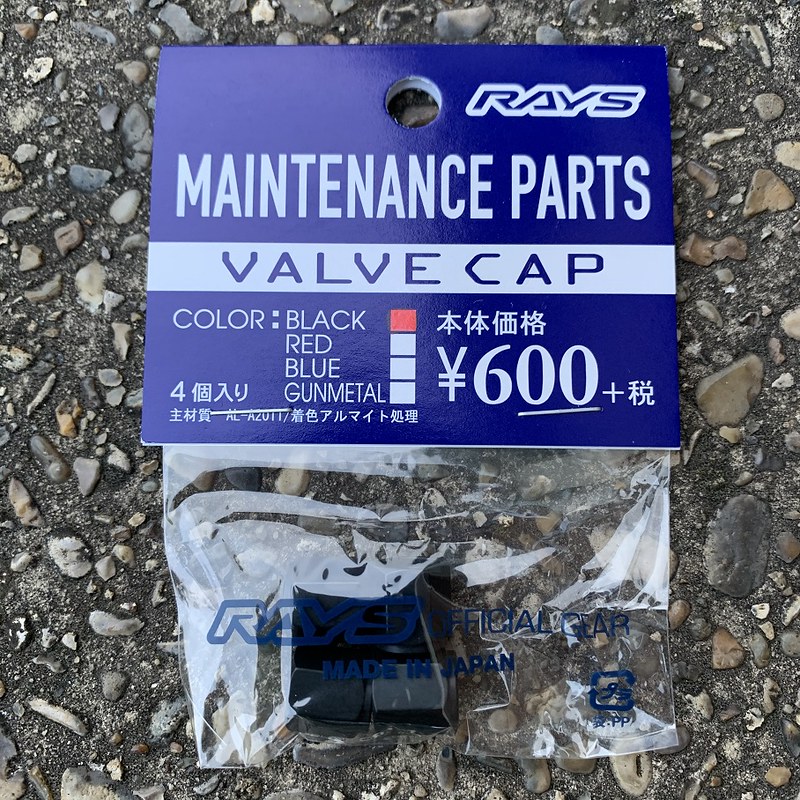
In other news, I finally got my small, but still good, REV9 order - took like six weeks to get here from Japan but with the world the way it is, that is totally understandable and wasn’t sure I would get it full stop! So yet again these are small little details that most wouldn’t notice or even care about - but for me, the small details make the car and continues to make it very much my own. So, open up the package and this is what we find…

The fuse box decal has bugged me from day one - wrinkled, faded, but being ‘N027’ for some reason I could never find a replacement. Not sure if this is rare of something but I never saw one on eBay. So this replacement decal for naff all money was perfect;

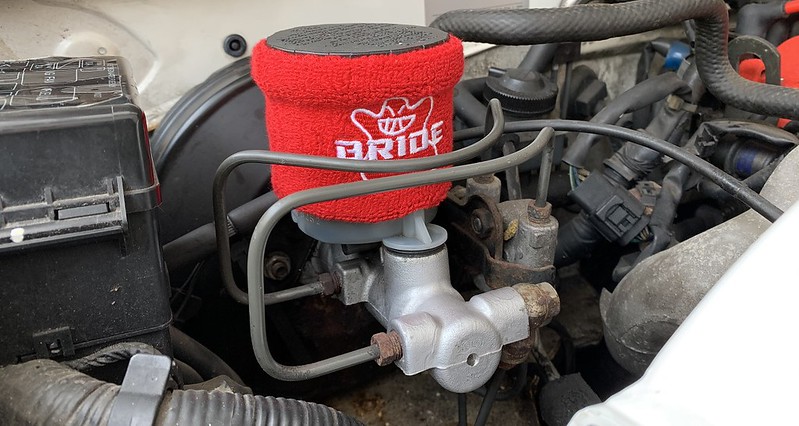
Next addition, there is no excuse or man maths justification, I just wanted it! :laughing:

BEFORE;

AFTER;

Carries on the brushed effect on several of the interior mods!

So yeah, that’s about as fun as it gets as we are deep into Lockdown and barely going out here.

I did break cover to book it in for an MOT however, so let’s see how that goes in a few days!

1 Like

Finally got the car back after a week and a half at the garage, but the list of jobs done in that time is all good so was worth the wait!

  • MOT passed
  • Oil and filter change, with genuine Mazda filter
  • Brake fluid change
  • 1x brake pipe replaced
  • Calipers painted red

The calipers being painted red was a proper job, all taken apart, cleaned, painted with 2 coats on the bench, re-greased where needed and all put back together again. Good to know the brakes have all had a thorough check!

I also bought myself something else completely unnecessary for the car :laughing: a JDM led ‘flare’ to fit in the factory fitted flare holder. This was a good modern compromise, didn’t fancy having a proper flare in the car and then it burning to the ground!

1 Like

Got some more bits done on the car, with the calipers now looking very fresh after being painted red, this made the brakes, especially the discs, look pretty tired. There was still a bit of meat left, but they would have been done in a few months latest so used this as the man maths excuse to just buy now and make it look pretty. Thanks again to MX5 Parts, these landed recently;

I bought all new wheel nuts as well as the others were looking a bit rusty after only just over a year, not ideal but at only £1.80 ish each from Driftworks, it’s not a bank breaker to just buy new and get another ‘key’ for the same price;

… and done and all fitted;

Quick photo after the test drive;

For the relatively low cost of £40-45 ish, I now have the I.L. Motorsport front lower chassis brace bar fitted as well as I had to take the upper strut brace off as it was in the way of fitting the Blitz induction kit, I don’t expect amazing things but should make a little bit of difference. The photo still showing evidence of previous oil leaks;

… and finally another unnecessary purchase, but why not! :hugs: