This will be a bit heavy. Advance warning!
In short overview:
I had the 175map fitted and did before and after results (see below thread).
i just fitted the catted manifold and center section (so, 2x sports cats in total) and ran some more results
then applied the 190 map which was designed/meant for the manifold package.
more power has been made!
Now, for the geeky bits and charts.
As a quick recap - all of this data is pulled directly from the EcuTek software and datalogging. it is able to calculate engine torque in Nm based on the parameters it can see (airflow, fuel needed, etc). This makes this a fantastic tool for real-world testing to see for airflow/fuelling changes with major and minor modifications, or even changes to fuel type!
with the Nm captures, its just simple math to covert to torque in lbsft, and then into bhp. in exactly the same way a typical rolling road dyno would do. ![]()
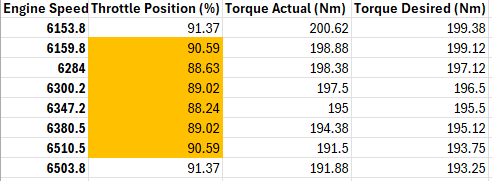
As such, here is an example of the data. (and, this isnt all the logging points either! these are just the ones i have elected to track)

fun, right?!
Worth noting at this point the similarities and differences:
- all tests done with 99 ron fuel.
- i do have tests with 95 ron, but i have not included these so not to muddy the data (separate topic this!)
- all tests are done at full engine temp, after a period of motion (to ensure the intake air temps are around 3- 5deg higher than ambient at start of test)
- same stretch of road on all tests
- I do not have a pure OEM dyno chart, as at the time i didnt know about several parameters’ existence. so i have some data, but cant make a chart.
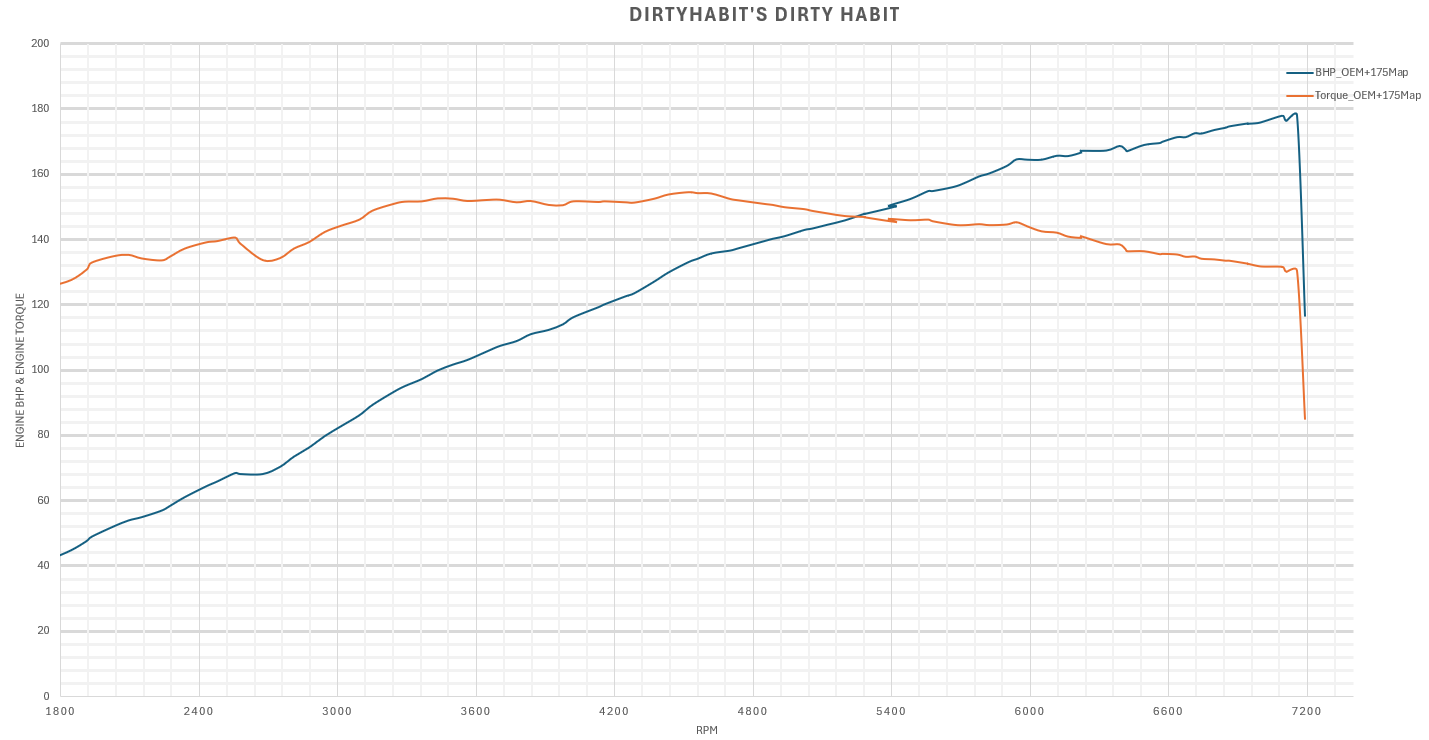
Ok so, first chart: 175 remap. stock car (only mod is/was a Colbalt backbox).
This next chart shows the ‘after’ of installing the BBR catted manifold, and center section. so i now have a 2.5" exhaust end to end.
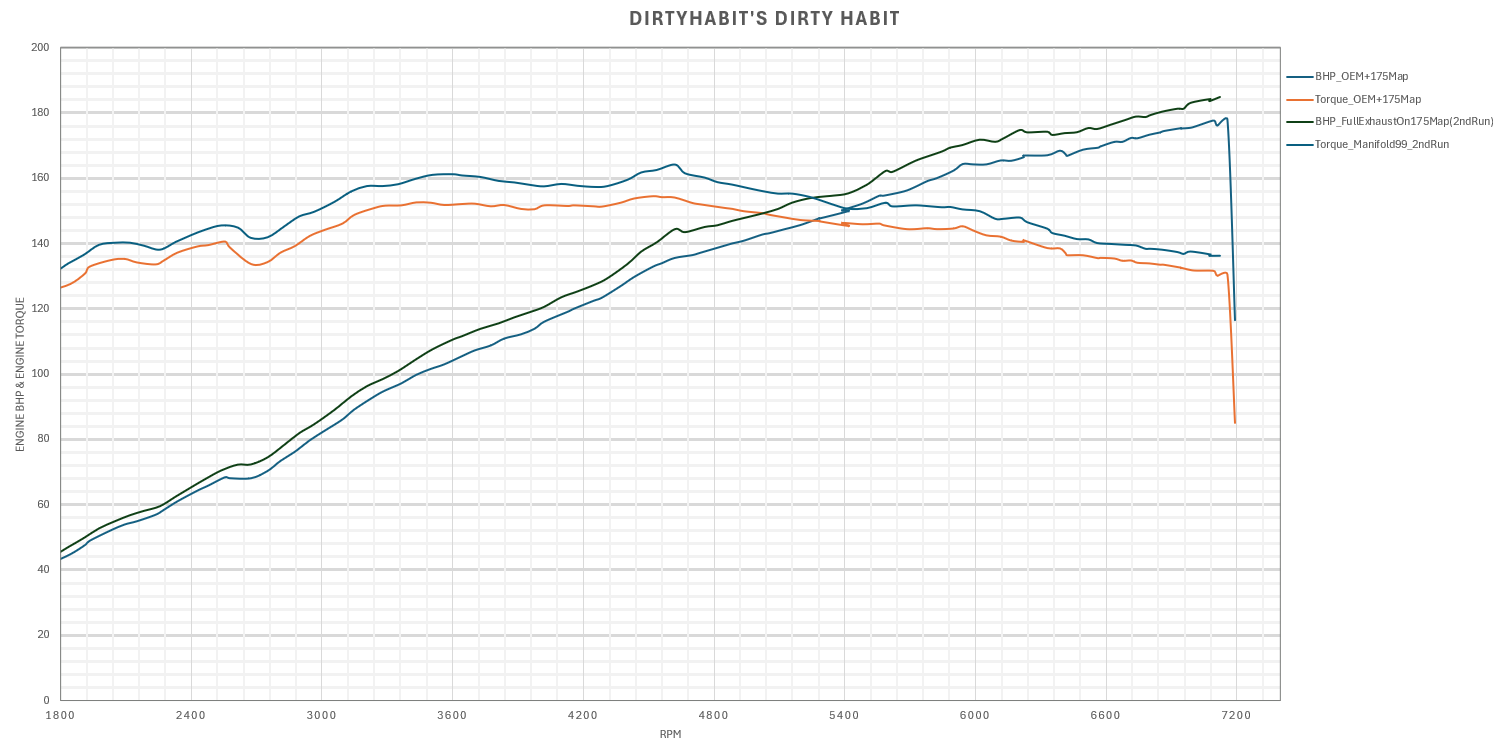
what you can see here is a across the board improvement, everywhere.
in terms of driving, noise wise its near identical to OEM + cobalt backbox. having that cat still placed in the manifold is stopping silly high decibels. i believe there is some extra boom/bass at very low rpm such as driving through town. but, no difference at cruising speeds or when flooring it. minimal difference.
driving impressions, not much different. the dyno shows more power, but it feels pretty much the same. not enough of a bump to notice.
except.
except…
and this is where it gets geeky
except when i was doing power pulls, i was feeling a hesitation around the 5500rpm mark. the car was having a bit of a stutter/lurch feeling. it wasnt until i got back into the data logs and i saw why.
the ecu was closing the throttle (slightly) past the 5800 mark!
We have seen this before (see thread above). on the mazda OEM map, Mazda elected to limit the power and close throttle from around the 6k mark, meaning that 6000 to 6800 redline was a painful and choking experience.
Why am i seeing this happen again?
This explains why:
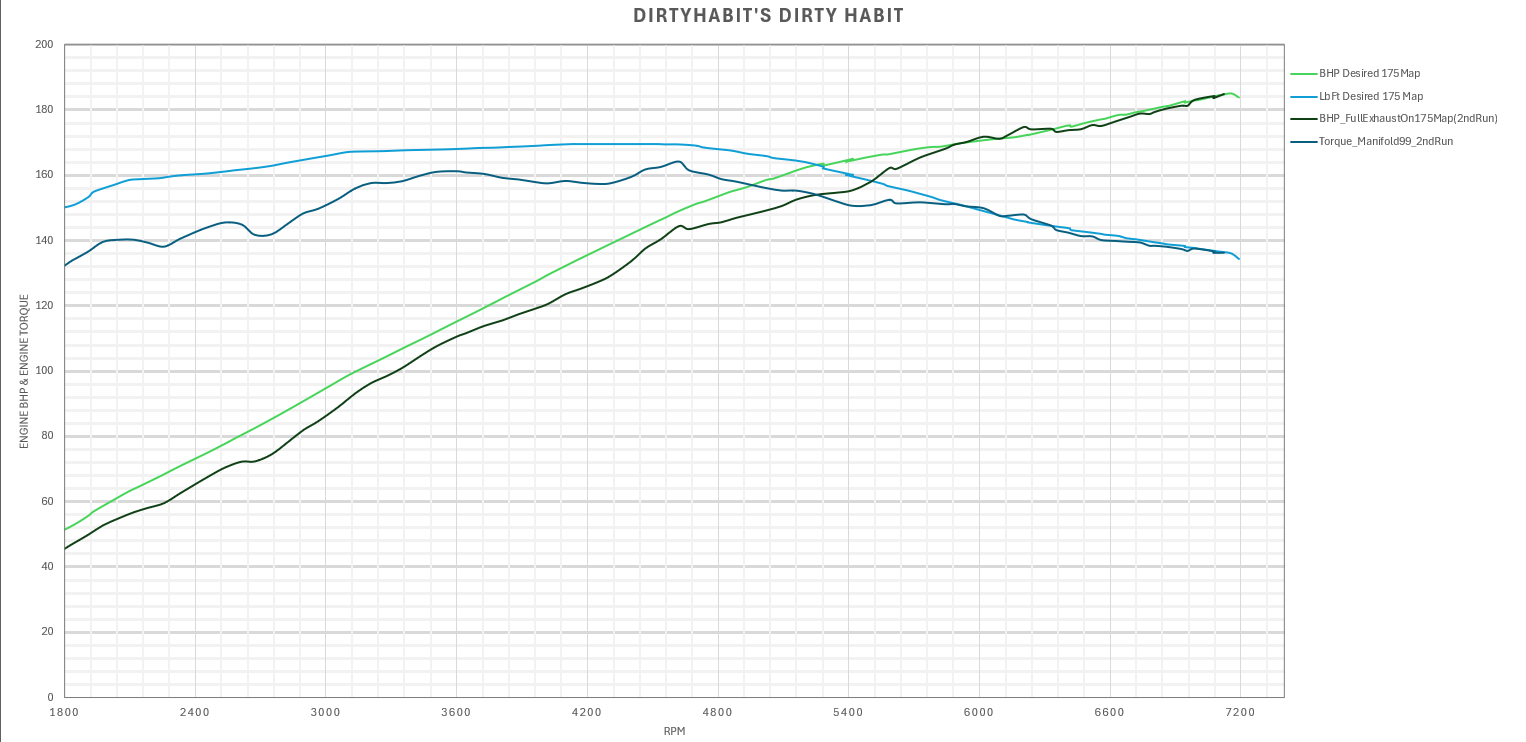
What you are looking at here is a Power Limiter in the map. BBR (well, EcuTek i guess technically…) have a parameter called ‘‘Torque Desired’’(Nm). what has happened is that on the 175 map, the exhaust is now flowing so much extra air that it has hit that Desired threshold, and the ecu is now backing back on throttle (and probably other parameters too, but i cant quite pinpoint) to ensure that Desired is not exceeded by Actual!
This is why i was feeling car hesitation past that 5500 mark.
again… Fun, right? ![]()
So next up - apply the 190 map.
This is what happened ( i have kept the Desired overlay as in the above, so its a clear showing of how the new map is able to break to a new ceiling)
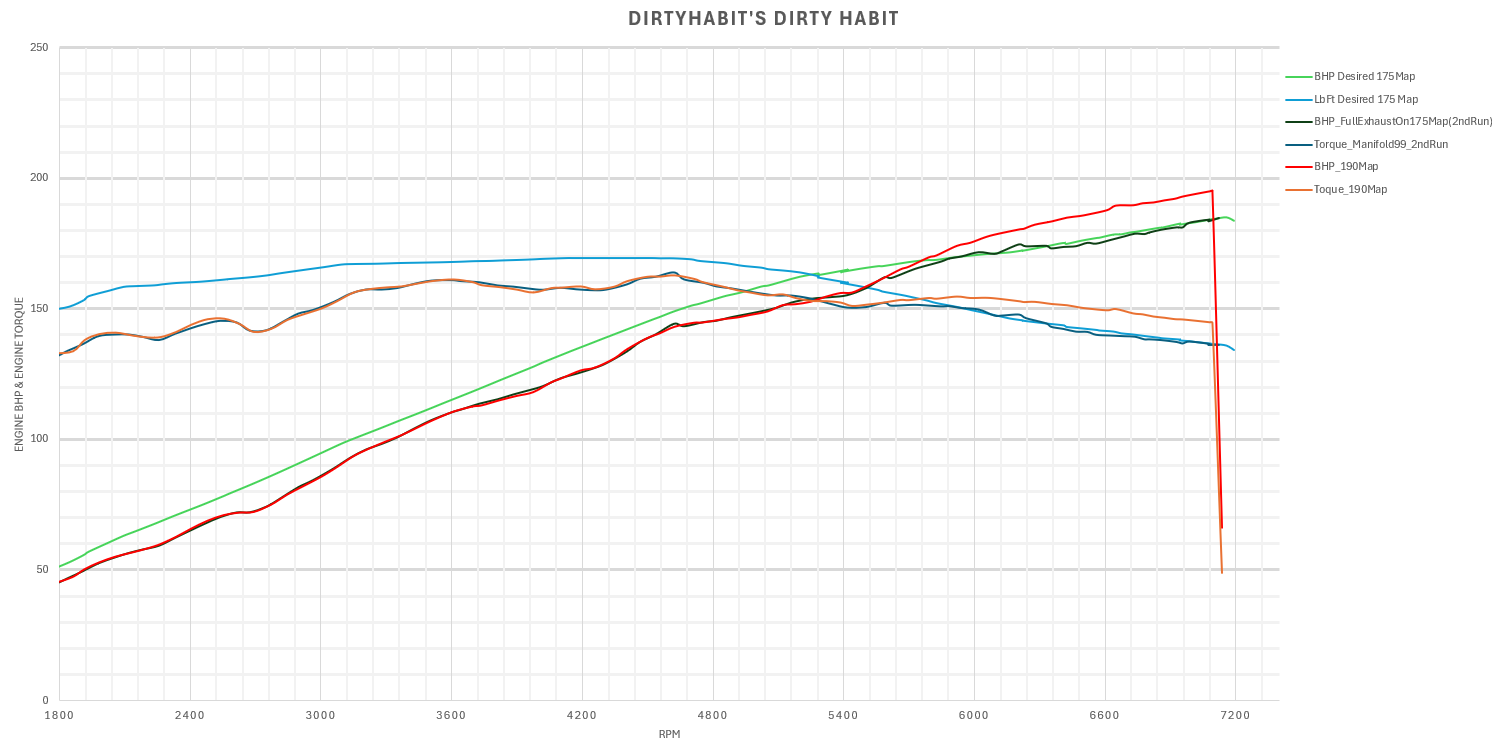
no change at all low to mid torque and power between those maps. mirror image. (which is good. gives credit to the repeatability of these tests), but as you can see the Torque Desired on the new 190 map is much higher and so the ecu is able to work as required to make maximum power.
Driving impressions on the 190 map
now it feels different! in two key ways - part throttle feels much, much lighter and responsive. BUT, i know now that this isnt due to the exhaust fitting, theres obviously something different between the maps. i’ll be doing my usual MPG testing over the weekend so will see any obvious changes on a 15mile run i do. but initally i feel my throttle input it far less for the same work.
full throttle - it pulls. ![]() really nice.
really nice.
Closing thoughts:
Whats got me itching, is the rpm limit. as a driver, it does not feel that its given up on power as it comes to redline, and the data supports that. I dont know what RPM the stock valve springs will safely operate at, but if the car is still making power then it goes to reason that the RPM limit should be moved to the right.
From all the tests i have done, the max RPM is different on the two maps as well. looks to be off by about 70rpm. (175 redlined at 7200, 190 map seems to be about 7130). not a huge gap, but thats why the dyno charts i have dont fully align at the end.
what is also very important - and probably needs to be on the top of everyones mind - if you go and fit a full exhaust WITHOUT a remap (from someone), then you are going to hit mazdas OEM throttle limiter. you will almost without doubt not make a single improvement to peak power!
There are some on here with more experience than me in this field. But i think this statement would be reaosnably true and accurate based on the data ive got.
if like me you are doing incremental modding, you need to also be aware of certain ‘ceilings’ in a tuners map.
Whats next
Ordered the Fab9 throttle body upgrade. this will be great for seeing if there are any flow changes. (its a 55mm throttle plate to a 68mm. big jump). from the few written comments and reviews iv found, its a positive driver reaction. but theres not any dyno data at all. so ill give it a crack.
short term, i might fabricate or buy a couple of air intake kits. i know theres dyno charts showing loss on power on some, and only 2 known to have made any improvement. but for this, its more a case of me being able to see real airflow changes. just experimentation.
longer term, i had been planning supercharger route. but i am now remembering my love for N/A. Cams are now on my mind more. ![]()
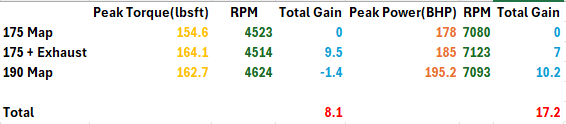
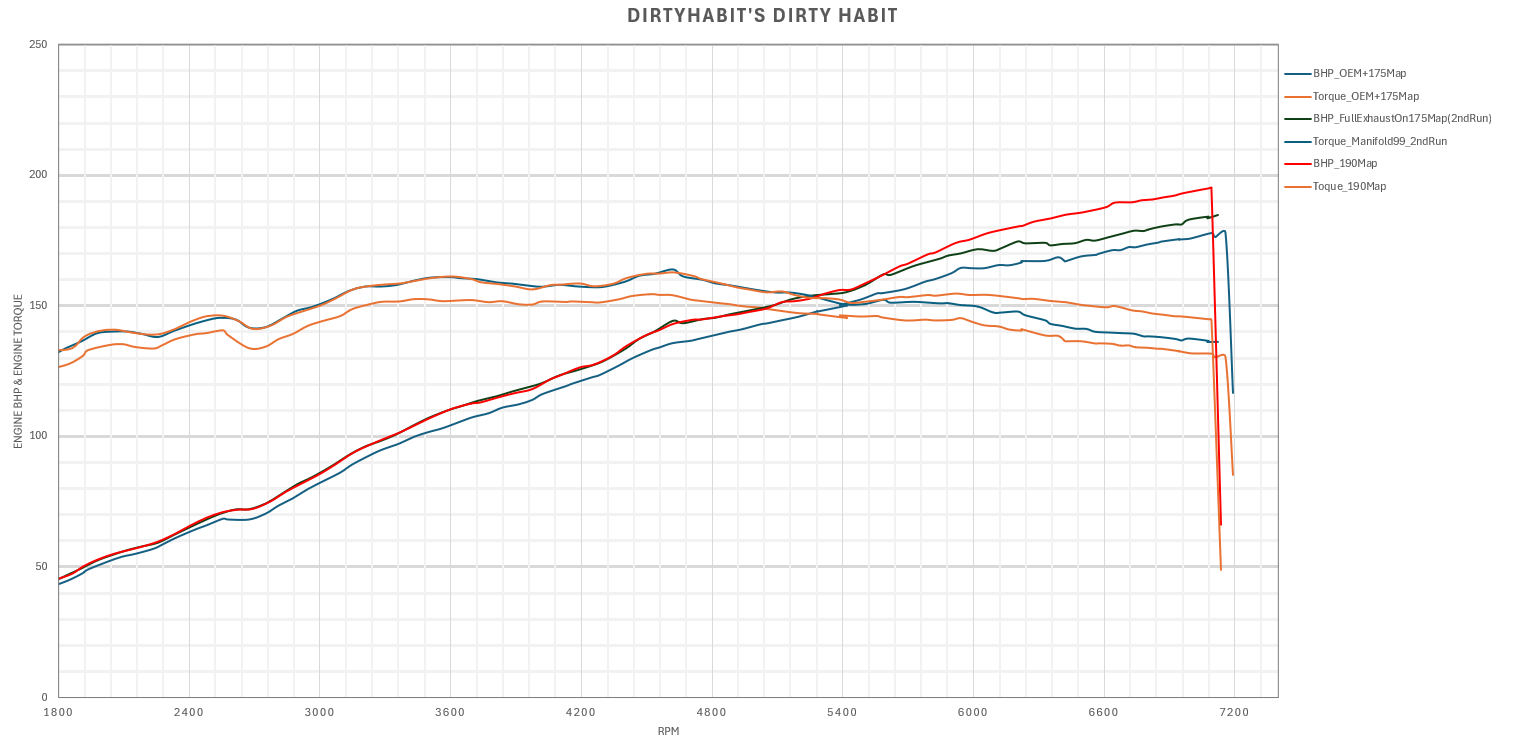
Final dyno charts, putting it all together:
175 Map (before)
175 Map + full exhaust (during)
190 Map then applied (After)
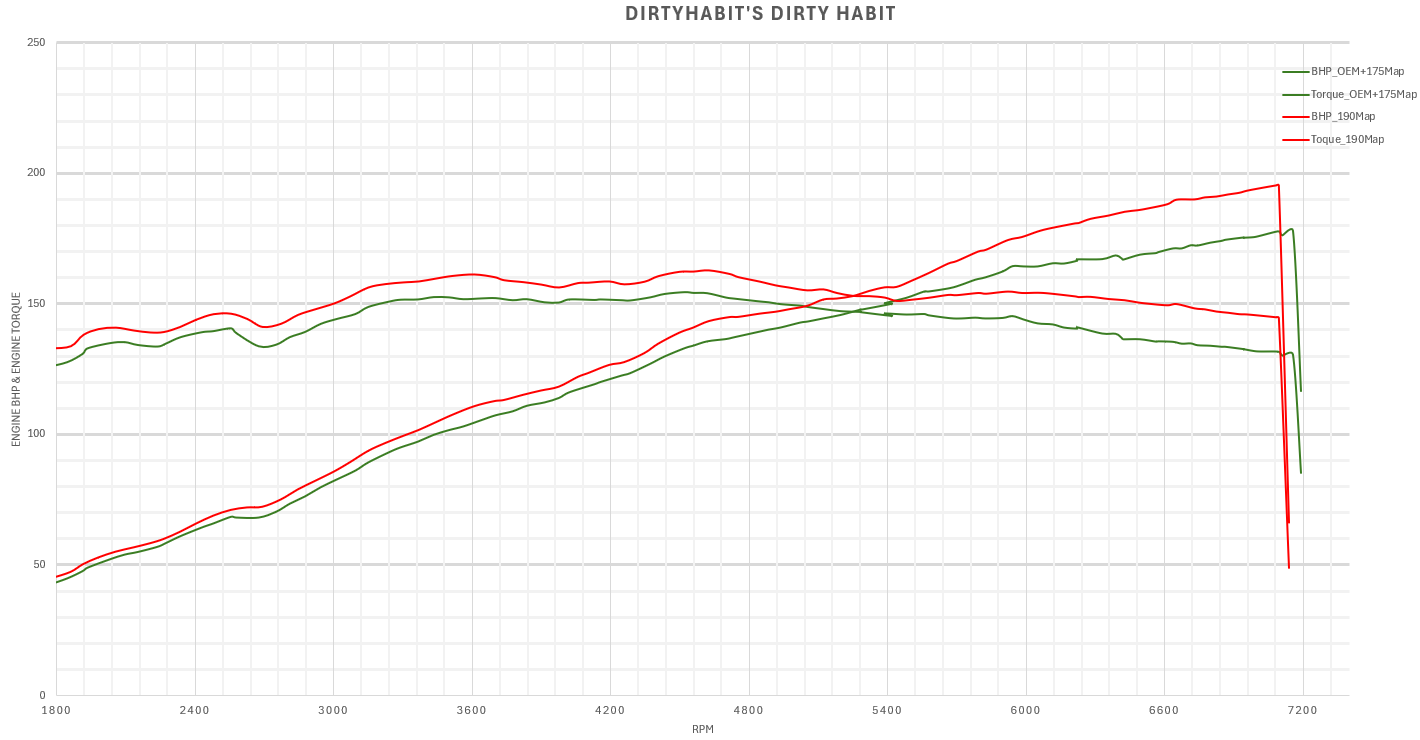
Clean Chart:
175 Map (before)
190 Map (After)
Hope this was useful guys.
Ive got a ton of data and can present in various ways if theres questions or something ive overlooked.