There are guides on some forums on how to do this. I followed a guide on MX5Nutz. However, it missed some important bits out and the writer also removed the clockspring mechanism too. Not what I wanted to do.
So; this is how I did mine.
The first thing I did was contact my insurer. I wanted to stay legal, (why wouldnt you?), some insurers may have a problem with you removing the drivers airbag. Mine, Admiral, were OK but charged me an additional £17.50 for the year. Other than that, no problem.
The next thing; the airbag is AN EXPLOSIVE DEVICE! It could do serious damage to you so treat it with respect and store it safely once you have removed it. If it goes off, it would also release some nasty chemicals too. The recommendation is to store it with the bag upwards so that if it ever did go off, it would not fly up into the air and the bag would just deploy.
The boss kit I bought for mine came from a supplier in the US. It is a Bell Works 75mm unit and is made for the Mk2 and had cutouts that allow for the clockspring to stay in place. http://miataroadster.com/works_bell/works_bell_steering_wheel_hub_adaptors_tall_75mm/g-62739.aspx
It comes with a airbag defeat circuit that has a resistor that fools the airbag sensor into thinking that the airbag is still in place. On the dashboard is an airbag warning light that comes on if there is a fault. This is an MoT failure if it is active, (though not having an airbag is fine). Some people just remove the bulb and some fit a 3 Ohm resistor but I wasnt sure if with a fault detected, the passenger airbag would work or not. This is my kit componants and show the boss with shroud, the airbag defeat wire and a connector for a horn button.

Anyway, on to the job in hand…
First, make sure that the wheels are facing straight ahead, then disconnect the battery at the negative terminal. Then go and make a cup of tea . I left it about 30 minutes. I also switched on the headlights so as to leave an open circuit to disipate any residual current. If your audio system has a key code lock, MAKE SURE YOU HAVE THE KEY CODE FIRST otherwise your audio system will not work when you restore power.

Next undo the two 10mm bolts that retain the airbag. There is one either side of the airbag on the steering wheel.

Now, VERY CAREFULLY remove the airbag by gently pulling it forward. At this point I was wearing a hard hat and face visor: I kid you not.

There is a large connector on the back of the airbag. The large yellow one is the main kiddy that can set the thing off. The connector is held in place by a clip

Take the connector out of the clip. There is a retaining clip that stops the connector from coming apart, (they mean business with these things). release the clip and pull the connector apart

You can now breathe again. Place the airbag in a safe place, ( you may want to fit it back again at some point in the future) remembering to store it with the bag upwards.
Looking at the wheel, you will see the airbag connector which you have just disconnected and a smaller red wire with a white oblong connector near to the steering wheel spline. This is the horn connector

Disconnect the horn connector. If you dont, when you come to remove the wheel, you may break it as it is attached to the steering wheel. It has the same type of connector that is found in some computers. There is a release tab that you press and hold down and it then just pulls away.

This shows how the horn circuit is made on the stock steering wheel. There are paddles either side of the wheel that move in when you push on the airbag/horn. The red wired horn connector is fitted to one of these paddles which is why you should disconnect it before the wheel is removed. If you push on the paddle where my finger is showing, you will see how the horn circuit is made.

You are now ready to remove the steering wheel. The spline nut is a 21mm self locking nut. Loosen it a little way but do not fully remove it yet

Gripping the wheel at a 3 o/clock, 9 o/clock position and 6 o/clock, 12 o/clock position, wiggle it to remove it. It will be quite tight on the spline so you may need to tap it from behind too. This is why you dont fully remove the spline nut, it stops the wheel flying off and hitting you in the face
You should now hopefully have something like this. This shows the steering wheel removed. It also shows the airbag connector and the “clockspring” arrangement.
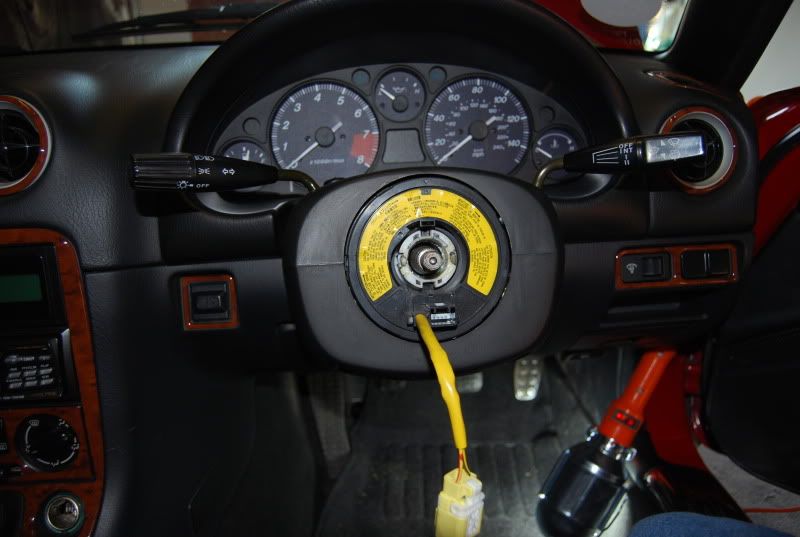
This has two lugs that cancel the indicators. They are the white, (out of focus, sorry) plastic lugs.

As I said at the start, the boss I bought has cutouts so that these lugs can locate properly.

Before fitting it however, I connected the airbag defeat wire that came with my kit to the airbag connector. It has two wires that just push in to the connector.

I also fitted the new horn wire to the socket near to the spline

Feed the horn wire through the cutouts in the boss so that it is on the inside of the bos and then fit the boss to the spline. My boss had a “up” arrow to mark the top.

This shows the boss in place with the airbag defeat circuit taped up for extra security. The horn wire is on the inside of the boss.

Refit the spline 21mm nut. My kit had a crush washer which I fitted between the boss and the nut. I temporarily fitted the new steering wheel to the boss so that I had something to hold onto when I tightened the nut.

I removed the steering wheel and then fitted the rubber shroud to the boss.

Make a final check of the wheel alignment and then fit the new wheel. Make sure to connect the horn button to the horn wire and then fit the horn in place.

Finally, start up and check that the airbag warning light goes out.

Make your self another well earned cuppa then go for a drive .
.


