I have a 2014 Sport Nav with the AVN2 unit to which I’ve just applied a firmware update to turn it into a standard Alpine INE-W920R. All works fine, but I’d like to add a reversing camera - there are lots of sub £20 options on ebay & Amazon etc., whereas the Alpine camera seems to be about £120.
I’m not sure what connector the Alpine camera has, but all the cameras I have found seem to have an RCA / phono plug - so I want to know whether the Mazda/Alpine unit has an RCA / phono socket that I can simply plug a camera into or will I need some sort of proprietary Alpine cable adapter to allow this?
Whilst I could take the unit out to look, it does look rather a big job, so I thought I’d ask on here first in case others have already done this and/or could offer some words of wisdom.
Just checked the Alpine website page for this unit. The reversing camera in the associated products section has a multi-way cable connection. Not an RCA in site.
Thanks Roadie - I also saw the Alpine camera had some sort of multiway plug on it, but I downloaded the Alpine manual and a diagram in there looked like there may be a multiplug with various other connectors hung off it including an RCA type, but numerous searches haven’t revealed anything else.
So I was wondering whether there may be such a cable with currently unused connectors hanging off the back of the unit in the car. Unlikely I know, but I thought I’d ask on here before pulling everything out. Looks like that will be my next move and then trying to work out what the pin outs are!
IanH - I’m still waiting for someone to advise me that a reversing camera isn’t necessary on an MX5.
I should probably just stick with the useful stuff like chrome trim rings for the dashboard, polished lids for the oil filler cap & brake fluid reservoir under the bonnet and chrome petrol filler caps and shiny exhaust trims on the outside.
Rumour has it that Carol Shelby (of AC Cobra fame) came up with the phrase ‘the only difference between men and boys is the price of their toys’ - the AC Ace was apparently crying out for a V8 in his mind. Now there’s a thing - maybe I should abandon this reversing camera nonsense and stick a V8 in there …
Did you ever manage to attach a camera with RCA plug to the AVN2 (Alpine INE-W920R) unit. I have a 25th Anniversary Edition and I am considering adding a camera. I had the head unit out but found that the RCA connector was not on that particular wiring loom. I have spotted a camera connector loom on ebay for the W920R.
No I didn’t. I also bought the specific cable kit to fit a camera to a W920R on eBay - but it doesn’t fit the unit in the MX5! So I can only assume that whilst the unit is electronically compatible with the W920R, the physical box & connections are different. I checked the back of the unit in the car against the diagram of the rear panel shown in the W920R manual and whilst it was similar, it was slightly different - the camera/w.remote connector on the back of the unit in the car looks wider than thAt shown in the W920R manual. Given the connector on the unit is labelled camera/w.remote, I assume it must be possible to fit a camera but in the absence of a fully wired connector kit, the difficulty would be finding the correct pin outs. Should you discover anything further please post here - as will I.
Did anyone finally succesed to install rear view camera with AVN2 Alpine ? I have the sendo edition (same with the Venture/25th anniversary edition) I bought the Alpine HCE-C 1100D rear camera for plug and play, but the Alpine source didn’t reconinge the camera at all. After searching the owners manual i found the followning. Someone dealt with this issues and found any solution so far ?
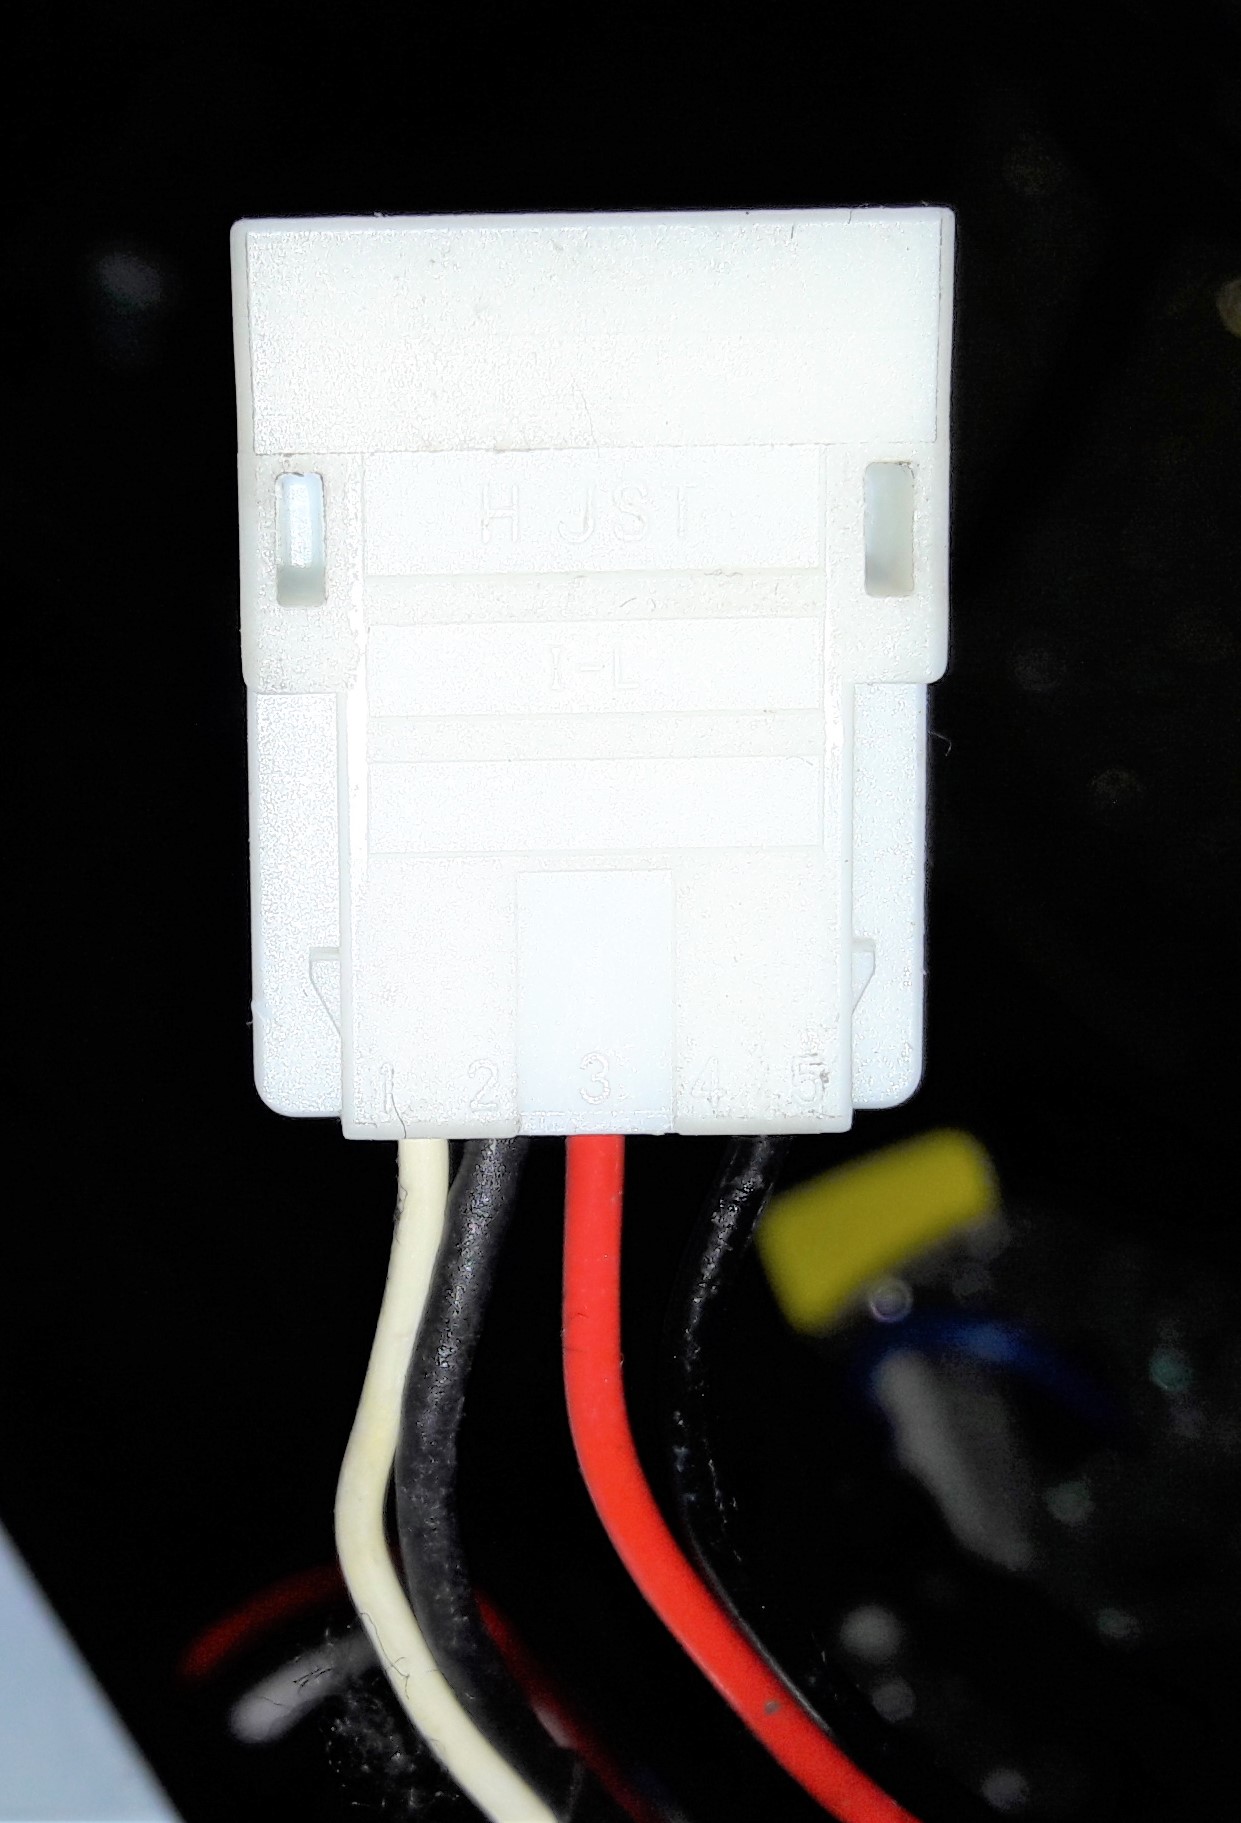
I have finally found the pinouts to connect a Reversing Camera to the AVN2 unit fitted to 2014 NC 3.75 models. During a random browse on Facebook, I recently I came across a German MX5 site where Heinz Offenburger (AKA BlackBlue101) had found the correct connections. So thanks to him I thought I’d share it back here.
When you pull the AVN2 out from the dashboard, hanging out the back is a white 5 way connector block with four wires fitted. The four wires are:
White - Camera signal, Black - camera earth, Red +6v power, (4th connection - no wire), Black - earth.
Note that you have to use an NTSC compatible camera (not PAL) - I bought one relatively cheaply on ebay which was described as “NTSC/PAL” which works fine.
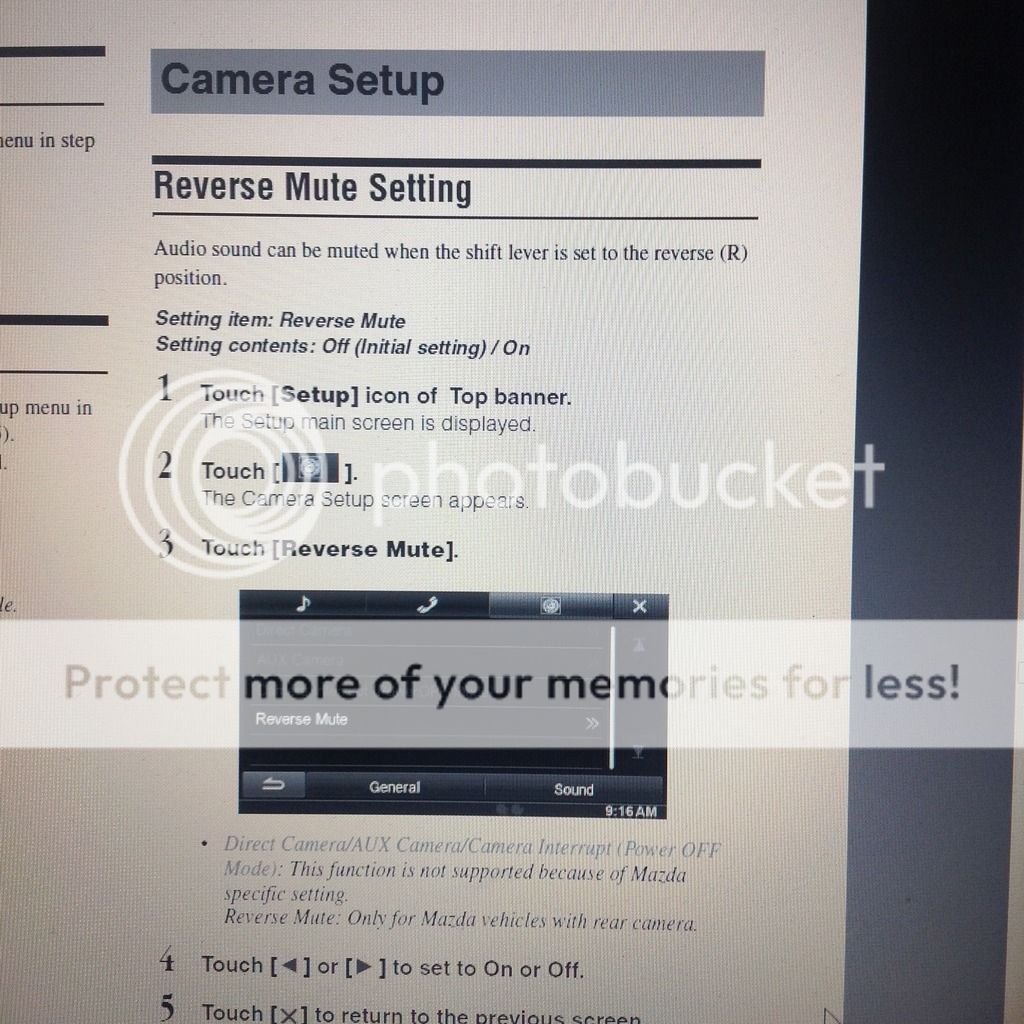
You need to update the firmware on the unit (‘flash’ it) to be able to see the reverse camera options (available from the Alpine site which also gives graphic equalisers & other functionality too) – which effectively turns it into an Alpine INE-W920R. I did this a few years ago (and made detailed notes if anyone wants to do theirs).
Then, go into the General Settings menu – across the top of the screen are icons for Music ‘Phone & Camera. In Camera settings, click on ‘Direct Camera’, then ‘Camera Select’ & toggle through the setting from ‘Off’ to ‘Rear’.
Mount your camera to the car, (you can get cameras that clip into the hole that is blanked off between the two number plate lamps) connect your camera to the 12v supply from the reversing light, & find a way of routing your camera signal cable through to the head unit & you’re in business (or alternatively you can also buy a little transmitter/receiver kit to save you running wires from front to back). When you engage reverse - the camera will switch on & the head unit will display the image from it!
I don’t know if there’s a restriction on the size of the USB stick you use - give it a try, it’ll either read it or it won’t. The total size of the files on the upgrade are only about 100Mb, so anything will be big enough!
I think I did my update with a 32Gb or 64Gb stick, so size doesn’t matter, but I’m fairly sure that it needs to be formatted as FAT32 for the head unit to read it.
If the USB stick needs to be FAT32 formatted then 32GB is usually the maximum size.
If bigger than 32GB the USB stick needs exFAT which is significantly different.
Found a 2GB drive and successfully upgraded the firmware to v1.3 this afternoon. Also successfully reinstalled my custom flash screen.
So, thanks again!
Anyone here mounted the camera on the black blanking plate on the trunk lid itself? I am especially wondering how anyone lead the wires from the lid to the main chassis. I do like mounting it on the lid better than above the license plate on the bumper.
Hi Nippan. I thought the plastic trunking between boot & boot lid that carries power to the licence plate lights looked too small to get both video & power connection wires through, so I used a wireless transmitter/receiver kit. There are plenty on ebay with or without cameras. This means that you need only one small power wire from the boot to the boot lid & it also means you don’t have the hassle of routing cables right through the car.
You need a very thin piece of wire for power from reverse light to camera / transmitter (they use miniscule power so thin wire is fine) and a piece of stiff wire to use as a pull-wire. You also need a couple of small tie wraps to replace the ones you’ll snip off.
Remove all the internal plastics that line the boot for access. In the boot, unplug the license plate light connector coming out of trunking from the boot lid and unplug the rubber grommet from the body of the car and the one at the other end from the boot lid. Unclip the trunking from the hinge and snip off the tie-wraps holding the trunking to the grommets and separate grommets from trunking. This should then allow you to manoeuvre the stiff wire through the grommet/ trunking / grommet. Then bend the end of the stiff wire back on itself to form a thin hook, hook your thin wire to it and pull the stiff pull-wire back through the grommet & trunking, thus threading your thin power wire through.
Solder the boot side of the thin wire to the reversing light feed (orange with white stripe) and the other end to your transmitter & camera in the boot lid. Take an earth for the transmitter / camera from one of the licence plate lights.
In the car, you will find the same colour reversing wire power cable (orange/white stripe) behind the dash – it runs into the AVN-2 – splice into this to take power for the receiver – I removed the AVN2 whilst I did this for better access. Finally connect the receiver video feed to the AVN-2 (as per my previous post – white for video feed, black -earth from the small connector hanging from the back of the AVN-2).