Fascinating read.
Do you have any photos of the painted corner?
What were your suspension bushes like?
The ones on my car looked very poor but when I removed them the rubber was still pretty good.
As a matter of course I replaced them and used OEM parts.
I still have the rear to tackle.
I’d also be interested in hearing your thoughts on the Bilthamber products.
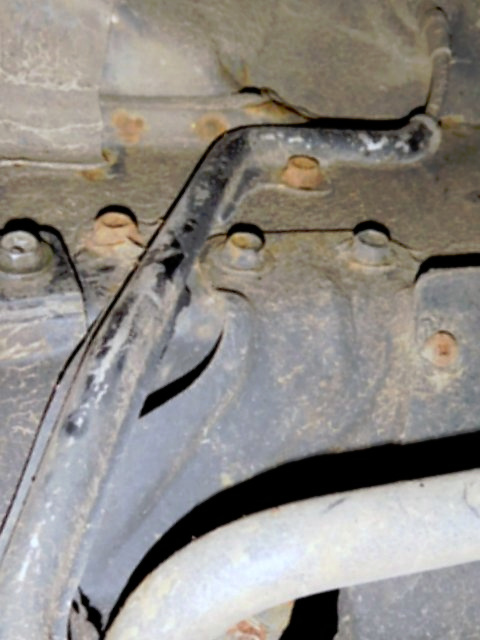
This is what the painted offside rear looks like:

Reviewing all these photos, I can see lots of areas that I missed first time around or that need to be re-done. The camera flash highlights what my eye didn’t see at the time.
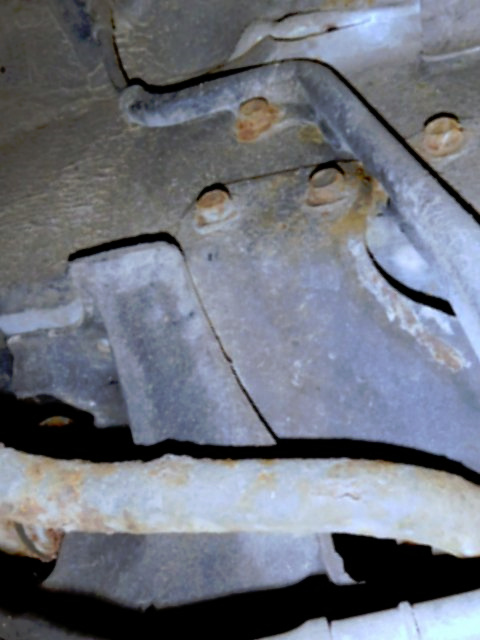
In my last post, I forgot to add images of the outer chassis rails:
I didn’t remove anything for inspection, but from what I can tell, the rubber bushes seem OK – no apparent crumbling or tearing.
I’ve been using Bilt Hamber cleaning and finishing products for a few years. Only recently have I started using the corrosion prevention products. Not only do they get good reviews, the company is located only a few miles away from me.
1 Like
Things look nice and tidy under there. Very smart.
Thanks for the photo and feedback. I’ve been looking at BiltHamber products so it’s good to hear from others.
From what you say I feel confident in shelling out some hard earned on their stuff.
Have you had success with their primer? I gather it has a high zinc content to offer greater long term protection?
Sorry, I can’t help with that one.
1 Like
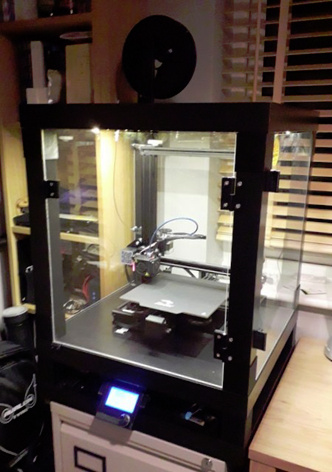
Early last year, I bought a 3D printer. There are many different models out there – I have a Creality Ender 3 Pro. During lockdowns and other restrictions, I have extensively modified the printer and constructed an enclosure for it.
My system:
Perhaps not surprising, but clear acrylic sheet was in short supply last year and prices increased.
The relevance to MX-5s is the ability to print plastic parts for the car. These can be designed yourself (using purchased apps or using free on-line tools such as Tinkercad), or you can download designs made by others (see Thingiverse). You can also modify designs made by others.
Recently, a couple of people have appeared on Ebay selling 3D printed parts from designs taken from Thingiverse. The door bushes have been discussed elsewhere and I mentioned the hood latches in an earlier post for this topic.
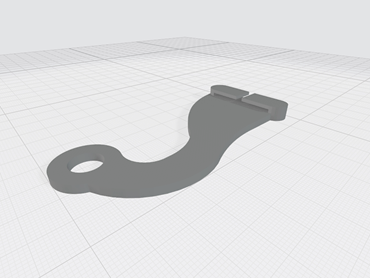
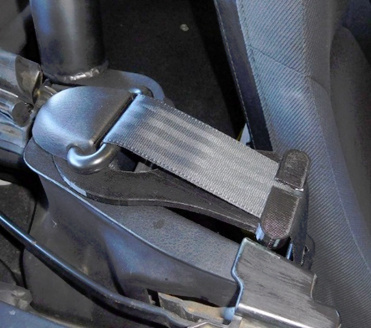
There are 2 designs on Thingiverse I found useful. One is a seat belt extender, the other a hinge to repair the broken armrest on early NBs. There are 2 seat belt extenders on Thingiverse:
I created my own design, based on both of them:
The hinge from Thingiverse is for a LH drive car, but is easily reversed in the apps.
On my Roadster, someone had already repaired the armrest using a small brass hinge. It worked but was not very elegant. You will need a rod for the hinge. I used some 1mm rod from my this-may-come-in-useful-one-day box.
I’m surprised no-one has tried to sell these on Ebay.
If anyone’s thinking about 3D printing, the important thing to remember when making items for a car is how hot it gets in summer. The most common (and easiest to print) material is PLA (polylactic acid – basically corn starch). This material will soften in the heat of the sun (as I soon discovered with the seat belt extender). An alternative is PET (or PETG) which, although not as resilient as ABS, seems to be OK for my part of the UK.
1 Like
A thought for the Forum Administrators …
There are a few forum posters who have 3D printers. Might there be enough interest in an new Area covering 3D printing for MX-5s?
This could be for sharing experiences, sharing designs for parts, or even (non-commercial?) making parts for other members?
3 Likes
A weekend brake ……
Prior to me buying the Roadster, it had failed its 2017 MoT test due to a problem with the offside rear calliper, which was replaced. Annoyingly, for my 2018 MoT, the nearside rear calliper caused a test failure. The garage replaced this for me.
For the 2019 MoT, the tester noted that the nearside calliper appeared damp, but it was not a test failure. I told him that I hoped it was not leaking as it was they who replaced the whole unit the previous year.
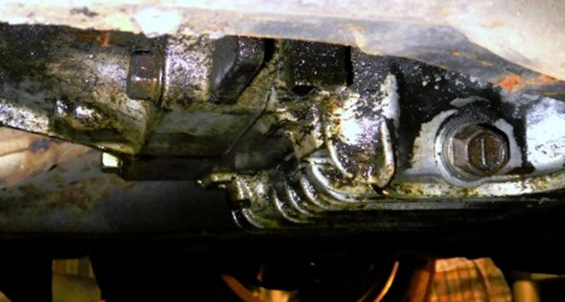
Prior to the 2020 MoT, we all went into Covid lockdown and my MoT period was extended by 6 months. I decided to replace all discs and pads and, while everything was dismantled, to inspect the nearside rear calliper.
Replacing discs and pads is a job I’d done on other cars. For the Roadster, I’d read a number of guides (including ones from the MX-5OC) and seen the videos, so I did not expect any problems. I should have known better. You have to be a member of the ownwers’ club to see these:
First task – on to the interwebthingy to get some parts:
Rear Brake Pad Set Blue Print ADM54254
Front Brake Pad Set Blue Print ADM54252
Pair of Front Brake Discs Blue Print ADM54348
Pair of Rear Brake Discs Blue Print ADM54328
It soon became apparent that the system would need additional bits - a couple of clips were missing, one of the slider pin boots was damaged and the shims had seen better days. So, back to Ebay for:
Front Pad Fitting Kit Anti-Rattle Clips
Front Brake Caliper Guide Slider Pin Kit
Front discs and pads were first. I removed the carriers to clean them up and file down some corrosion to get the new shims to seat correctly. No significant problems, but the shims would spring off while inserting the pads.
Offside rear next. A bit trickier extracting the disc and again I cleaned up the carrier. The big problem for me was that, worse that at the front, it seemed impossible to keep the shims in place while trying to get the pads inserted. After a number of frustrating failures, I pondered the problem over a mug of tea. I’d tried to hold the shims in place with string and then electrical wire, but it was all too thick. I remembered I had some very fine bare wire I’d kept from my dad’s “may-come-in-useful-one-day” box (it must be hereditary) and figured this wouldn’t interfere with fitting the pads and was thin enough to be easily pulled-out when the pads were seated. It worked.
I saved the nearside rear until last, not knowing what I might find. I discovered the cause of the damp calliper noted at the MoT test. The rubber seal was slightly damaged and had not seated correctly.
I would now need:
Brake Caliper Seal Repair Kit (3207)
Just in case I had to remove the calliper to do the work, I also bought:
Banjo Bolt Copper Crush Sealing Washer
Plus a few tools to make life a little easier:
Laser Tools 6498 Brake Bleeder Wrench 8mm
Laser Tools 6497 Brake Bleeder Wrench 7mm
Laser Tools 6820 Silicon Hose with Valve 1.2m
I did manage to replace the seal with the calliper still connected, but it was awkward and if I ever have to do it again, I’d remove it completely. The difficult part is getting the rubber seal over the piston and seated in both grooves - not easy at my age, hunched over in the wheel arch. There are some Youtube videos that cover the topic. This is quite good:
After re-assembling (again using the wire to hold the shims in place), I remembered I had to adjust the handbrake mechanism on both sides. This turned out to be easy - just tighten to pads rubbing and back-off 1/3rd turn.
Having interfered with the calliper, I had to bleed the brakes. I had plenty of hydraulic fluid, so I also did the clutch which, like the diff oil was likely original. The tools I’d bought made this an easy job. I could have done it alone, but I decided to enlist my wife’s help and see what else she had learnt from Ed China.
Finally, a quick test drive and inspection to make sure everything was OK.
The 2020 MoT test was passed with no issues.
3 Likes
Many posts ago, I mentioned that the air-conditioning was not working. When I first got the car, I thought I’d take a chance and get refrigerant added. It worked, indicating the system was capable of functioning properly, but it didn’t last for very long. Clearly, a leak somewhere, so I left it for another day.
Unusually for a NB, my Roadster has an inspection window in the circuit. I presumed there must be some refrigerant in there, as I could see the green dye, but no pressure to operate the switch.
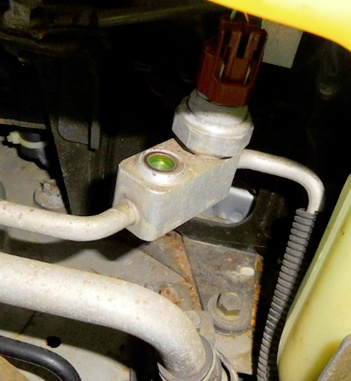
Armed with the JDM wiring diagram and the parts list, I worked out how the system worked and, after conducting a few tests (shorting the pressure switch, forcing relays to operate etc.) I was convinced a leak was the problem.
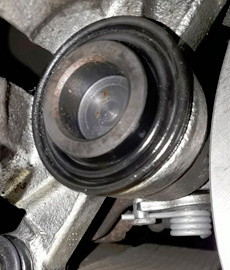
In addition to looking into cavities, the borescope allowed me to get in other inaccessible places, which is how I found what may be the location of the leak:
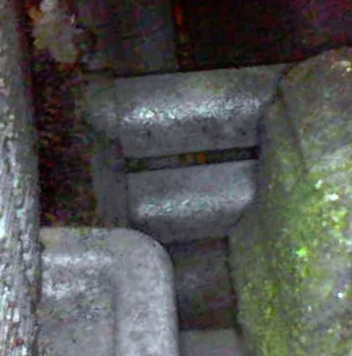
This is the lower connection to the condenser, which is tucked away on the nearside and the green dye is obvious. It may be simply an O-ring that needs replacing, but the system will need to be emptied of residual refrigerant and the radiator must come out to get access to the condenser.
I’d like to have everything on the Roadster working as it should, and I like a challenge, but this is a job that seems more trouble than it’s worth, so I’ve decided to leave it as it is.
So, what’s left for me to do?
Well, nothing much and certainly not until the spring, when weather warms up.
I still have the Dynax S50 to squirt into the sills and into the chassis rails, and I should have a second go at the suspension components with the Hydrate 80 and Corroless paint.
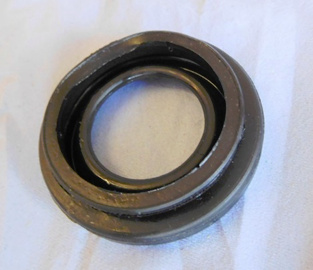
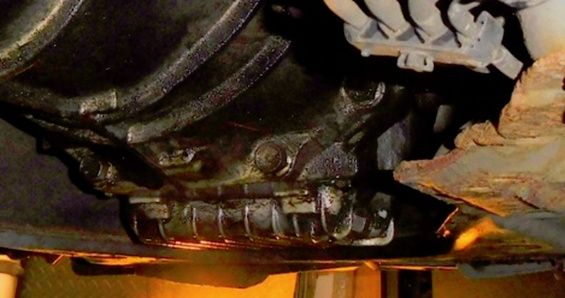
There is also the (slight) oil drip to be investigated. It’s not coming from the cam cover and the oil filter is tight. Anywhere else is unlikely to be something I can fix.
I will probably use Bilt Hamber Surfex HD to clean the engine when I change the oil and filter. This may give me a clue to the source. It could be the sump, but I suspect it’s the rear crankshaft oil seal and the drip is coming from the hole at the bottom of the bell housing. Something to be done should I need the clutch replaced.
…
I guess this should be in the “My Garage” topic, but here it is, anyway:
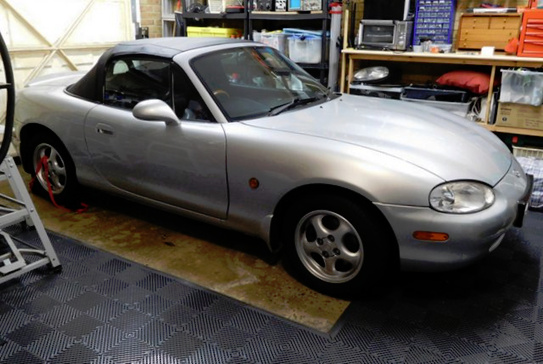
Unfortunately my garage floor is a bit rough and appears not to have a damp-proof membrane - I get condensation on the bottom of plastic boxes on the floor, so solid mats or tiles are unsuitable. The garage is also my woodturning workshop, so I wanted something that would not only improve the look of the floor, but also be robust and provide adequate ventilation for the concrete to breathe. I found these:
I also have these rubber mats to provide some comfort when standing for long periods:
Finally, a big thank you for all who have indulged me and taken the time to read my posts and especially to those who have “liked” them.

7 Likes
Post Script …
I’ve just spotted that, over all my posts, the most popular link is how to fold the tonneau cover.
No more scrunched-up covers shoved behind the passenger seat, eh? My work here is complete.

4 Likes
Thanks Bob for the entertaining and very informative read. Managed to divert me form doing some work for quite some time!!
Now is (nearly) the time for just enjoying and driving the car!
Take care and stay safe.
1 Like
Enjoyed this thread! Lots of info and helpful links.
Any more updates?