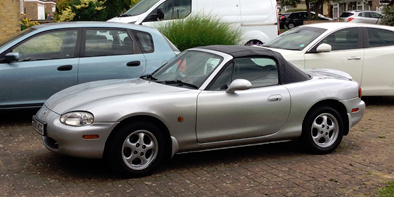
It's time I gave something back to the forum

I’ve been lurking on this forum for a few years, gathering information and advice, so I thought it’s time for me to give something in return. This is not going to be an account of a restoration, more a diary of fettling and reviving a 20 year old JDM NB. Some of it has already been covered by other members of the forum, but there may be some things I can add. This includes some inter-web-thingy links I found useful.

There’s too much for a single post, so I thought I’d use this as an introduction to a new topic and add to it every now and then. I’m a forum-posting newbie so if I get anything wrong, or pictures are too big/small/inverted, please be gentle with me.

I intend to start with a bit of background stuff, then I’ll add an occasional post about the repairs, replacements and general tinkering that I’ve done and problems I’ve had. It might not always be interesting, but hopefully some of it will help other owners.

Bob
(South Essex)

PS - Another COVID lockdown means I may be posting more often than I’d thought I would.

8 Likes

:popcorn:

Always good to hear stories, particularly interesting ones. If an MX-5 is involved, that’s interesting.

:smiley:

:popcorn:

My interest in the MX-5 began about 5 years ago when planning for retirement. I’d been an electronics engineer in an aerospace and defence business since leaving school, so I thought I would need something to keep my brain and body (moderately) active. My wife would blame the next bit on me watching too much Car SOS, Wheeler Dealers etc.

Over the years, I’ve done a lot of home DIY and some car servicing and repairing so I thought a car restoration project would fit the bill. I know my limitations, so “restoration” really meant reviving something already half-decent. I needed to find a car that would not need too much work, or be too complex, or too difficult to work on, or be physically challenging. Good availability of spare parts and information was essential. I set myself a purchasing limit of £1500.

I had briefly considered a (proper) mini, but anything other than a rust-bucket seemed beyond my budget. I then thought about a soft-top that would be useable and fun to drive in the spring and summer months, and be reliable enough for weekend breaks away from home. An old MX-5 ticked all the boxes. The Mk1 was my initial preference, but I soon discovered that a decent one attracts a premium price, so it would have to be a later model.

Bob
(South Essex)

4 Likes

The internet is a rich source of information and soon I had many forums (fora?) listed on my PC as favourites and the hard drive was filling up with videos from YouTube and other guides and useful snippets of information. I thought I was being thorough – my wife thought I was being obsessive.

I bought a couple of books (Carla Crook’s Essential Buyer’s Guide and Rod Grainger’s Enthusiast’s Shop Manual) and started looking at cars for sale on Ebay and Autotrader. By this time, I knew all about rusty sills and adjacent seat belt anchorage points, and the dreaded front chassis rails on the NB. So with a link to the DVLA’s MOT Check website as a “favourite” I could tell which cars for sale were either potential rust buckets or had been repaired just to get through the test (the time between the failure and the retest is the clue). I’d also found out about looking for the original spot welds on the leading edge of the rear wheel arch. It’s surprising the detail you can often see when you download a rear quarter view of a car and zoom in.

If you look on the MoT Check site for as many cars as I did, a pattern of problems emerges - mostly rust, but also leaking rear brake callipers and poor handbrake efficiency. This reinforced what was being discussed on the forums, together with other common problems such as leaking cam cover gaskets.

So far, this was all an on-line activity. I’d not yet seen and inspected an MX-5 for sale, let alone sat in, or driven one.

Bob
(South Essex)

MoT Check website
MX-5 Essential Buyer’s Guide
Enthusiast’s Workshop Manual

4 Likes

I look forward to hearing more of your adventures Bob. Thanks for sharing. :+1:

Excellent, I always look forward to repairing and modding stories. Keep it up.

During this time, I’d had periods working in Bristol, away from home. One evening, over a pint in the hotel bar, a colleague mentioned he had a rust-free Mk2 MX-5. He was also working away from home and, due to the nature of his work, he would soon be getting a company car. The downside was he had limited parking space and may have to sell the MX-5. I told him about my retirement plans and that when the time came to dispose of the MX-5, I’d be interested in buying it.

After few months, my colleague got his company car and asked if I was still thinking about buying a MX-5. He sent me emails with photos, service and MoT history, plus a list of what he thought were the faults – aircon doesn’t work , power windows are slow to go up, cam cover weeping oil, slow pressure leak in one tyre. It turned out to be a ’98 JDM 1.6 Roadster, imported in 2006. He told me that, at some stage in its life, the car had been a Cat D insurance write-off (actually it was Cat C). The offside front wing had been replaced and the whole car resprayed. I went to the MoT history check website and everything seemed OK - just a few advisories in 2014 including “some crash damage/crumpling to o/s/f inner wing area”. To me, this suggested the write-off occurred between the 2013 MoT and the one in 2014.

Since then, I have been in contact with an earlier (garage) owner who took it in part exchange from a regular customer as a known Cat C in early 2011. It was kept for his personal use, then later sold to the father of his MoT tester, who sold it to my work colleague.

As it happens, although living and working in the West Country, my colleague was originally from my part of South Essex and visited family once in a while. He said he’d use the car for his next visit so I could decide if it was for me. A couple of weeks later in June 2017, I saw it (a decent respray in the original colour), I inspected it (no rot or filler) and I drove it. Not a long test drive but, as an Antipodean friend of mine might say, I was grinning like a dead fox. Knowing it had recently been MoT’d and had just driven a couple of hundred miles without breaking down, I bought it.

image

Car tax was surprisingly expensive (still is), but offset by relatively cheap classic car insurance from brokers Grove and Dean, which included a breakdown/recovery service. I’ve not seen Grove and Dean mentioned on this forum. For some members, they may be an alternative to the usual suspects.

Of course, there was no way I was going to wait another 3 years until retirement before doing any work to the car.

Bob
(South Essex)

Grove and Dean Insurance

3 Likes

So, I now own an MX-5 and it’s time to trawl the internet for as much information, workshop manuals, guides and any other stuff that may come in useful. Thorough or obsessive – you decide. As I write this, I’m starting to think my wife was right.

I soon discovered that I had an early NB, originally for the Japanese domestic market (JDM). The JDM VIN is different from those used for the export market and it took me a while, but I found a website to decode it. This identified the production date as early August 1998. Mine was number 2937 in the first year of production. According to Wikipedia, Mazda sold over 10,000 JDM NBs in 1998.

JDM VIN Decoder

The UK V5 document shows first registration as August 1998. with March 2006 for the UK registration. The number plates indicate the importer was Car International, Park Road, Fordingbridge, but the business doesn’t exist anymore. I found the same telephone number and address is now used for a wedding car business. Google street view from 2009 shows a number of MX-5 cars on the drive. Has anyone any more information about Car International? It would be interesting to find any original import documentation.

Oddly, it appears nobody ever looked in the passenger set back pocket. I found 2 items of post for the previous Japanese owner – Mr Noguchi (?) in Tanabe City.

image

Dated April 2002, it’s difficult to get a consistent translation from my phone app. They may be newsletters from the Japan National Relief Society.

Bob
(South Essex)

2 Likes

Digging deeper, it appeared this JDM car had some things not often available on UK cars of a similar age - a limited slip differential (supposedly a good thing – more about that later), anti-lock braking, air conditioning, power steering and electric windows. I found a website with old brochures, from which I identified my car as a “Special Package” with a few factory extras. These included a Nardi wood rim steering wheel (in excellent condition), a Roadster boot liner, original footwell mats, a cover for the hood when it was down and a Bose Double-DIN, flip-screen, multi-function audio/navigation unit with separate amplifier and Bose speakers. This may have been a top-end system in Japan, but all the screen instructions were in Japanese and, although the importer had fitted a simple frequency converter the radio could only get BBC Radio 2.

Brochures

I also discovered the bracket in the passenger footwell was for an emergency flare, which went some way to explaining why there was an emergency channel button on the radio. If you’re interested Google J-Alert, which is the latest system.

Finally, if you’ve ever wondered how to properly fold the hood cover see

Tonneau Folding

I was given a Haynes manual with the car but, for the 1.6 it’s mostly based on the NA. I’d come across many sources of workshop manuals, but these are predominantly for the US Miatas. Mellens gets mentioned a lot, but the site appears no longer available. I found an alternative at

Workshop Manuals

This is useful, but I kept hunting and came across

http://do-da.co.jp/index.html

I ran it through an online translator and found parts list and wiring diagrams for JDM cars. It appears there are different lists for different years of NB production.

Bing Translator

Parts Lists for JDM NB1

Wiring Diagrams

Copy the URL (internet address) into the translator and it will present you with a (mostly) readable page. Sometimes you can simply keep clicking on the links, but I found limitations in the translator meant that some nested pages would come up as an error. I overcame this by running a translation and the original in parallel. OK – I’ll admit this may look a bit obsessive, but I saw it as a challenge.

Bob
(South Essex)

3 Likes

So, what to do first? Fix the cam cover oil leak. There were signs of old oil and muck all over the engine block and bellhousing. There was also an occasional small drip of oil on the garage floor.

Among the receipts given to me was one for a new gasket (Blueprint brand) from when the cambelt was changed and one for refitting it a year or so later. Seemed to be a recurring problem. By this time I was up to speed with the common faults, so on to the MX5Parts website for a genuine Mazda gasket. I’d also read about the brittle cam cover screws, so I bought a couple of spares.

Cam Cover Gasket https://www.mx5parts.co.uk/cover-gasket-genuine-mazda-mk1-25-p-240.html

Cam Cover Bolt https://www.mx5parts.co.uk/cover-bolt-mk1-25-p-698.html

I suspect many problems with the correct sealing of the gasket may be related to correct and even tightening of the cover bolts. One US workshop manual tells you to hand tighten the bolts, but a supplement gives 5.0 to 8.8Nm and Haynes gives 8Nm. This is more like finger-tight and so difficult to achieve consistency over 14 bolts. Over-tightening may also be a reason why the soft-metal OEM bolts snap.

I guess many ½ inch general purpose torque wrenches (like mine) will not go this low (or, at least not accurately), so I treated myself to a small torque wrench and (just in case) a set of screw extractors. I paid significantly less than my budget for the car, so I was fortunate in being able to buy any tools I needed.

Torque Wrench https://www.norbar.com/products/view/product/categoryname/tt-wrenches/rangename/tti-adjustable-ratchet/pname/tti20-3-8-n-m-lbf-in/category_multid/50/range_multid/309/id/23374

Screw Extractors https://www.ebay.co.uk/itm/251851692872

Before doing the work, I found on Ebay stainless steel Allen head bolts, so I decided to replace all the old ones. Sure enough, two of the original bolts snapped at the head and some others looked iffy.

Stainless Steel Bolts https://www.ebay.co.uk/itm/Mazda-MX5-MX-5-Stainless-Rocker-Cover-Bolts-Inc-Cam-Cap/254728379201?hash=item3b4efe9b41:g:f8AAAMXQq8BQ4rp8

Even though I have a 1.6 NB, the many YouTube videos were very useful. Best ones are at

https://www.youtube.com/watch?v=pMf0bRi63o8
and
https://www.youtube.com/watch?v=wDSFztSNcdI

Although this engine has a cam sensor at the front, on mine there’s a cover at the rear that was loose. So I tightened that, wiped away the muck at the top of the block and fitted the new gasket (with sealant in all the recommended places) and torqued-down the cam cover, working my way around the bolts in the correct order. I went around these 2 or 3 times, each time increasing the torque up to 8Nm. I also had a look at the condition of the cambelt – not many miles on it but it was 6 years since it was changed. My first MX-5 job seems to have been successful as, after 3 years there’s no sign of leaks.

The downside of this was I soon discovered that, although the gasket leak resulted in much oil at the top of the block, something else was causing the drip of oil on the garage floor. So, as a short term solution I bought a large plastic drip tray (actually a very large garden tray and much cheaper that the same thing from Sealey) and decided to see if it got any worse – it hasn’t and so it’s turned into a long term solution.

Drip Tray

I selected a tray big enough to collect all the residue and spillage when I get around to cleaning the muck off the lower part of the engine and the bellhousing.

Bob
(South Essex)

3 Likes

Keep them coming Bob. I’m enjoying this.

The next couple of jobs were a bit simpler. I changed the pedal rubbers (clutch one was worn to one side) and I added one to the accelerator pedal. Easy job – just pull-off and push-on.

Pedal Rubber Set
Accelerator Pedal Rubber

I also replaced the window weatherstrip on the driver’s side. It looked like one or two of the retaining clips had failed and someone had stuck it down with black silicone rubber. This was an easier job than I’d expected (apart from removing the silicone). I didn’t need to remove the door card, but I did take a lot of care to ensure that I didn’t drop any clips into the door.

Door to Glass Weatherstrip
Trim Remover Set
NB Video 1
NA Video 2

Everything was now set for a weekend break and our first “meet” with other owners - the MX-5 Show and Shine at Beaulieu. Disappointingly, on the journey to our hotel, it rained heavily, so hood up all the way. On the upside it did prove the hood was watertight.

It was a great (and dry) day out at Beaulieu, with all the MX-5s parking close to the building. It gave me an opportunity to compare mine with many others. It looked like I’d bagged a decent one – albeit a repaired Cat C.

It was during one of the long periods driving with the hood up, I noticed a slight smell of oil in the cabin. Also the area around the gear lever seemed warm. At first, I thought the smell was due to the oily residue on the hot engine. When we got home I did some more Googling and I learnt all about shift boots and turret oil. Another job to do.

Bob
(South Essex)

3 Likes

There may be a Good Luck/ Blessing Yen coin under the pax footwell carpet.

So, what did Google tell me about shift boots and turret oil – too much. Lots of stuff in all the forums, website articles, Youtube videos eyc. Some better than others. At the time I was not yet a member of the MX-5 Owners’ Club, so I didn’t know about the article in the Member Downloads section.

I looked at many sources for new parts. I chose mine from MX5Parts. I figured a genuine Mazda part would be most likely not to present fitting problems.

Gearlever Shift Boot Package

If you’re going to do this job, I suggest viewing many different videos. There are subtle differences between models. A couple of the better ones are:

UK Video
US Video

It’s a pretty straightforward job. A couple of the videos I watched mention the additional cable clamp next to the screw under the ashtray. On my NB, this was difficult to unclip and there’s little slack in the cable loom. As for the rubber boots, both were split. I also had some difficulty removing the old nylon cup.

There’s not much I can add to the videos, other than to advise using old cloths to fill the gaps between the bodywork and the turret and protect the seats and the carpet. This will help prevent losing a dropped bolt somewhere inaccessible and will also catch any drips of old oil when you remove the lever. As many have said before on this forum, gear oil has an unpleasant and lasting odour.

In a couple of videos the advice is to shift into first gear before removing the lever. I’m not sure if it’s necessary, but it worked for me.

Bob
(South Essex)

4 Likes

By this time, I’d noticed that the hood latches felt a little too easy to lock and unlock. I’d already adjusted them to get the fit right, so off to Google again to see what I could find. I found another common problem. There’s lots of used replacements on Ebay, but they’re not cheap There’s also the risk they have the same wear problem. New ones are over £100 each.

There are a number of forum posts and Youtube videos showing how to improve the operation of a worn latch by adding a screw. Here’s one of the better ones

Hood Latch 1

I did, however find a more elegant solution, which I used. This is another fix that, for me has lasted over 3 years.

Hood latch 2

I’ve found that images often get deleted from wherever is hosting forums, so if you’re interested, download them while you can.

If you have a 3D printer, there’s a design for a replacement latch on Thingiverse.

Soft Top Latch Button

It might be worth a try but, personally I’d be concerned about reliability. You really don’t want the latches to fail while driving. The material will be critical (definitely not PLA) and may wear quickly or soften in the summer sun (even PETG). Then there’s the possibility of the layers separating if they’ve not melted into each other properly. There’s someone on Ebay selling 3D printed latches from this design but they don’t mention the material used.

Since I made the modification, I have found that Autolink is selling something similar, but which appears to be moulded rather than printed:

Catch Replacements

If anyone from Autolink reads this, are they metal or plastic? If plastic which one? It would be useful if this information was added to the website. If anyone has had them fitted for a while, how are they wearing?

Bob
(South Essex)

4 Likes

While I was playing about with the hood latches I discovered one of the rubber weatherstrips on the frame was missing and another was damaged. I thought it would be easy to identify the items from the parts lists I had and then look for replacements on the internet. I was wrong.

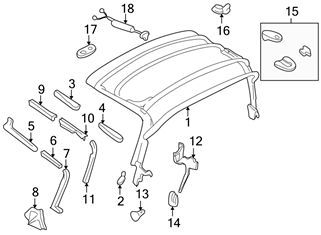
At first, I found the parts lists and diagrams confusing. I was concerned about minor differences between model years and regions if I bought from Ebay. Eventually, after much Googling and with the help of a Youtube video or two, plus this simplified view I worked out what was what.

image

If it helps anyone with a similar car, the part numbers are:

Item 3: NC10-R1-431B (right); NC10-R1-441B (left)

Item 4: NC10-R1-432B/C/D/F (right); NC10-R1-442 B/C/D/F (left)

Item 5: NC10-R1-411C (right); NC10-R1-421C (left)

Item 6: NC10-R1-412C (right); NC10-R1-422C (left)

Item 7: NC10-R1-413C (right); NC10-R1-423C (left)

Items 9, 10 and 11 are the metal retainers for the rubber parts.

The “Hood Side Seals” sold by MX5Parts and others are items 5, 6 and 7 in the diagram. These are the ones that press up against the windows.

I needed NC10R1431B and NC10R1442C. Other than the USA and Germany, I couldn’t find these anywhere on the internet – new or used. Eventually, thinking this is going to be expensive, I went to the local Mazda dealer, who ordered them for me (from the Netherlands, I think). As it turns out the price wasn’t too bad.

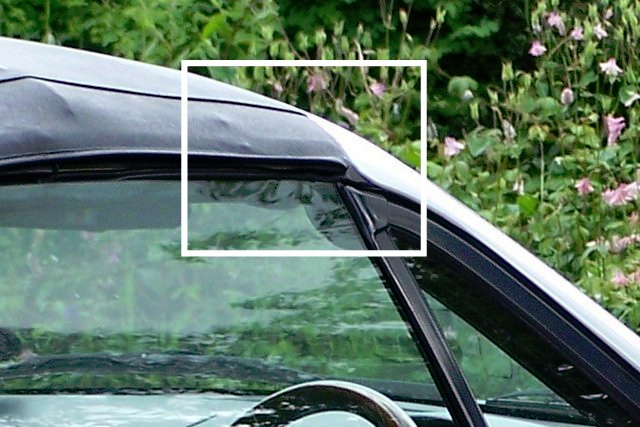
Being up close and personal with the hood, I noticed some of the stitching at the front corners had failed. A new hood seemed excessive, so I needed to find a way to stop it getting any worse.

Bob
(South Essex)

4 Likes

Thanks for the link to the JDM cars. I have now found out that my Eunos Roadster 1.6 is a June 1993 S-Special, with 118hp. Cheers Bob!

Back to Google again to see what I can do about the hood stitching. The damage was where the material is folded and wrapped around the corner of the frame. I soon came to the conclusion that there were too many layers for me to even attempt adding more stitches. I thought I might be able to find a strong adhesive/filler to do the job.

image

There are many guides and videos about repairing torn hoods (with varying degrees of neatness) but nothing for what I wanted to do. I did, however come across a UK one that mentioned a Stormsure adhesive to glue on a patch.

Video

I decided to find more about this stuff. Google is my friend, and I found their website with lots of useful information and a couple of relevant videos. This stuff looked promising.

Stormsure
Video 1
Video 2

The user information notes that this adhesive will not store for long after opening, so I bought a 3-pack of small tubes in black. This stuff sticks like the proverbial, so wearing disposable gloves is essential.

I cleaned and dried the damaged area and simply applied the adhesive – just enough to secure the stitching. I figured if one side had deteriorated, the other would also go, so I applied adhesive to that also.

Two years later and after many hood ups and downs, the adhesive has proved itself. This is what it looks like now:

image

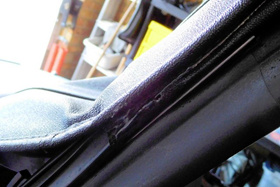
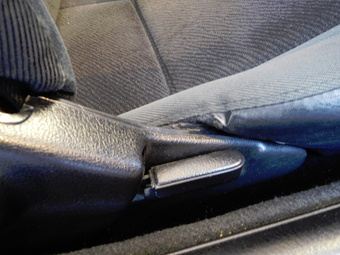
I decided to see if this adhesive would also repair some damage to the driver’s seat vinyl. It’s that part of the seat, adjacent to the recliner handle that seems always to be just outside the camera view for cars that are for sale. It seems to be a common wear point and, on mine the vinyl had simply worn away from its cloth backing. The seat seam and stitching were still OK.

I wedged the squab away from the plastic frame (I didn’t want it all sticking together) and removed any remaining loose vinyl. I carefully applied a thin layer of the adhesive to the damage area, trying to replicate how the original vinyl adheres to the cloth backing and making sure the adhesive blended into the edges of the undamaged part.

Two years later, the repair looks like this:

image

I’ve since used this adhesive for other things, including repairing a split in the upper/sole bond of a pair of old shoes for gardening. Useful stuff to have in the cupboard.

Bob
(South Essex)

4 Likes